E-Learning System Web Portal Java Project

Objective:

e-Learning” is an educational-based java web application; this web portal helps college students to get all the resources & study materials of every course available on the online portal. All the students can access this website portal anytime and from anywhere on the internet. E-Learning System is a very good online e-learning portal compared to all web links given by Google, Bing, Yahoo, ChatGPT, or any website while searching for student course materials.

Contents

Existing System:

In Present Educational based E-learning system, students can get information from books or study materials provided by professors manually. But in this system, students may not get the related and sufficient information according to their syllabus. The above resources do not provide discussion forums between students and professors to clarify their doubts. There is no proper guidance for the students.

Proposed System

The main aim of this E-Learning system is to provide sufficient study materials to the academic students according to their syllabus from which students can easily download study materials of their relevant course. The first step is to register in order to access this website. In this system, we are providing discussion forums between students and professors where students can easily clarify their doubts. Modules of this website are Admin, professor, student, and mentor.

Modules:

Admin:

  • Admin can view all member’s details like professors/asst. professors, mentors, and students. Here each user (student/mentor/professor) can upload material.
  • The uploaded material can be verified by the admin. The admin can validate the material if the material is related to the subject. The validated materials are only visible to the students.
  • The admin can view the queries which are sent by the students to the mentors. The admin can also check how many solved queries and unsolved queries.

Student:

  • Each student must and should be registered before login. Here we have user authentication every time. Students can upload material, view material, and send queries. The upload materials first verify by the admin and then visible in the view material tab.
  • The student view uploaded material by all the users which is validated by the admin and he can download materials.
  • The student can send a query to the mentor if he/she has any doubts regarding academic subjects.

Mentor:

  • Mentor registration and login.
  • Mentors can upload material, view material, forward queries, and reply to queries. The upload materials first verify by the admin and then visible in the view material tab.
  • The Mentor view uploaded the material by all the users which is validated by the admin and he can download materials.
  • The Mentor can solve a query if he/she is unable to solve queries forward it to Asst.Professor/Professor.

Professor:

  • Professor registration and login.
  • Professor can upload material, view material, and reply to queries. The upload materials first verify by the admin and then visible in the view material tab.
  • The Professor view uploaded the material by all the users which are validated by an admin.
  • The Professor can solve a query and send it back to the mentors.

Software Requirements:

           Operating System: Windows 10/11

           Web Technologies: HTML, CSS, JavaScript

           Programming Language: Java, JSP, Servlets

           Backend Database: MySQL /Oracle 10G

           IDE / Work Bench: Eclipse/ Netbeans

Campaign Management System Platform for Women PHP Project

Project Problem Statement:

Women all over the world are disadvantaged when it comes to having access to knowledge/capital for starting a business, crowdfunding, political campaigning, and more. 

Women are limited by several factors at different times in their careers, including disadvantaged economic status, discrimination and restrictive gender norms, and lack of access to knowledge on how to start a business or traditional fundraising networks.

Home Page:

The objective of the Task

The main objective of the Campaign Management System project is to build a web-based platform for women so that they can overcome the economic and social barriers that prevent their access to political decision-making through training, mentoring, and technology.

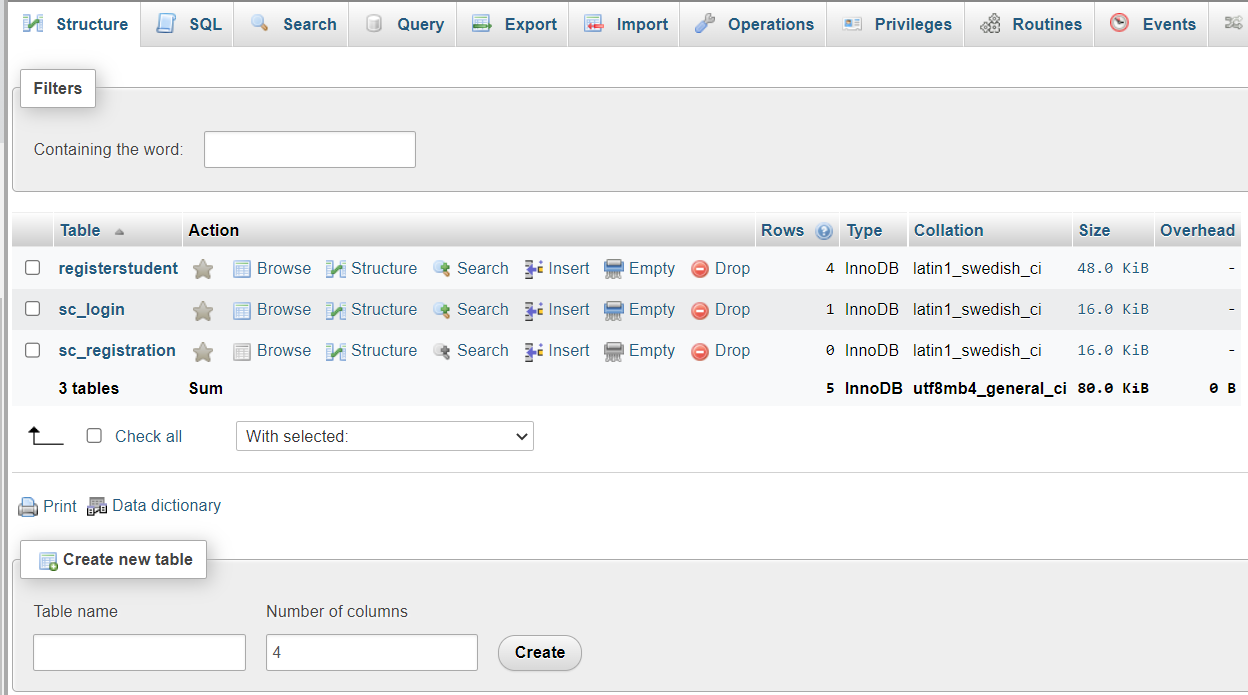
Database Schema:

Pages:

  • Registration page, Login page, welcome page, backend of profile
  • Home page, Dashboard Page
  • Profile page

Technologies used:

1.HTML

2.CSS

3.PHP

4. MYSQL

5. BOOTSTRAP

6. JAVASCRIPT

Download the Project on Campaign Management System Web application using PHP & MySQL.

Gym Fitness Management System Python Project using Django, HTML5, CSS, JS, MySQL

Introduction

  • The aim of creating this project is to bring every manual activity of the gym to the website or on the online platform.
  • This helps in making work easy for the gym staff which is lengthy and a little bit complex because of doing it on paper.
  • This website also helps the member of a gym, through this website the members can track their attendance manage their schedule, and many more things which we will discuss further.
  • It also allows guest users to apply for Gym membership directly via the website.
  • Trainers of the gym also can track their attendance and workout details of members via this website.
  • Trainers can prepare workout schedules and diet charts for members via this website.

Entities:

  • Admin
  • Trainer
  • Member
  • Guest

Project Profile

Requirement Gathering:

ADMIN:

Admin is the one who manages the whole website and has every access right to the website. Admin can do the following things:-

  • Admin can log in.
  • Admin can add, update or remove Gym Details.
  • Admin can manage the members and trainers of the Gym.
  • Admin can manage the attendance of members and trainers.
  • Admin can manage memberships.
  • Admin can sell Gym products.
  • Admin can provide fitness blogs and videos.
  • Admin can manage payments.
  • Admin can generate reports.

MEMBER:

Members are like clients of the Gym. Member can also access many things on a website like purchase products, view attendance, etc. member can do the following things:-

  • Member can log in.
  • Member can manage his/her profile.
  • Member can track his/her attendance.
  • Members can watch training videos and workout schedules and diet charts provided by Trainer.
  • Members can buy Gym products.
  • Members can manage payments for membership renewal.
  • Members can provide feedback for the website and Gym.

TRAINER:

Trainers are like employees of the gym. Trainers will do things like managing the workout schedule and diet chart of members. A trainer can do the following things:-

  • A trainer can log in.
  • A trainer can manage his/her own profile.
  • A trainer can view or track the attendance of members and his/her own.
  • A trainer can manage users’ workout schedules and diet charts.
  • Trainers can upload workout videos for users.
  • Trainers can give reward points to members on the basis of their weekly performance.

GUEST

Guests can only serve or see the gym website, he/she can do anything only after registering for the gym and website.
• Guest users can view the website.
• Guest users can register/Apply for a Gym membership

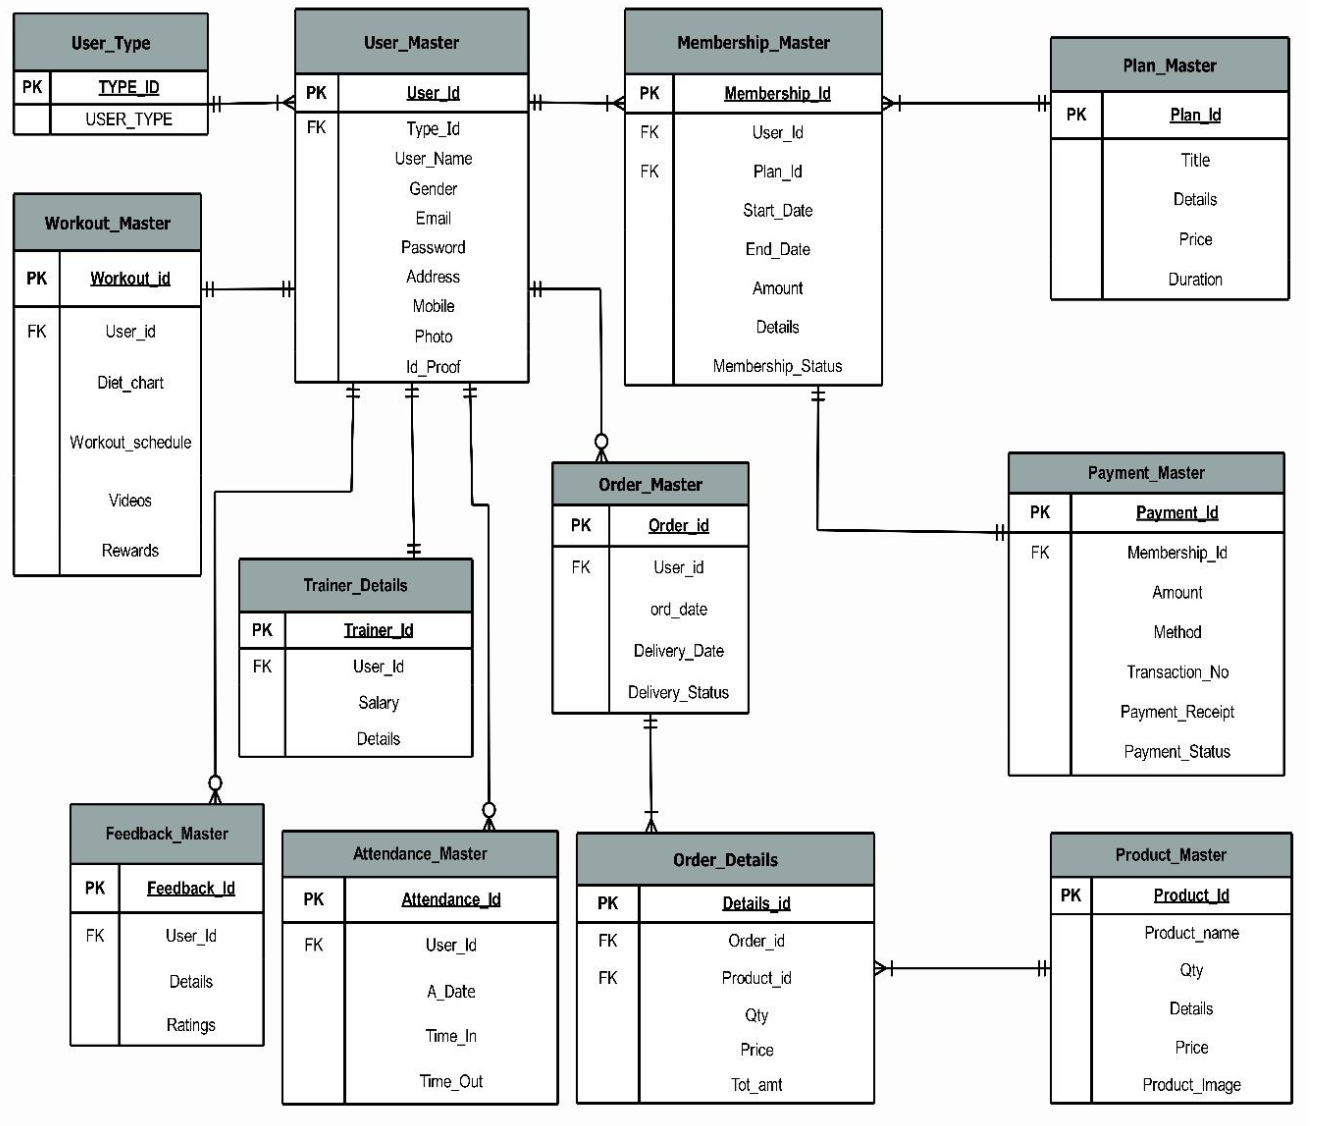
ER Diagram:

Existing System

  • Customer data is stored manually either in registers or in MS Excel.
  • Books are maintained to keep track of Customer attendance.
  • Payment transactions are kept in books.
  • Currently, the GYM does not have any advanced system to manage the GYM.

Proposed System

  • In the new system trainers and members can track their attendance from anywhere.
  • In the new system, a member can get his/her diet chart according to their workout plan.
  • In the new system, members can get a workout schedule from the trainer, while they also get rewards for points for achieving workout targets.
  • In this system, members can watch workout videos provided by their trainers which helps them to do exercise at home.
  • Here members can also purchase gym products.

Tools And Technology Used

FrontEnd: HTML5, CSS 2.1, JS
Backend: Mysql 5.5
Framework: Django 3.1 (Python 3.8)
Other Tools: Microsoft Powerpoint 2019, EDraw max 9.0, Microsoft Visio 2016, and Microsoft Word 2019

Data Dictionary

1) Table Name: User_Type

Table Description: Contains details of user type. It will give information about the type of user whether it is a member, trainer, or admin in the User_Master table.

2) Table Name: User_Master

Table Description: Contains details about users. It will contain all the basic information about users like name, email, gender, address, mobile no. etc along with the type of user.

3) Table Name: Plan_Master

Table Description: Contains details about membership plans. It will contain all the basic details about plans that a member can choose for a gym membership.

4) Table Name: Membership_Master

Table Description: Contains details about members’ memberships. It will contain all information regarding memberships of members according to their chosen plan.

5) Table Name: Trainer Details

Table Description: Contains details about the trainer. It will contain additional details about trainers along with details in the User_Master Table.

6) Table Name: Payment_Master

Table Description: Contains details about payments. It will contain the payment details of Memberships of a member

7) Table Name: Product_Master.

Table Description: Contains details about Gym products. It will contain basic information about products that the admin wants to sell and that a member can buy.

8) Table Name: Feedback_Master

Table Description: Contains details about feedback. It will contain feedback details given by members about the Gym.

9) Table Name: Workout_Master

Table Description: Contains workout details of members. It will contain members’ workout details like diet charts, workout schedules, workout videos, and reward points provided by trainers.

10) Table Name: Order_Master

Table Description: Contains Order Details. It will contain basic order details like which member has made the order, date of placing an order, delivery date, etc. of orders made by members for their purchase of products

11) Table Name: Order_Details

Table Description: It contains order Details. It will contain additional information about orders like the product purchased, the quantity of the product, the Price of the Product, etc. in relation to the Order_Master table.

12) Table Name: Attendance_Master

Table Description: Contains details about the attendance of users. It will contain day-to-day attendance details of members and trainers which will be added by admin.

Modules Functionalities:

ADMIN SIDE:

  • Login page for admin with validations. The email id Field Should not be empty. Email id should match the requested format which contains @ and (.)
  • Admin not allowed to login due to invalid username.
  • Change the Password page of Admin, the retyped password doesn’t match the validation Correct admin username and password:
  • Home page of Admin:
  • Admin dashboard. It Shows Side Panel which directs it to the selected page to be visited. The Page shows the direct link and information of User_type, Users, Trainer details, Attendance, and plans.
  • Add User Type: Admin is adding user type member
  • When the view tab of User type is clicked type of users is shown on this page
  • Add Users window can be opened from the side panel and the Admin can add a new user.
  • View Users window- All the users are shown here to the admin where the admin can take actions like edit and delete.
  • When the view part of Plans in the side menu is clicked plan details are shown.
  • Add Plans window-Admin can add new plan details in this window.
  • Admin can add membership details of the user, here validation is showing where the amount field is required.
  • When viewing a part of Membership Details in the side menu clicked Membership details table is shown
  • Attendance adds window- In add attendance window admin can add attendance details of users.
  • When view part of attendance in the side menu is clicked attendance details of users are shown
  • Then add part of Trainer Details is clicked, Admin can add details of the trainer.
  • View part of Trainer Details where Details of the trainer have been shown.
  • Add payment window is open when adding part of Payment Details is clicked, Admin can approve Payment Status.
  • When the view part of Payment details is clicked Payment Details is shown.
  • Add product window is shown when clicking on the add part of the Products.
  • When the view part of the Products tab is clicked all product details with price and quantity have been shown.
  • Add Workout Details Window – The admin can add Workout Details of a particular user by adding a diet chart, workout schedule, and workout videos for the user.
  • View the Workout Details window where all the details of a user’s workout(including diet chart and schedule) are shown.
  • View Order window – All the details with delivery status are shown in this window.
  • View Feedback window: Admin can view feedback and ratings given by users in this window.

TRAINER SIDE:

  • Trainer Login Page:
  • Trainer dashboard which contains information about trainers with Edit Profile and Change Password Link. It Shows Side Panel which directs it to the selected page to be visited. The Page shows the direct link and information on Attendance and Workout Details.
  • When Change Password Link is clicked, the trainer will be redirected to the Change Password Page where he/she can change their login password:-
  • Change Password Validations:-
  • When the My Attendance part of Attendance in the side menu is clicked attendance details of his/her own are shown:-
  • When the Members Attendance part of Attendance in the side menu is clicked attendance details of the member are shown:-
  • Dashboard Showing Add and View Option in Workout Menu of Side Bar :
  • Add Workout Details Window – The trainer can add Workout Details of a particular user by adding a diet chart, workout schedule, and workout videos for the member.
  • View Workout Details Window: Details of member workouts including diet chart, workout schedule, and total reward points are shown in this window.

GUEST SIDE:

  • HomePage:- The starting point of the website/first page of the website
  • About Options:-
  • About Us page giving information about GYM:-
  • FAQ Page:- It Contains all the frequently asked questions with their answers
  • Testimonial Page:- It contains all the reviews given by the members.
  • Contact Us Page:- It contains all the contact details of the gym.
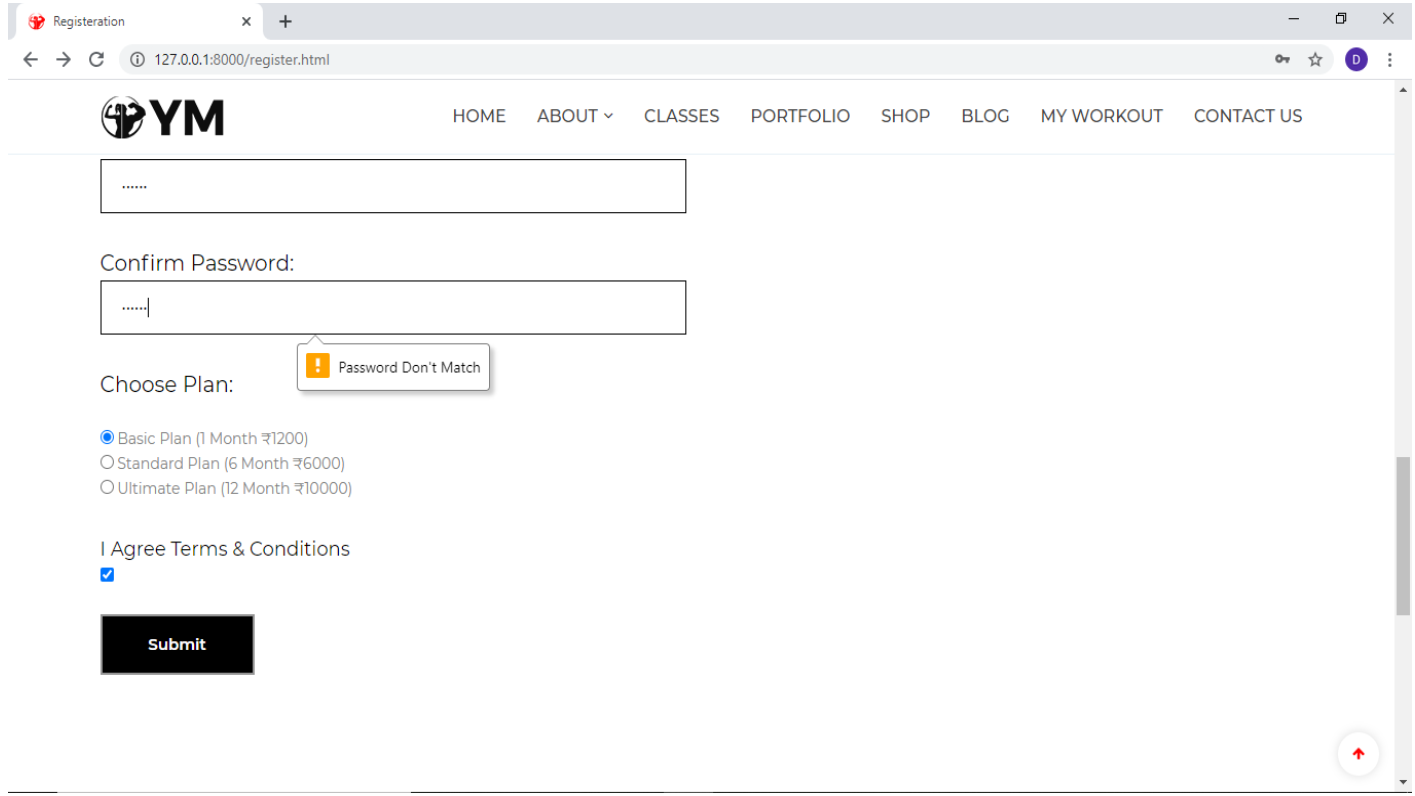
  • When a user clicks on the Apply For Membership tab Registration page is opened which Collects user data for registration so that the user can make a login.
  • Registration Page Showing How to Apply for the GYM Membership.
  • Registration page displaying validation:-
  • After Successfully filling Registration Form, the User will be redirected to the Payment Confirmation Form which will show the user information along with the plan he has chosen while registering then the user has to choose how payment was done, enter transaction no. and has to upload Payment Receipt.
  • When User will successfully submit the payment confirmation form, they will be redirected to the Login page or can open it from Login Tab.
  • Login Page with Validation:-
  • Forgot password? – asking for a registered email ID
  • Password received by the customer through email.

USER SIDE:

  • After Successful Login User will be redirected to the Homepage. The Apply For Membership and Login heading is changed to My Account with Profile, Membership, Attendance, and Logout Options.
  • When the User Clicks on Membership, He/she will be redirected to the membership page which contains the membership details the user.
  • When the User Clicks on the Attendance option in the My Account Section he/she will be redirected to the Attendance Page which contains the attendance details of the user:-
  • Shop Page:- It contains all the products with details that the gym wants to sell.
  • Add to cart option on the product:-
  • Shop Page showing Add to Cart Option for a product:-
  • After clicking add to cart from Shop Page, Cart is opened which shows items in your cart.
  • If the Customer wants to shop for more than one product, he/she can click on Buy More and add other products also.
  • When the User clicks on Proceed to Checkout, the Checkout page is opened which shows order details and Billing details and gives the summary of your orders.
  • After clicking Place order, the user is provided with the appropriate order placed message and view order option. On clicking view order user will be shown all the details of his/her orders.
  • When the User Clicks on View Order, he/she will be redirected to My Orders Page which contains all the order details of orders made by the member.
  • When the user Clicks on More details, he/she will be redirected to the order details page which contains additional details about the order.
  • My Workout Page:- It will give the user his/her option to download his/her diet chart, workout schedule, and workout videos provided by the trainer
  • Blog Page:- It contains all the fitness blogs that users can read.
  • Homepage showing My Account Section having Options Profile, Membership, Attendance, Logout:-
  • On clicking the Profile Option in the My Account Section, the User will be redirected to the My Account Page which contains all details of the currently Logged In User like name, address, gender, email, mobile, etc. with the Edit Profile/Change Password Option.
  • When the User Clicks on Change Password, he/she will be redirected to the Change Password Page where the user can change his/her old password new password.
    Change password Validations:-
  • Showing Logout Option In My Account Menu:-
  • When the User Clicks on Logout, he/she will be redirected to Login Page.
  • Report of all the users registered with Dynamo Fitness.
  • Various Filters for user reports like reports based on user type, i.e. members or trainers, and reports based on gender.
  • Report after using the user type and gender filter it will show only gym members who are female as we used the user type filter as members and gender filter as female.
  • Report on Current plan and membership of the members it displays the name and plan type of members.
  • Membership report using start date filter for plans starting date.
  • The report shows the list of members whose memberships start in a selected month.
  • Filter based on plan title i.e. basic, standard, and ultimate plan.
  • list of members who are registered with the standard plan.
  • Report after using the print option, the report shows the member with their specific plan with a start date and end date of the plan.
  • Report for the feedback given by users with filters that are gender and ratings.
  • Report using a rating filter, it will display users with specific ratings.
  • Report showing list of users given rating 9.
  • Feedback report after selecting the print option.
  • PDF view of feedback report using the view pdf option.
  • Product order report showing user id with the product they ordered
  • A report showing a filter of product names with different products available.
  • Reports after applying the product name filter i.e. dumbells will show the product id and user id of the users who ordered them.
  • Report after using a filter with the Delivery status it displays the product which is delivered.
  • The attendance report shows the attendance of users that are members and trainers on day to day basis.
  • The filter of the Attendance report is based on the user type i.e. Member and Trainer.
  • The attendance report on the base of the trainer filter displays only trainer attendance.
  • Report after selecting the print option.
  • Date filter option for a report which shows the attendance of users of a specific date.
  • Report After Filter By Attendance Date and Gender

CONCLUSION

The entire duration of this project has been a great learning experience for us. It has introduced us to the working of real-life projects and taught us to face obstacles while developing them. By developing this web application, we hereby conclude that at Gym Management we have achieved our aim at the following:

1) Building a platform where people can apply for a GYM Membership at any place and start their workout activities even at Home.
2) We believe that this website has made it easier for the GYM Owner to manage the information regarding different aspects of the Gym.
3) This website has also made it easier for trainers to manage the workout activities of members. We also hope to expand the scale of the project and make it ubiquitous by developing it for all digital platforms.

Download the complete project on Gym Fitness Management System Project using Python, MySQL, and Django Framework.

Online E-Commerce System Project Using HTML 5, CSS 3, NodeJS and ExpressJS

Purpose

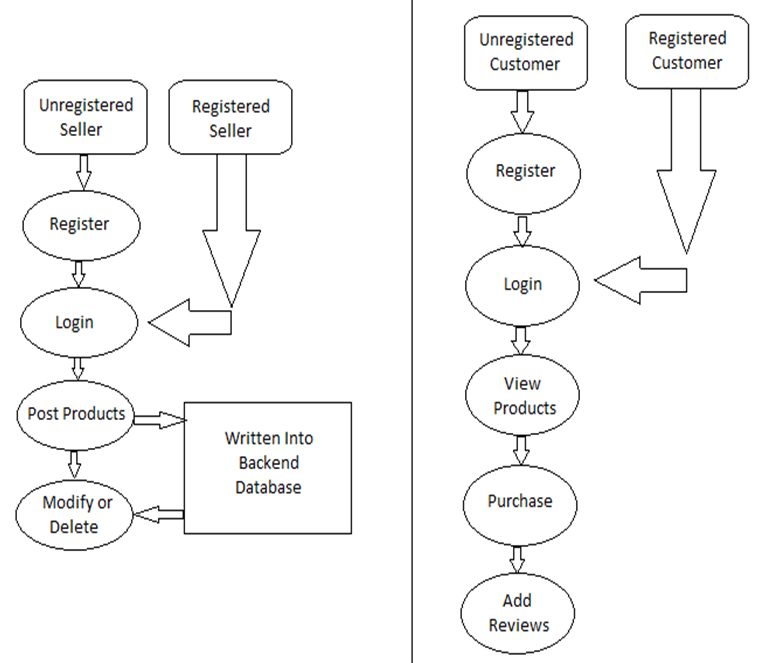
  1. To develop an online e-commerce system that will provide a platform for customers and sellers to meet and sell and purchase items. The Online e-commerce system shall accomplish the following as of achieving the major goal:
  1. To build a user-friendly business website, where users will be able to search for any product which is available nearby or anywhere in the world. By using an Online e-commerce system, it will be easy for sellers to sell products and save time and money. Doing business through this application will help to reach a maximum of customers and sellers. Creating a panel where a seller is able to upload their product’s full details and a customer can view and make a purchase as per their wish.
  1. To implement the system and check if it actually is able to provide benefit to the people.

Scope

The scope of this application is to build a user-friendly e-commerce website, where users will be able to purchase any product which is available on the website. By using the e-commerce system, it will be easy for sellers to make a sale and save time and money. Doing business through this application will help us reach a maximum of sellers and customers globally.

General Objective

To develop an online e-commerce system that will provide a forum for sellers and customers to interact with each other, and sell and purchase items.

Specific Objectives

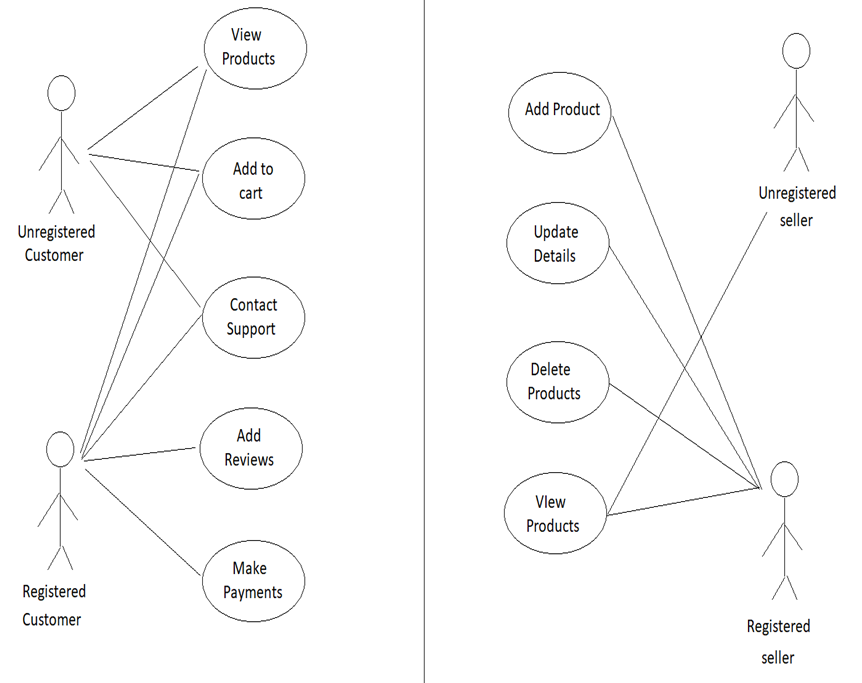
  1. Create an online platform where sellers post items for sale through the online system.
  1. Create a panel where a customer can view products from a seller and make purchases and do payments through online payment systems, and later submit reviews about the service.

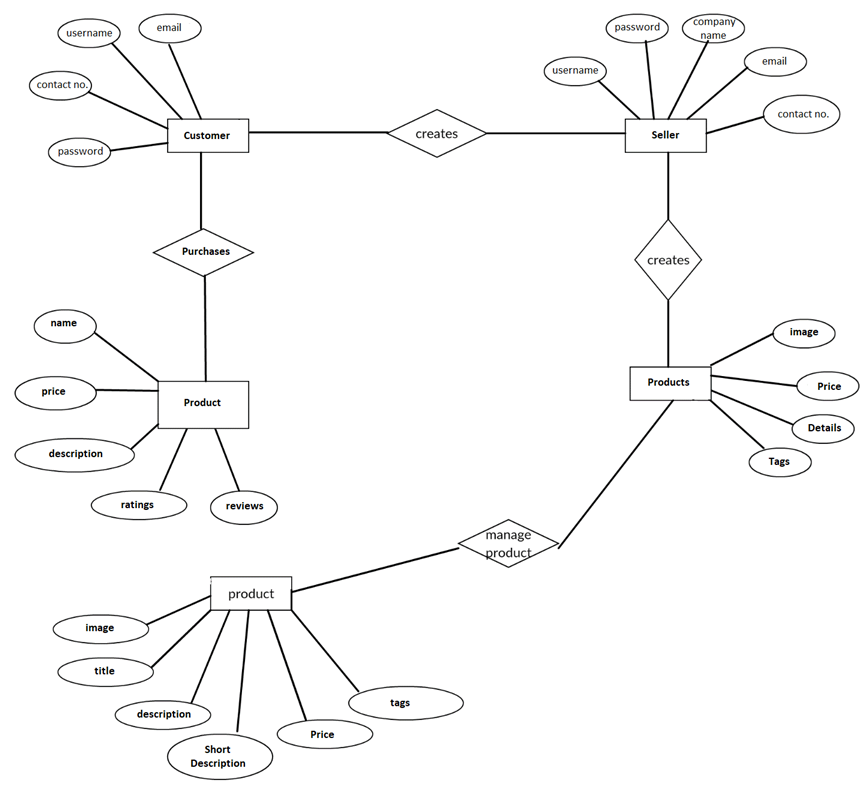
ER Diagram:

Data Flow Diagram:

UML Diagram:

Modules Description

Sign Up

1. It is used to register or to create a new account for a particular website.
2. It also allows the user to be a part of the website and also provides all the services of the website.

Log in

1. It is used to open a session with an account that is already created.
2. It is successful when your credentials (i.e., username and password) match with what is already stored in a database. This is called authentication.
3. It makes the site personalized for you.

About

1. This module gives an overview of the website.
2. It shows the website’s business, values, and commitments and its management.

Contact

This module allows the users to ask any queries related to their property or anything.

Search

This module is used for searching the posted auctions

Add Product

This module helps in posting Auctions

Product Function

1. Enable the customers to view posted products in their locality and also globally.
2. Enable the creation of accounts and logging in to the accounts
3. Enable users to log out of their accounts
4. Provide an interface for the seller to view the transactions, and add sellers and products to the system.
5. The seller should also have accounts where they will receive customer orders and respond to them.

Modules 

  • Login and new registration
  • Search: The search page will help users to search for the desired items using the search box.
  • Contact: This module will help users to contact the seller in case of any queries or issues that arise.
  • Add Product: This module will help the seller to add new products to the system

Summary

This NodeJS-based website is a reliable web application that saves time and money. This must be implemented in most of the information technology industries. It is user-friendly software, through which users can easily interact and easy to search for and buy products. This turns out to be great usage.

With the rapid growth of the internet and the world wide web, everything is going online. This website is developed by keeping in mind the easiness of interaction by the users so that they get a very user-friendly environment while surfing the website. Such compatibility of this website enables it to attract users to visit the website more frequently

The system is capable of maintaining details of various users, sellers, and products and storing all day-to-day transactions. The central concept of the application is to allow customers to search, compare and purchase products using the internet. The information pertaining to the products is stored on a NoSQL database on the server side. The Server process the customers and the orders and stores them in the database. 

Future involvement with the project

We will keep on improving our project in the future by adding more and more modules in the system as per the needs of the users. 

Limitations

Our project was limited in time and cost which is a limitation. If provided with more time and cost, we would have done better using the better infrastructure.

We developed the project on a local offline server, though we could have used an online one if provided with more cost.

Hardware & Software Used

Hardware

1. HP Notebook
2. i5 10th Gen CPU
3. 8GB RAM
4. 512GB SSD

Software

1. Visual Studio Code
2. Postman
3. NodeJS
4. ExpressJS
5. Google Firebase
6. AWS
7. HTML 5, CSS 3 & Javascript.

Library Management System BCA 4th Semester Minor Project using SQL and PHP

ACKNOWLEDGEMENT

We truly resolve to acknowledge the opportunity provided to us by the Institution, respected teachers, and family.

We intend to show our gratitude for all the support and guidance we got from our teachers, classmates, and all individuals who helped us at any point in this project.

This whole process we went through in bringing out this project was a great source of knowledge and valuable experience, which would for sure, come in handy for us in any future we will have to bring out another such project.

This has been a period of time over which we learned about technological and logical aspects of the field where we are going to land soon, we feel indebted for being so well equipped with all the knowledge and experience we gathered here.

Introduction 

Surface details:

Our project entitled “Library Management System” is designed to bring ease to both the library staff and the students seeking for issuing books.

It is designed with features that reduce the effort for the staff and increase convenience for the readers, Being a Web Based application, it is easy to Run and adapt in almost all conventional environments.

Any moderate user can easily learn and operate this system 

Scope:

This System can work fine for all most every library, where desired,

This cuts off a lot of human resources required to maintain the library, hence saving money too.

It has fluid UI and UX which can be learned and adapted quite quickly by any category of user.

This system extends its use outside the library with is easy to adapt interfaces for readers

Objective

The Objective of this System is to reduce effort and increase convenience in the management of libraries.

It allows users to hold a book for 24 hours so that no one can get it issued before they reach the library.

It will save time in the calculation of fine

Students will always stay notified about generated fines via their online accounts which they can access from anywhere.

  • It will make it easier to search for books.
  • It will help keep track of bookholders.
  • It will keep Libraries less crowded.
  • It will save money as fewer human resources will be required.

About the existing system

Currently, libraries need to maintain bulky files to record books and the individuals occupying them.

Fines are calculated manually by going through bundles of records.

Need to manually check for availability of books in the library

The process of issuing a book involves designated officials making entries in registers manually, which takes plenty of time.

Disadvantages of the Present System:

The current system is full of flaws:

  • A lot of Human Resources is required to maintain such a system much cost and hard to operate and maintain.
  • A lot of money is wasted in maintaining these records
  • Paper is wasted
  • A lot of time is consumed in the process of searching a book, making its entry, and retrieving any previous record.
  • Availability of books cannot be assured without physically searching the library
  • People need to travel to the library to know whether a book is available. 

Proposed System

The System we developed comes with all solutions to the drawback of the previous system.

Some of them are listed below:

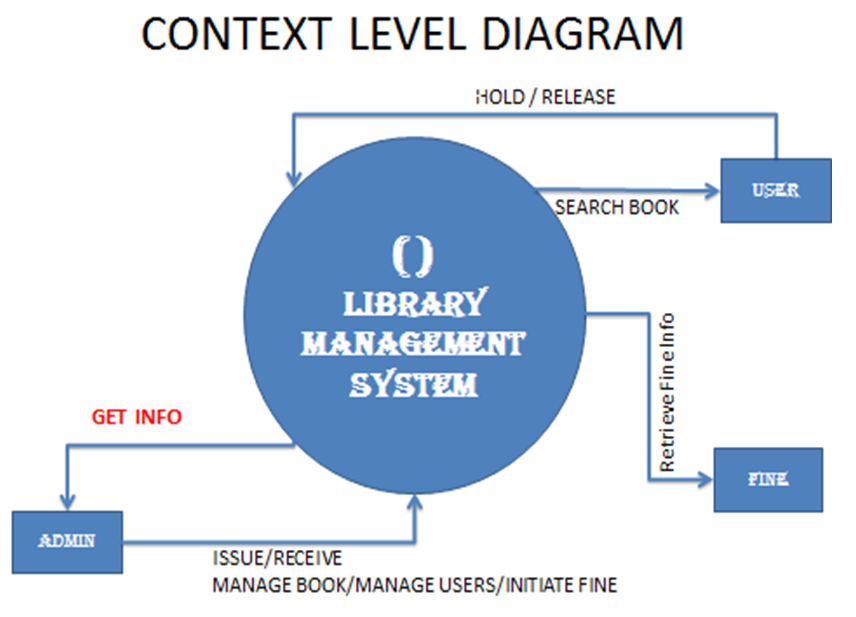
  • Search books from anywhere.
  • Put the book on hold for 24 hours so that no one else can take it before you
  • Release the book if you don’t want to hold it anymore
  • A panel for users to check their hold and issued books
  • Easy login and registration System.
  • Automated Fine System
  • One-click book Issue
  • Easily return book
  • List of trending books.

Feasibility Study

This document enables proper decisions to be made over the progress of the project, by studying various aspects of feasibility associated with it

Such are listed below:

  • Cost: as it is a web-based project it needs to be hosted over the server to be accessed by users, but the efficiency which comes with the product shadows this cost, as it reduces money being spent on human resources
  • Time: The time invested in this project is also justifiable as keeping the yield into consideration.
  • Technical: All technological tools used to make this project are conventional easy-to-use ones, and they are easy to maintain too.

This project can be easily upgraded and maintained as it is designed in a standard manner and is easy to understand. 

Hardware and software information 

HARDWARE CONFIGURATION

  • System: Multimedia PC
  • Processor:  Pentium 4 or above
  • Memory: 512MB RAM or above
  • Hard Disk:  500GB
  • Keyboard: 104 standards
  • Monitor: SVGA          

SOFTWARE CONFIGURATION

  • Front end: HTML, CSS, JavaScript
  • Back end: SQL, PHP
  • Operating System: Windows/Linux

Design Phase:

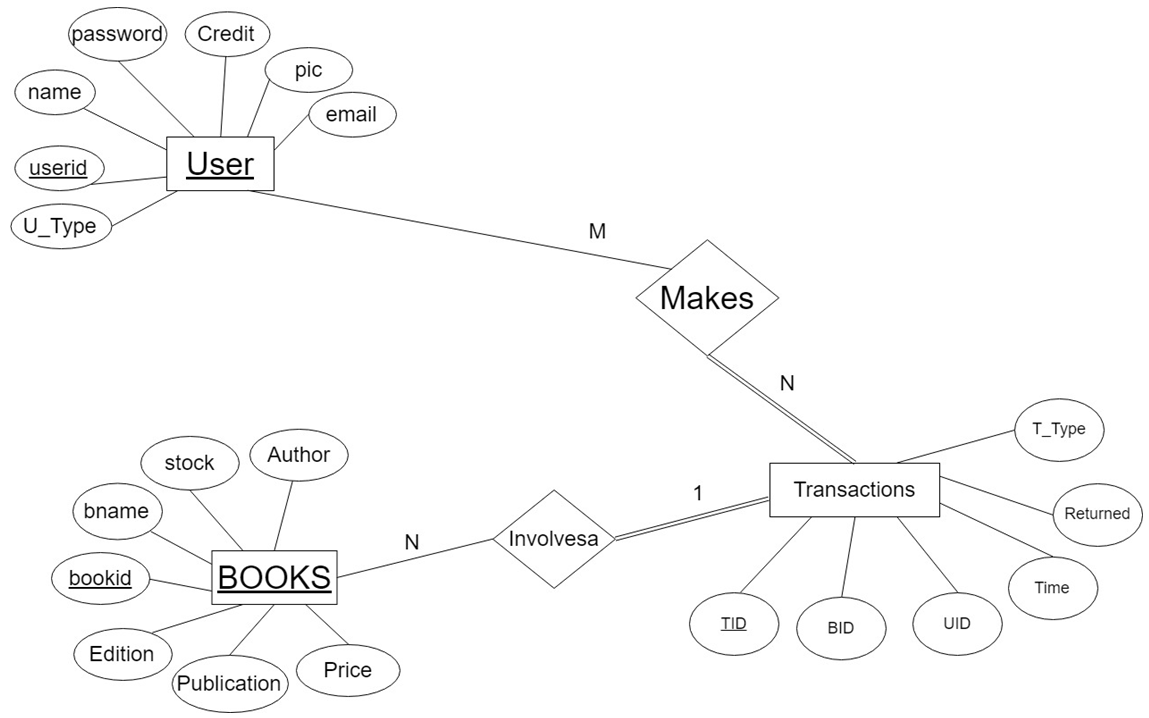
ER Diagram:

Context Level Diagram:

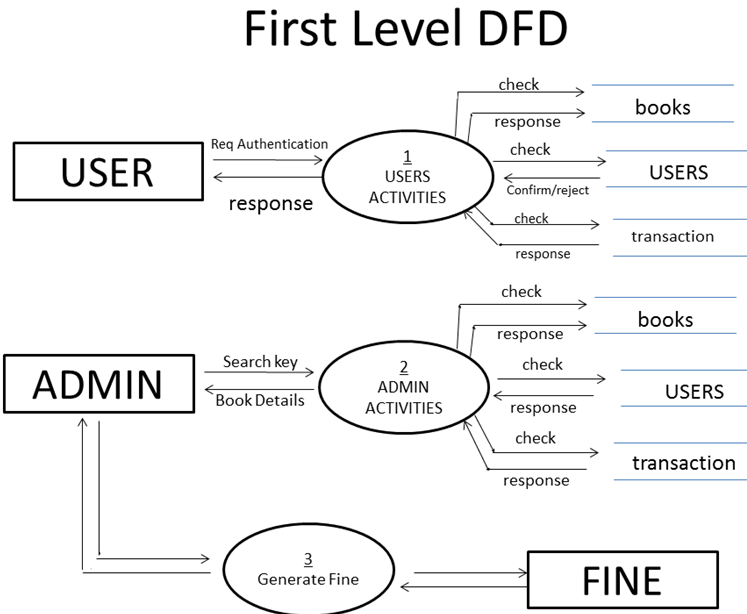
First Level Data Flow Diagram:

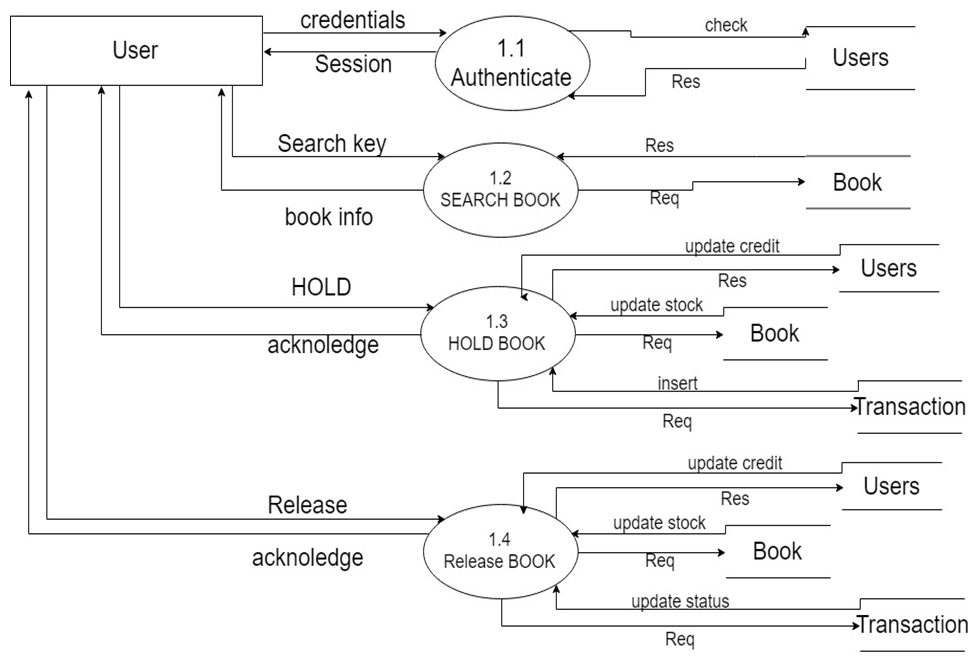
Second Level Data Flow Diagram for User:

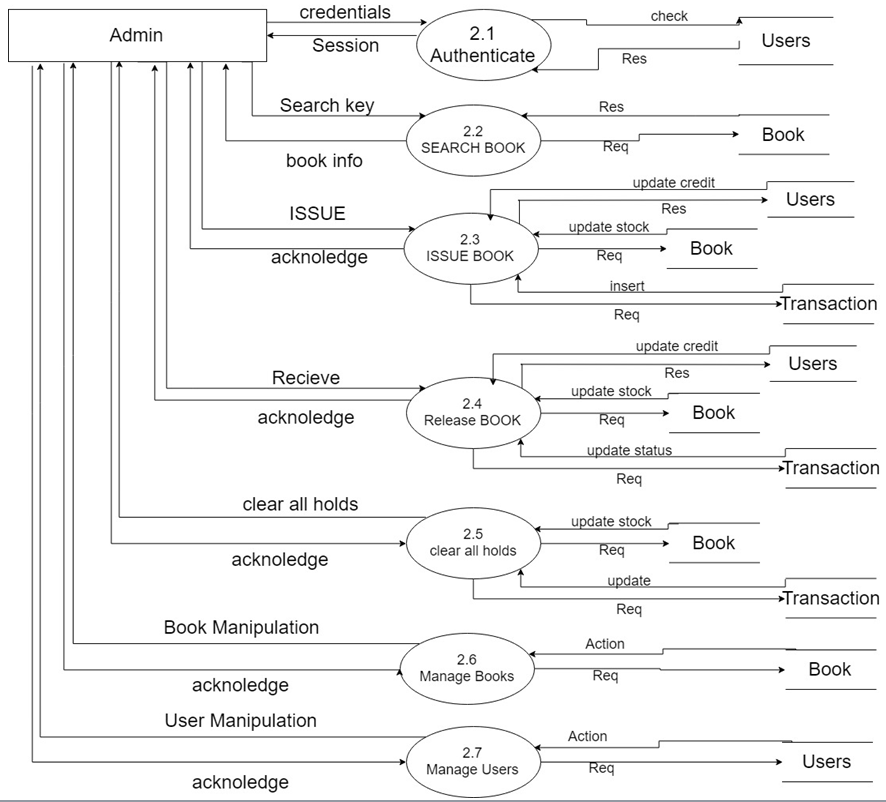
Second Level Data Flow Diagram for Admin:


DATA DICTIONARY 

Users Table:

Name

Type

Field-Size

Description

Example

Uid

INT

100

Unique ID for Users

0

name

VARCHAR

100

Name of user

XYZ

password

varchar

100

Password

XYZ

credit

INT

100

No.of books currently Occupied

0-5

U_type

varchar

100

Reader/admin

admin

Pic

varchar

100

photograph

Xyx.jpg

Email

Varchar

100

Email for identification

[email protected]


Books Table:

Name

Type

Field-Size

Description

Example

bookid

INT

100

Unique id of book

1

bname

Varchar

100

Name of book

Life of pie

stock

INT

100

Available copies

66

Author

Varchar

100

Name of author

ABC

Publication

Varchar

100

Publication name

BBC

Edition

Varchar

100

Year of publication

2013

Price

Int

100

Price of the book

2000

 Transactions Table:

Name

Type

Field-Size

Description

Example

Tid

INT

100

Unique id of the transaction

1

bid

INT

100

The ID of User Involved

1

uid

INT

100

The ID of Book Involved

1

Time

timestamp

100

Time of transaction

2018-07-02 19:55:11

Returned

INT

100

State(returned or not)

0

T_type

Varchar

100

Hold or issue

issued

Download the complete project on College Library Management System using SQL and PHP.

Professor Online Question Paper Submission to the Examination Cell ASP.Net Project

Introduction

Online Question paper submission is a web portal that is developed or implemented in the ASP.NET domain or platform. This project is helpful for the Professor to submit the question paper to the examination cell or to the Examiner from this site. In the current generation preparing the question paper and handovering in the examination cell is not that much security. This project is developed for a Professor to maintain his details, experience, and preparation of question paper and submit the same to the examiner. The examiner also gives his information, experience and takes approval from the administrator, and then selects the question paper. This project will work on the same line of online examinations; Apart from this, it contains much more additional information such as Course type, Department details, and other details of professors and examiners in this web portal.

For the examination cell, it is very difficult to identify whether the particular question paper is submitted or not. The online Question paper submission portal is implemented in 3 main modules. Professor module, Examiner module, and Admin module. Admin module will add multiple courses and departments under different branches so Professor can easily know the best details of about subjects. The professor module ought to register with the application and choose the course and upload the question paper to the site.

Scope of the Project

The scope of the project is used to manage the details of the professor, Examiner, and Administrator. The Professor and Examiners Sign up by providing the appropriate information and then take approval from the administrator. According to course-wise Professors prepares the question papers and send them to the examiner, then the examiner selects the question paper and submits it to the board. And all these records are stored in Online Question Paper Submission Database. 

Design of the Project:

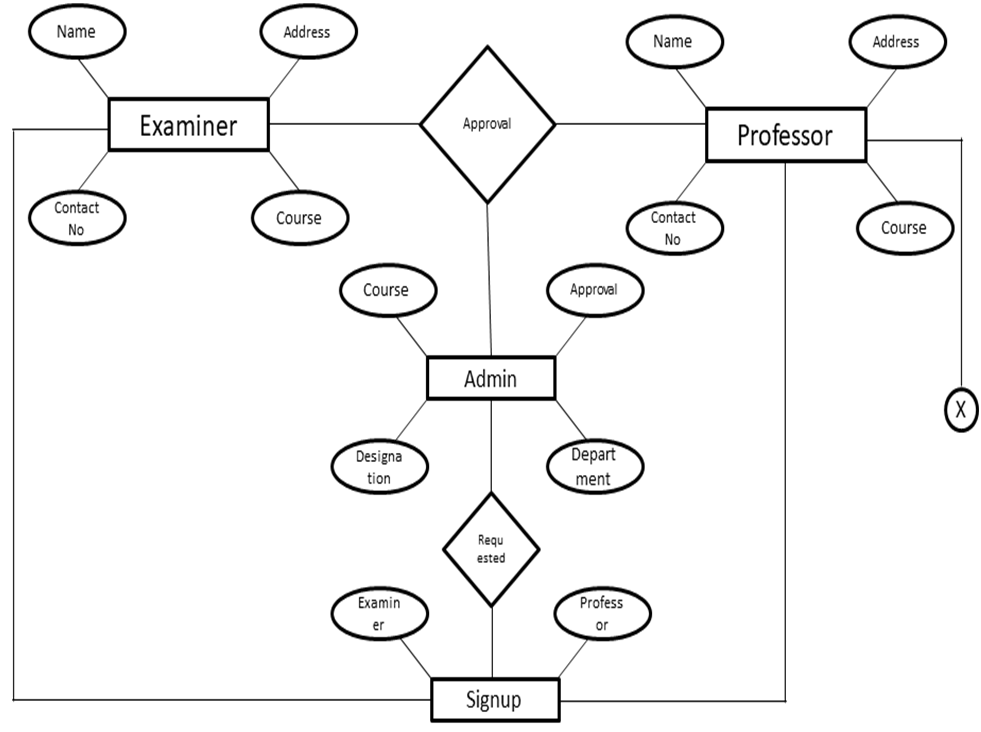
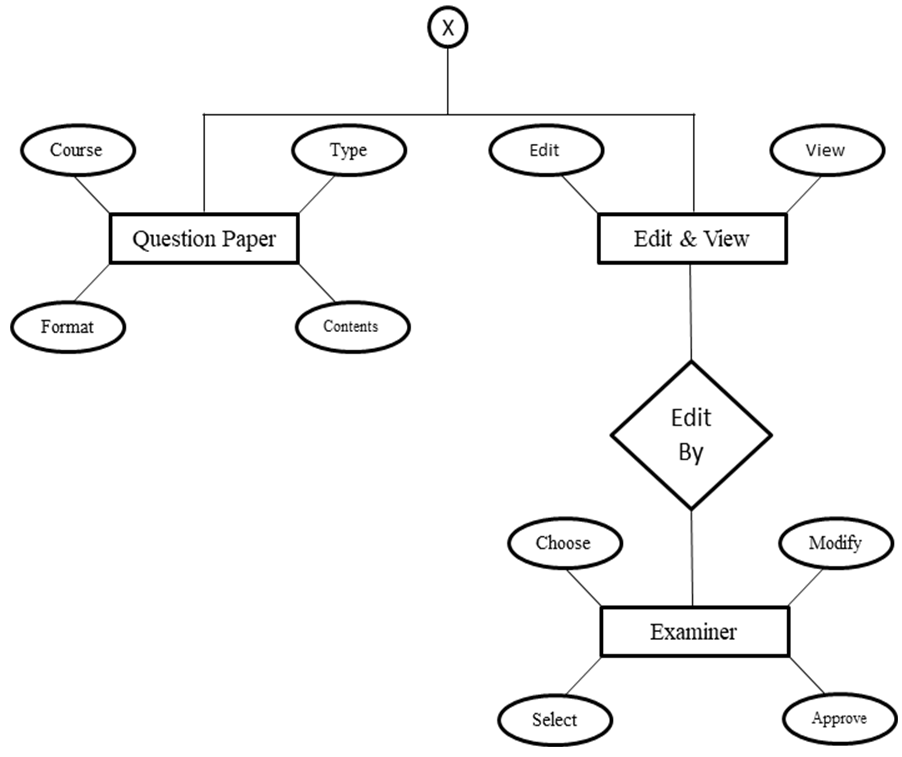
ER Diagram:

Main Modules of the Project

Administrator

 He administrates by giving approval to Examiner and Professor’s Signup. He also creates Courses, Departments, and Designations in order to fetch the correct and appropriate question paper for that course and department.

Course Details

 It is created by the Admin and it consists of Details of specific courses like BCA, BBA, BCOM, and more. The professor sends the Question paper on the basis of the Course.

Department Details

 It is created by the Admin and it consists of Details about the entire department which is created. The Department section consists of the Department name and Address of that Department.

Designation Details

  It is created by the Admin and it consists of Details about the Designation of a particular professor. This section consists of  Designation names like Ass-professor, HOD, and so on, it also has a description section under the Designation name which helps us to know which particular department the professor’s designation is from. 

Professor’s Signup

 In this section, any professor can sign up. But the request is only approved by the Admin. This section consists of the Login name, name of the professor, password and confirms password to confirm, phone number of that particular professor-main ID, and at last the address of that professor.

Examiner’s Signup

 In this section, any Examiner can sign up. But the request is only approved by the Admin. This section consists of the Login name, name of the examiner, password, and confirm password to confirm, and here it consists of designation and department where the examiner can select any of the given designations and department. At last, it asks for the Address and a photograph of that particular Examiner.

Approval for both Professor & Examiner

 This action is performed by the Admin. He approves both professor and Examiner. 

Login for professor & Examiner

 A Professor who has been approved by the Admin can now log in to the Login section and the same for the Examiner too.

Details of Question paper

 Every Question Paper must be sent with appropriate details so as to know more about the paper at a single glance.

View and Edit the Question Paper

 It is viewed and Edited by the Examiner and it is submitted to the University.

Final Reports

It creates and shows all the database records of this project.

Screenshots of Online Question Paper Submission System:

  • Home Page
  • Admin Login Page
  • Admin Main Screen Lists Section
  • Admin Main Screen Create Section
  • Admin Main Screen Approval Section
  • Admin Department list
  • Admin Designation List
  • Course Creation Section
  • Department Creation Section
  • Designation Creation Section
  • Home Screen Signup Section
  • Professor Signup
  • Professor Approve Section
  • Professor Main Screen
  • Examiner Signup Section
  • Examiner Approve Screen
  • Examiner Approve Page
  • User Login Page
  • Examiner Main Screen
  • Examiner Document Viewing Screen
  • Professor New Question Paper Screen
  • Examiner Acknowledgment Screen

Conclusion

It is believed that in the future Online Question Paper Submission centralized document system with the concept of cloud technology will recede in importance as a strategic application to become a competitive necessity that must be adopted by most government departments.

India is striding smoothly towards integrated E-Governance.  In the next five years, situation will be entirely different.  Most companies are adopted cloud technology for the maintenance of documents.

Online Question Paper Submission creates a new trend in maintaining and verifying documents online and it reduces the workload. 

Future Enhancements

  • The news feed is essential for our day-to-day purpose; hence we will add a section about the news. There, we are going to display the news about examination dates, deadlines for submitting papers, etc.
  • We are going to add some more security to our system like an OTP number for verification of the Professor’s and Examiner’s Phone numbers.
  • Authentication of Professor and Examiner is also important, thereby uploading the College Approval Letter by Principal (Signed and Sealed), makes it Admin easy to verify them.
  • We will add a few more Image File Formats such as TIFF, GIF, PNG, JPEG, etc. in order to make Professor and Examiner upload photocopies easily.
  • To make a question paper, Professor has to be experienced; therefore we will add a new section while signing up called Years of Experience. In that section, the professor has to enter how many years of experience he/she has in the teaching profession.
  • Live communication between Professor and Examiner makes it easy to fix the problems; therefore we will add live messaging on the portal.

Download the complete asp.net, vb.net project code, and SQL database on the Question Paper Submission project.

University Leave and Outing Pass Automated System Application

Purpose of the Project:

This Project is a leave/outing pass automated system designed for Educational Universities. This system is an end-to-end module that enables a user (Student) to raise a request and an admin (Mentor) to approve/decline it. This is a robust system where Parent Verification, In-Out Time recording, and Data Security have been taken care of. This Project is built to be a secure, flexible, unique, transparent, and user-friendly environment that aims to digitize the whole process thus removing fake paper trails.

Feasibility Study:

The project has been undertaken after the feasibility study, which paves the way for deployment, and phase development.

Scope of the Project:

The scope of the Automated System is designed to run on the University server and to allow students to raise requests for their leave, trace the request status, and modify them. On the Mentor Dashboard, the software also allows the Mentor/ Mentor Coordinator to view requests, and approve/decline requests. Whereas on the Hostel Dashboard, the Warden/ Deputy Warden and Hostel Supervisors will be able to view and grant leave passes to the students.

This Automated System will provide ease to all the actors – students, mentors, hostel authorities, and security services in regard to leaving/outpassing sanctions and will ultimately eliminate the paperwork.

Overall Product Description:

Product Perspective:

It will provide a way in which existing paper-based work can be supplemented with the end-to-end robust leave management system. The system can be used independently of the platform and device, be it on a smartphone, tablet, or computer.

Product Functionality:

The server will be responsible for storing each request generated, generating one-time passwords, generating QR Codes E-Pass for authorized requests, receiving and authenticating requests, generating statistics at the needs of each audit, and maintaining and verifying security and user privacy. This server can also potentially contact all authorized students by email to give them username information, passwords, server address, OTP code, updates to the users from the Mentors/ Hostel Services, etc.

Process Flow – Student:

  • depicts how the student raises the request and the activity which is continued after the review from the mentor.
  • depicts how the Mentor/Warden/Supervisor approves/declines the requests.
  • depicts how the Security guard can verify the leave request the student displays.

Upper Classes and Characteristics:

It is anticipated that three types of users will use the Licensed Software defined in this SRS.

  1. IT staff/ Software Development Cells are expected to deploy and configure the System using the defined system interfaces. This will include running the whole system and maintaining software after the handover and deployment of the project.
  2. The second type of user of the Hostel Warden/ Deputy Wardens / Hostel Supervisors and Managers is expected to understand and use correctly the software interfaces defined with the appropriate design documentation.
  3. Finally, it is expected that any student accorded with Hostel Services within the domain of Vellore Institute of Technology may access all of the leave request information such that the request is independently verifiable. This will include a web application presented using Hyper Text Markup Language (HTML) to allow a user to raise their request that has been registered under review including the previous requests history.

Working Environment:

The Automated System software is directly made as a web application, so the computer hosting must be capable of running HTML and should have internet. The system will be uploaded to the University server, in order to make it accessible for all the students, faculty mentors, and wardens.

Design and Implementation Constraints:

The Application provides an end-to-end leave management system that copes with malicious attacks provided certain constraints are met. Principally, all necessary steps should be taken to protect the System from unguarded attacks by using physical, network, storage, and user security protection. These safeguards should be penetration tested by the SDC to ensure viability.

User Documentation:

The users are the students or faculty/staff of the university who are authorized by SDC, they will be able to raise/ view/ approve/ disapprove requests on the server. The application client will be available free of charge, and any purchase of the server software will be authorized to distribute it to their users.

Assumptions and Dependencies:

 This software in its initial phases of development depends on a few third-party commercial applications or any assumption. Student Development Team will take care of all the assumptions and dependencies. It will be the responsibility of SDC to purchase/ develop the dependency as per the University IT norms.

System Features:

Login:

This is used to login and maintain security by authenticating the users

1. Should accept the user name password
2. A case-insensitive comparison is done for a user name and a case-sensitive comparison is done for a password
3. If the correct user id and password are supplied then, Main Menu should be displayed
4. If an invalid user id or password is entered then the system should display the error message “Invalid ID or password” and should quit the application.
5. Username – Students – Registration Id Faculty – Employee Id Staff – Employee Id
6. VTop Login Credentials can be used in the further enhancements

Mentor’s Portal:

This feature allows mentors to work out the leave/vacation requests.

1. Can approve a request.
2. Can decline a request.
3. Can edit the request.
4. Can verify the request.

Warden’s Portal:

This feature allows the warden to authenticate the requests

1. Is able to view all requests for outpass.
2. Can reconsider requests

Hostel Supervisor’s Portal:

This feature allows supervisors to issue outpasses to the students

1. Can issue outpasses to students.
2. Can deny the issue of an outpass.
3. Can send a request for reconsideration to the warden.

Student Portal:

This feature will allow students to raise a request for an outing/extended outing/leave.

1. Can raise requests of respective categories.
2. Would receive a system-generated outpass

External Interface Requirement:

User Interfaces:

Login Interface – The login interface consists of the student username and password fields, Students can log in with the same VTop Credentials.

The login interface for the faculty and staff consists of the faculty/ staff employee id and password. Their credentials will also be the same as those of VTop.

Hardware Interfaces – Hardware requirements include a laptop or a desktop or a smartphone with proper connectivity to access the system. Other than above mentioned, no hardware is required.

Software Interfaces – The software is based on an application interface. The Application will interact with the University Server with regard to user verification and information retrieval.

Operating System

Ubuntu

Programming Language

HTML, PHP, CSS, JavaScript

IDE

Visual Studio Code

Database

InnoDB

Hosting Base

Amazon Web Services

Communication Interfaces – This software would be functional on an ethernet connection or a wireless connection.

Cost Calculation:

SOFTWARE COST ESTIMATION:

For any software project under development, it is indispensable to know how much it will cost to develop and how much development time will it take. The project scope must be established in advance and software metrics are used as a support from which evaluation is made. The project is broken into small PCs which are estimated individually. Several estimation procedures have been developed to monitor the project’s progress, so developers and product managers can assess whether the project is progressing according to the procedure and take corrective actions, if necessary.

STATIC, MULTIVARIABLE MODELS:

Static, multivariable models depend on several variables describing various aspects of the software development environment. In some models, several variables are needed to describe the software development process, and the selected equation combines these variables to give an estimate of time and cost.

WALSTON and FELIX developed the models at IBM to provide equations to give a relationship between lines of source code with effort and duration of development.

For our software project, the lines of code (LOC) sum up to 5223, which becomes 5.223 KLOC.

So, according to the WALSTON-FELIX model, we need to hire 24 engineers per month and require 7 and half months to develop our project.

Book Reading Event System MVC App Using ASP.Net SQL & Bootstrap

This Book Reading Event App is a combination of tools and processes that manage book-reading events across India. A book reading event where book lovers come together for a community reading of their favorite book. One or more readers read the book loudly and optionally people even play roles from the book.

INTRODUCTION

A book reading event app is an online web application that is a single-point entry for all book lovers across India. Any registered and verified user who wants to keep a book reading event can create an event, invite people they know by specifying their email ids, or can keep the event open for all. The invited people need not be registered users. Due to some problem, if someone is not able to create an event, s/he can ask some other registered user to keep an event on their behalf of her/him. The registered user can check for the public events happening by just browsing into to portal and for private events, one can check the invited list of events by logging into the portal as well as by checking their invitation mail. Admin can see all the events (whether it is public or private) and all the registered users. As per the requirement, the admin can Edit as well as Delete any future public or private event details.

OBJECTIVE

The objective of this Book Reading Event System Project was to manage all the book reading events properties created by one user and send an invitation to the guests by entering their email ids or by keeping an event public. Managing these resources may itself be sufficient enough to give any user a big jump in terms of efficiency. The objective was to build a web application for people that makes use of it to manage their hectic schedule and make the best use of it in a smooth and efficient manner.

FUNCTIONALITY

The project will manage the intellectual property by creating a database of all the users and events, helping users to create an event, edit the event details, delete an event, add comment(s) on the event, invite the guest(s) for the event and to see any book reading event details happening around. Admin simultaneously verifies details of events as well as users. Admin can also edit and delete the event whenever required. Book Reading Event App has two types of users: Registered users, and Admin users.

Registered users are the normal user of the application who has the following rights:

  • View Past and Upcoming Public events
  • Log in to the system using “Email id” and “Password”
  • Create an Event and send the invites by specifying email ids
  • Edit the events created by him/her
  • View the events invitation list along with the details
  • View the list of events created by him/her
  • Add Comments to the Event

Admin Users have all rights throughout the application as follows:

  • View Past and Upcoming Public events
  • Log in to the system using “Email id” and “Password”
  • Create an Event and send the invites by specifying email ids
  • Edit any upcoming event’s detail
  • View the events invitation list along with the details
  • View the list of events created by him/her
  • Add Comments to the Event
  • View list of all the users
  • View a list of all the events

METHODOLOGY AND APPROACH

The following technologies were used for building this project:

  • Frontend – Hypertext Markup Language (HTML) CSS (Cascading Style Sheets), JavaScript, Bootstrap
  • Backend – ASP.NET (Active Server Page) Model View Controller (MVC)
  • Database – Structured Query Language (SQL) Server
  • Framework – Entity framework is used to connect to the database which helps in object-relational mapping

This project is built in an MVC pattern where M is the model which determines the classes, V is a view that determines views shown to the user and C stands for the controller which is used to handle the request. This project follows three layered architecture. The first layer is the presentation layer which includes views, and the second layer is the business layer which includes the services which work as a mediator between the presentation and data access layer. And the third layer is the data access layer which directly interacts with the SQL server database using entity framework and code first approach.

OBSERVATIONS

Graphical User Interface (GUI) – The website contains many links and tabs for various requirements like Create Event, Edit Event, View Invitations, etc. The users of the application consist of users from India. It will lay stress on each

page’s layout and the features to be depicted on that page.

HOME PAGE:

This is the first landing page. Any user can see the Public Book Reading Events without logging into the system by using the Past Events and Upcoming Events links. The past Events link redirects to the Past Public Events and the Upcoming Events link redirects to the Upcoming Public Events along with their details.

PAST EVENTS:

This page is landing by clicking on Past Events on the home page. Any user can land on this page without logging into the system. But one cannot add comments without logging into the system. Users can see the list of Past Public Events along with the details of each event. The working of Upcoming Events on the home page is the same.

A registered user or admin can log in using their credentials.
Depending on the type of user, s/he will have access to various functionalities of the application. In case the email id and password typed by the user do not match any record in the database, a login failure message will be displayed. If not registered already, a user can sign up by clicking on “Signup”.

USER SIGN UP

A user can register using their credentials. After successful registration user will be redirected to the login page. In case of failing the validation requirements of email id or password, a failure message will be displayed. If registered already, a user can log in by clicking on “Login”.

HOME PAGE AFTER LOGIN:

This is the landing page after the user logs in to the system. PAST EVENTS redirect to the page containing the list of past events which either the user invited, or was a public event. UPCOMING EVENTS redirects to the page containing the list of upcoming events to which either the user is invited, or it is a public event.

Navigation bar: Contains the button for CREATE EVENT, MY EVENTS, INVITATIONS, HELP, USER DETAIL and
LOGOUT functionalities.

Only user with Administrator rights has some additional button for some additional functionalities available in the navigation bar are ALL USERS and ALL EVENTS button.

CREATE EVENT:

Users can create a new event. The user just needs to enter some necessary details like Title, Date, Location, Time, Type of event, and some other optional details like Description, and Other Details. Users can invite guests to the event by entering their email ids separated by a comma. Users must provide the creator id for whom they are creating the event. If the user wants to create an event for himself/herself only, then he/she can check the creator id by clicking on DEAR – XXXXX. If the user is creating an event for someone else, then the admin will verify the details with whose creator id has been entered. If the BACK TO LIST button is clicked, the user will be redirected to the HOME PAGE.

MY EVENTS:

Users can see the complete list of events created using their own creator id. From here user can Edit/Delete his/her any upcoming event by clicking on the Edit/Delete button. Users can also create events by the button provided just under the tile MY EVENTS.

COMMENT. And can also see the comments posted by others in the COMMENTS section. The comments in the COMMENTS section are shown anonymously sorted by date and time.

EDIT EVENT:

Users can edit the details of any upcoming events from the list of events provided on the MY EVENTS page. Users can edit any of the details provided in create event form except the creator id. The layout of the page is exactly the same as CREATE EVENT page. Users can return to the MY EVENTS page using the BACK button.

INVITATIONS:

Users can see the complete list of events to he/she is invited. The list of events being shown is sorted by the date and time of the event. As this page proved to be much helpful to users in order to plan their future activities. By clicking on the DETAILS button, the user will be redirected to the EVENT DETAILS page. On the EVENT DETAILS page, users will find some additional information regarding the events such as the type of event(public/private), the number of invitees invited, and the creator of the event.

EVENT DETAILS:

Users can see all the available information regarding the event he/she invited to by clicking on the Details button available on the INVITATIONS page. Here one can find some additional information such as the type of event(public/private), the number of invitees invited, and the creator of the event. Users can also add comments for this particular event by clicking on ADD

USER DETAILS:

Users can check his/her own details by clicking on the DEAR – XXXXX button. One needs to check their user id for creating their event, so here they can find it out. Here the button name is extracted from the email id by which the user has login into the system. As it is clearly visible from the image, if someone logged into the system with [email protected] then the name before @ is shown after the Dear – button like “Dear – XXXX”. The name visible in the button is the extracted from user’s email id leaving the part from @ symbol.

ALL USERS – ADMIN ONLY:

Only users with administrator rights can access this page. This page can be accessed by clicking on the button ALL USERS available in the navigation bar. On this page, the admin user can see the whole list of users who may or may not be an admin. Admin can see each user’s name, id, and email id.

ALL EVENTS – ADMIN ONLY:

Only users with administrator rights can access this page. This page can be accessed by clicking on the button ALL EVENTS available in the navigation bar. On this page, the admin user can see the complete list of events. The list contains both public as well private events. The list contains both past and upcoming events. The events in the list are sorted by date and time. Admin can use create event functionality here also by clicking on CREATE NEW EVENT button.

Admin can see details like Title, Date, Location, Start Time, Type of Event, Duration, Description, Other Details, No. of Invitees invited, and Creator id of all the events. For some specific requirements, the admin can see the details for a particular event by clicking on the DETAILS button available in that event’s particular row which will be redirected to the EVENT DETAILS PAGE as shown before. Admin can not only edit the events created by him/her but also edit events created by other users/admins. Admin can edit any upcoming event by clicking on the EDIT button for that particular event which will redirect to the EDIT EVENT page. Admin can also edit the creator id for the event.

After being done with the usage of the portal, the user/admin can log out from the system by clicking on the LOGOUT button available in the navigation bar. After clicking on the LOGOUT button, the user will be redirected to the HOME PAGE. Users can again use the system any number of times by logging into the system using the same credentials used for the first time.

CONCLUSION

This Book Reading Event system is a user-friendly software that can be used in any locality for any user to arrange the event and to send an invite to guests just by entering their email ids. Due to some problem, if someone might not be able to create an event and send an invite or somebody might not have email ids available for all the guests, in this case, the book reading event app provides functionality to a user to create an event on behalf of someone else and it will be verified by an admin before sending an invitation to the guests and posting that event on the portal.

Allowing all the users to have access to such web-based application software can help anyone who wants to keep an event busy with the preparation of the event can easily send invitations to the guests and save his/her time. Further, this software can be developed to add more functionalities in the future, like setting a reminder for the events and notifying the user time by time, and setting a flag for the events one is interested in. This project can be further extended to keep any event (i.e., House-Party, Get to Gather) and not just only for book reading. The sheer possibility of scaling this application is immense and will definitely go to be proven the most useful software in the future times.


Online Cafe and Salon Management System Angular Project

During the Internship, Students worked on various static websites which include websites of café and event management companies. My internship also includes work on the Angular project Salon management system. This management system includes my main contributions in the registration portal, login portal, password changing portal, membership and offer cards, and other registration and contacts forms. This summer internship provided me with team experience and helped me in developing my skills in Web development using HTML, CSS, and JavaScript. Students have worked with the development of the front end and design of a Company’s Website and Dashboard.

Overall, the Internship program helped me in different ways to grow my knowledge in my field and also gave me insight into how to work in a team with proper coordination and in a timely manner.

ACKNOWLEDGEMENT

Working on these Cafe and Salon Management System projects has given us a wide opportunity to think, implement and interact with various aspects of computer technologies as well as learn new skills. One of the most fruitful benefits of working on this project is that we got a proper experience of working as a team, working on our assigned tasks, supervising and correlating with others, and management of the entire team with their tasks and completing the whole project.

I would also like to express our sincere thanks to our HOD and Course Directors, because of them we got the opportunity of having this group project as a subject in our current semester, and as a result, provided us the seed of execution of such a wonderful idea into action.

Overview of Projects

  • The Salon is a salon management system that has functions like admin management, customer tracking, and product shopping from the web.
  • The Café is a static site that has been designed for the users to get acknowledgment about the café. It has functionalities like booking tables, ordering online food, and menu details.

Objective

  • The objective of the salon management system: The Salon is to keep track of its daily expenses, customer, manage staff, and Publicity of its salon.
  • Static website Cafe management system which is designed also has the main objective of reaching more and more people through the help of the internet and making their marketing more strategic in the market.

Tools and Technologies

When the idea of making a web-based application came to our mind, the first thing that was required to be done was to gather information about the things that were required to be learned by us in order to make this project come to life. Hence after some brainstorming and group discussions, we followed the following figure and according to that learned the things in order.

After conducting this brainstorming and learning the process the tools and technologies that we had to use were as follows:

For Salon:

  • Angular
  • NodeJS
  • Stackoverflow (to learn about our software requirements)
  • GitHub (to learn about our topic)

For Static Website (The Cafe): 

  • Html
  • CSS
  • JavaScript
  • Bootstrap

IDE’s:

  • Visual Studio Code

Roles and Responsibility

  • Contributed to the making of a few modules for the Salon which includes modules like registering customers, forgetting passwords, and reset
  • Also contributed to live project

Implementation Environment:

 The backbone and the main aspect of the software side of the project were to run the HTML code, perform the JavaScript and make the site more user-friendly by adding CSS. So the implementation was carried out in such a way that the correlation of different files would be done easily. Hence, the use of an IDE was a must. Initially, we thought of using IntelliJ IDEA but the idea was dropped later on and we began working with the visual studio code 2020.

Sometimes to organize we even had to use some text editors like sublime text, atom, etc. Implementation of the code was done altogether after we researched and sorted the image data that we obtained. The basic approach that we used was the partial compilation method and went on integrating the small amount of the code into larger ones, module by module.

CONCLUSION

 In the end, we would just like to briefly explain how this project helped us to excel at our own best level and made us learn a lot of new things, technologies, and team management. And also implement all of the skills that we previously acquired or learned later on as a part of the completion of the project. Moreover, this project helped us to learn about the real scenarios of working in a team for real tasks and to cope with deadlines, quality management, and each and every aspect of the project. This project gave us the motivation to think differently and express our own ideas to implement them. Also, it taught us how to deal with errors, quality-related, time-related, and other management-related problems.

Most importantly with the medium of this project, we learned Many new skills, ranging from soft skills to technical skills. Qualities related to management, problem-saving time saving, etc. were also learned by us. We tried to make an honest solution for people out there facing problems and learned how all the skills combined: with the help of a perfect team and proper management along with proper skills is the key to providing the solution to any possible problems out there. And we believe that we did a great job implementing all our knowledge, and are grateful to present this execution of one such idea.

Thanking all those who helped us in a big or a small way with this project. Every contribution that has been given is very valuable to us and is the true reason for this project to stand out as a pioneer-based preliminary project and success of this project. With that being notified we heartily present our project and welcome all suggestions or improvements with open hands.

Online Banking Website Project using HTML, CSS, and JavaScript

In this academic project, we are going to create an Online Banking Website using basic HTML, CSS, and JavaScript. We have planned and going to create as per the design given by the instructor. Which include:-

  • A home page that will provide all the necessary views. And it includes the link to the various linked pages (login/signup page, services, fixed deposit, e-services, account details, about us).
  • The top bars include the link to every single linked page.
  • We are going to provide services like Personal internet banking, Corporate banking, Merchant business, and Online tax.
  • Payment transfer: – International transfer, National transfer, Bill payment.
  • My Account page contains: – Account No. , Bank / Branch. IFSC Code.
  • ABOUT US page which shows the details of our contacts and our headquarters.2 Online Banking Websites

Concept:-

  • We have used the concept of HTML Programming like o Hyperlink projection.
  • Use of different tags to make it visually better like font, table, listing, hyperlink, styling, etc.

Use of:-

  • Combo Box
  • Search Box
  • Button
  • Text Field
  • Label
  • Fieldset
  • Legend

This project is basically an online banking website where one can create his/hers bank account, and use the same account for various banking services.
All designing and programming are done by us only.
All the members have their role in creating this website.

PROJECT DESCRIPTION

Project Name: Online Banking Website

Languages Used: HTML, CSS, JavaScript

Software Used: Visual Studio Code

Browser Used:  Google Chrome

Description:

This project is not a pure website that works on the internet. This project is just a template of a bank website, which can be used with the backend to create a perfectly working website. This website is work fine with JavaScript, CSS (Cascading Style Sheet), and HTML (Hyper Text Markup Language), with some simple concepts to make it a Responsive Web Page.

PROJECT CONTENT

This website is consist of various HTML pages, which are linked to each other with links (either by link or anchor tag).

Following are the HTML file names involved in the project:

  1. html (Home Page)
  2. html (Login Page)
  3. html (Sign Up Page)
  4. html (Personal Internet Banking)
  5. html (Corporate Banking)
  6. html (Merchant Business)
  7. html (Online Tax)
  8. html ( International Money Transfer
  9. html (National Money Transfer)
  10. html (Bill Payment)
  11. html (Fixed Deposit)
  12. html (E-Services)
  13. html (My Account)
  14. html (About Us)

Following are the CSS files name involved in this project: (Here, we used a simple convention in the naming of the files: “<html_file_name>CSS.css”

  1. css (Home Page)
  2. css (Login Page)
  3. css (Sign Up Page)
  4. css (Personal Internet Banking)
  5. css (Corporate Banking)
  6. css (Merchant Business)
  7. css (Online Tax)
  8. css ( International Money Transfer
  9. css (National Money Transfer)
  10. css (Bill Payment)
  11. css (About Us)
  12. css (My Account)
  13. css (Fixed Deposit)
  14. css (E-Services)

Following are the JavaScript file names involved in this project:

  1. js (Login Page)
  2. js (Sign Up Page)
  3. js (Personal Internet Banking)
  4. js (Fixed Deposit)
  5. js (Bill Payment)

CONCEPTS USED

As above mentioned, this template website is made up of HTML, CSS, and JavaScript.

The concept used in HTML:

  1. Using the link to add an external CSS file to it.
  2. Using the “src” attribute with the “script” tag we link external JavaScript.
  3. Using the “div” tag to separate various parts of the webpage to give functionality and style separately.
  4. Using “h1” tags to give a heading.
  5. Using “img” tag to give images on the webpage.
  6. Using anchor (“a”) tags to link multiple HTML files to each other.
  7. Using “id” and “class” attributes with different tags to give them style and functionality accordingly.
  8. Using the “form” tag to use the form for the login and sign-up page.
  9. Using the “method” attribute’s value as “POST” to give the form data securely.
  10. Using “input” tags to make an input field for the users. (With its different types.)
  11. Using “onload”, “onclick”, “onblur”, “onchange” with its value to call the functions which are in the respective JavaScript files on loading the webpage, on clicking a button, on losing focus, and changing the state respectively.
  12. Using “label” tags to create labels for the input fields.
  13. Using “select” tags to create a drop-down menu or combo box in the form.
  14. Using “option” tags inside the “select” tag to give options in the drop-down menu.
  15. Using “button” tags to create a button for submitting and resetting the form.

The concept used in CSS:

  1. Using “#” and “.” to access elements with their id and class values respectively.
  2. Using some pseudo-classes to make a somewhat interactive web page. (Without using JS.)
  3. Using media queries to make the page responsive for some specific display ratios.
  4. Using “@import” for importing another CSS file to a specific file.

The concept used in JavaScript:

(In this project, JavaScript is used mainly for form validation and for interactive buttons.)

  1. Using Regular Expression (RegEx) for creating a pattern for email and password validations as they have a specific pattern in them.
  2. Using “window.location.replace()” to go to a specific location on calling it.
  3. And using other pre-defined functions to create our user-defined functions.

CONTRIBUTION BY TEAM MEMBERS:

  • The idea of the project and its structure of it.
  • Creating all JavaScript files, to make our web pages interactive.
  • Final touch-up to the project.
  • Creating all CSS files, to make our web pages beautiful.
  • Creating all HTML files, to add content into it.

PROJECT IMPLEMENTATION:

Here are some images of our project.

  • home.html
  • acc.html
  • login.html
  • signUp.html
  • billPay.html 

CONCLUSION

This online banking website project is completed in two scripting languages i.e. HTML and CSS, and JavaScript.

There is a total of 14 .html pages which are linked together to create a full website template for online banking.

In this project, all three developers work equally, with the same amount of effort.

REFERENCES

1. w3school.org
2. geeksofgeeks.com
3. developer.mozilla.com

Download the complete project on code, report of Online Banking Website Project using HTML, CSS, and JavaScript