Computer and Laptop Service Management System Project

Project Introduction:

  • Computer and laptop service centers are in great trouble with the manual operating systems such as they cannot maintain the data of Vendors, Products, Reports of Laptop Service Customers & Employee details.
  • This (LSM) application is used to maintain the Major Data of both product and customer details.
  • They have maintained the secret (PII) data on their server and the documents and files are stored on a computer. Now the manager will allocate the work to their employees of different branches based on the technician available.

Overview of the Project:

The main users of the LSM application are given below:

  • The administrator: The management staff at his office is the administrator of this system. He will take decisions on different tasks whether to issue them or not.
  • The employee: The employee gets the service job on his home page. The employee checks the problem with the laptop & computer and finally solves the problem and updates the status.

MODULES:

  1. Registration module
  2. Login module
  3. Admin module
  4. Customer module
  5. Employee module

REGISTRATION MODULE

  • In the registration module, the admin will register employee details, and branch details and create individual passwords, and usernames.
  • Both registered employees and customers can log in to the system by entering their login id and password. Admin also has login credentials to manage the whole application.

ADMIN MODULE

  • The administrator has full authority over the website. Only the administrator can add employee, and branch details like adding a new branch, laptop service job allotment, job status view, sales of this month, and editing employee details.

CUSTOMER MODULE

  • The laptop and computer problems will be solved by employees and they will update the status in the job receipt form. Customers can open the status view login by entering the job number and mobile number and clicking submit to display the status of the job.

EMPLOYEE MODULE

  • On the home page employees can register for laptop & computer service forms and they can update the service status. And also, how many jobs are allotted to an individual employee. This is an employee module.

ADVANTAGES OF THE PROJECT:

  • Evaluated their employee effort
  • They are maintaining employee data, and customer data.
  • Meanwhile, the application will forecast the Business of their Budget year.
  • Generate the various reports into Grid View as well as the same report will be generated into an excel sheet
  • Invoices can be printed into their letter paid.

You can also visit & download the .Net Application project on Computer Store Management System Project

Software Requirement:

  • Framework: Framework 4.5
  • Language: Microsoft C# .Net Language.
  • Technologies: Asp.Net, Ado.net
  • IDE: Visual Studio 2012
  • Operating System: Microsoft Windows 7
  • Professional Database: Microsoft SQL Server 2008

Hardware Requirement:

COMPONENTS

MINIMUM

RECOMMENDED

Processor

Pentium inside

Intel

Clock Speed

700 MHZ

1 GHz or above

Cabinet

AT

ATX

RAM

256MB SDRAM

512 SDRAM or above

Primary Device

1.44MB Floppy Drive

1.44MB Floppy Drive

Hard Disk

20GB

80GB

CD-ROM

40X CD-ROM drive

52X CD-ROM drive

Display Unit

14” Color Monitor

15” Color Monitor

Keyboard

104 Key Board

107 Key Board

Mouse

2 Button Mouse

3 Button Scroll Mouse

Modem

33.6 Kbps Modem

56.6 Kbps FAX Modem

Sound System

100 W Sound System

380 W Sound System

Pages:

  • Registration
  • Homepage
  • Employee Entry
  • Employee Details:
  • Branch Details
  • Job Check-In Page

Conclusion:

  • In this system, we are hosting the website so working on this system will be online.
  • The designing of registration and authentication modules and connecting them to the database. So that this system will be useful for all laptop service center branches, employers, and customers in all ways.
  • Using this project, time and money can be saved because we are using an online system for all its work. Thus, this project is made for the welfare of society itself.

Also, Read this Online Computer Store .Net Project

FUTURE SCOPE OF THE PROJECT:

This project “LAPTOP SERVICE & MAINTENANCE” will be implemented in the future after making some enhancements as we make our project at a low level. So, the modifications that can be done in the future to our project is to check how interactive the employee is with the customer in the chat box to clarify. And also, feedback on the service can be recorded for social users to trust our service center. Similarly, various modifications can be done to enhance the usability of the given project as suitable for the user’s requirement.

College Sports Management System .Net Project using Asp.net, C#.Net and SQL

PROJECT DESCRIPTION: The College Sports Management System’s objective is to provide a which manages the activity of many sports at a time. It also manages the registration process and announcement of the results.

Modules

Add sports

We can add new sports into the system so that we are able to retrieve them later during the registration process. The sports added would be viewed during the creation of a new intra- college or university tournament.

Add Scoreboard

We add a scoreboard so that the students can view it and the results of each match are announced here so that there will be only one platform for the results. This would reduce the chaos during the score announcement.

Add Tournament

Each tournament from an intra-college or a university can be added here. It later would help in the registration of any sports in that tournament. While adding a new tournament the system would show the set of sports that are entered into the system by the director of the sports so only those sports can be included in the tournament while creation.

Remove Sports

This module will help in the removal of any sports that the sports director thinks are not needed in the system. The removed sports would not be shown anywhere in the system that includes during the addition of a new tournament.

Edit Scoreboard

The added scoreboards would be updated here. This module helps in updating the scores on the scoreboard. Only the scoreboard which is added using the add scoreboard module would be present here and only these scoreboards can be updated. We won’t be able to add a new scoreboard here.

Remove players

This module would remove each player after each round of the tournament. So that only the existing player will be present and the one that is not qualified for the next round would be removed using this module. This would give a clear picture of the qualified players. As well as the player from the college team I can also be removed.

Remove Tournament

After each tournament in the college or a university, we should remove it, so that there won’t be any confusion between different tournaments which are going to be held later on. This module would help in removing all the details of the deleted tournament.

Registration Individual

This module would help in the registration of individual sports events held in the tournament. We selected the tournament in which we want to be part and the sports in which we want to participate in and the player would add his name and the required details asked in the registration form. After all these processes then we can click on the submit button and the student has registered for the tournament that they wish to participate in.

Registration Group

This module would help in the registration of group sports events held in the tournament. We selected the tournament in which we want to be part and the sports in which we want to participate in and the set of player’s names would be added and the other required details asked for in the registration form. After all these processes then we can click on the submit button and the student has registered for the tournament that they wish to participate in.

Payment

This module would help with online payment. So that the students wouldn’t have to stand in a queue or have hard cash in hand in order to do any payment to the sports department. By using this module we are reducing a lot of paperwork and we are giving the students the liberty of doing the payment from wherever they are.

  • This College Sports Resource Booking Project is related to the College Sports Management System Project. You can also visit & download the Android Application project on College Sports Resource Booking

SYSTEM STUDY

EXISTING SYSTEM

The existing system is more of a manual work, where the students have to walk up to the sports department and have to register for the events that they desire to participate, it’s not just the registration process but even other activities such as the announcement of the result, the payment, etc. This results in a lot of paperwork and the chance of the data getting mixed up is high. In the existing System, students are not able to get proper information about the games conducted in various venues. The student needs to spend a lot of time to get the information about the game. The student should attend the venue to get information on the game which takes a lot of time. The information such as the qualified player’s list, the timing of the event, the score of the sports happening, etc.

DISADVANTAGE OF THE EXISTING SYSTEM

  • Involves a lot of paperwork
  • Students have to walk a lot for the registration and other sports-related activities
  • Data getting corrupted is high
  • Human error is common during intra-college and university tournaments.
  • The students need to visit the venue to get all the information about the tournament and would have to wait for a long time.
  • Manually recording all information with regard to all data and manually creating the contest schedules, coordinating facility usage, and hand-registering athletes and teams. The dissemination of information would require that documents be typed, photocopied, and put up on the notice board or common place where students can view them.

You can also visit & download the website project on University Leave and Outing Pass Automated System

PROPOSED SYSTEM

In the proposed College Sports Management System student can get all the information about various games and the venue.

OUTPUT SCREENSHOTS

  • Sports team
  • Adding new tournament
  • Adding new sports
  • Removing sports
  • Removing Players
  • Index page for Registration
  • Registration form for intra-sports
  • Registration form for group events
  • Admin Login
  • Index page
  • Admin Home page
  • Adding scoreboard

You can also visit & download the web application project on Student Activity on Sports System

CONCLUSION

Sport is a part of the curriculum in college. Hence it’s time for the sports department and its activities to be automated and go online as it will be beneficiary for everyone who is associated with sports in college. The “College Sports Management System” project will assist the sports department of the college and would help the students in saving a lot of time in searching for games being conducted in the college. Our project provides students to get register from anywhere and anytime. It helps the administration by streamlining the current intra-college sports event administrative practices. Specifically. It will allow the administrators to configure a set of Tournaments into the system and simply record the results of those contests so that administrators and the public can track the teams during the course of the tournament.

.NET Framework makes the application robust, secure, and reliable. This system provides better scalability and is open to more enhancements. More levels of abstraction can be implemented at the front end and back end, thereby making the system easily adaptable to any changes in the environment.

The software developed was implemented and tested with real data and was found to be error-free. Also, it is found that the system works successfully. The user has to provide their personal detail to buy a package. All the necessary validations are carried out in this project so that the company can make use of this software and the necessary messages make them conscious of the error they have made. Henceforth, valuable reports have been generated for this organization.

You can also visit & download the Java and MySQL-based web Application project on Sports Event Management System

Download the Complete College Sports Management System .Net Project with ASP.Net, C#.Net, and SQL Server.

Professor Online Question Paper Submission to the Examination Cell ASP.Net Project

Introduction

Online Question paper submission is a web portal that is developed or implemented in the ASP.NET domain or platform. This project is helpful for the Professor to submit the question paper to the examination cell or to the Examiner from this site. In the current generation preparing the question paper and handovering in the examination cell is not that much security. This project is developed for a Professor to maintain his details, experience, and preparation of question paper and submit the same to the examiner. The examiner also gives his information, experience and takes approval from the administrator, and then selects the question paper. This project will work on the same line of online examinations; Apart from this, it contains much more additional information such as Course type, Department details, and other details of professors and examiners in this web portal.

For the examination cell, it is very difficult to identify whether the particular question paper is submitted or not. The online Question paper submission portal is implemented in 3 main modules. Professor module, Examiner module, and Admin module. Admin module will add multiple courses and departments under different branches so Professor can easily know the best details of about subjects. The professor module ought to register with the application and choose the course and upload the question paper to the site.

Scope of the Project

The scope of the project is used to manage the details of the professor, Examiner, and Administrator. The Professor and Examiners Sign up by providing the appropriate information and then take approval from the administrator. According to course-wise Professors prepares the question papers and send them to the examiner, then the examiner selects the question paper and submits it to the board. And all these records are stored in Online Question Paper Submission Database. 

Design of the Project:

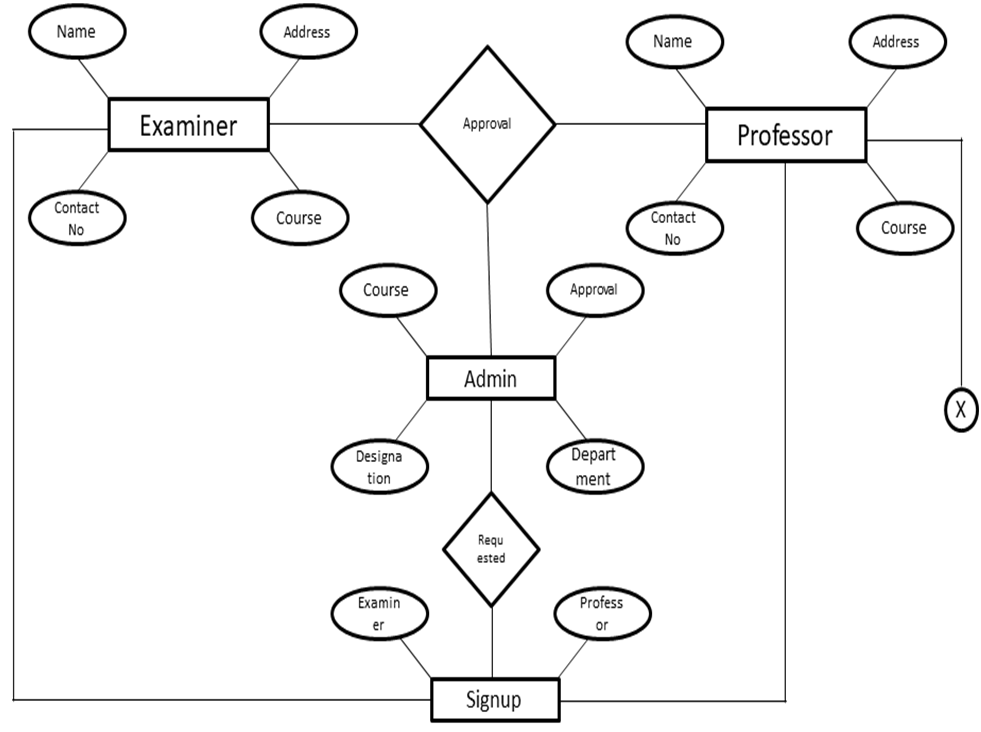
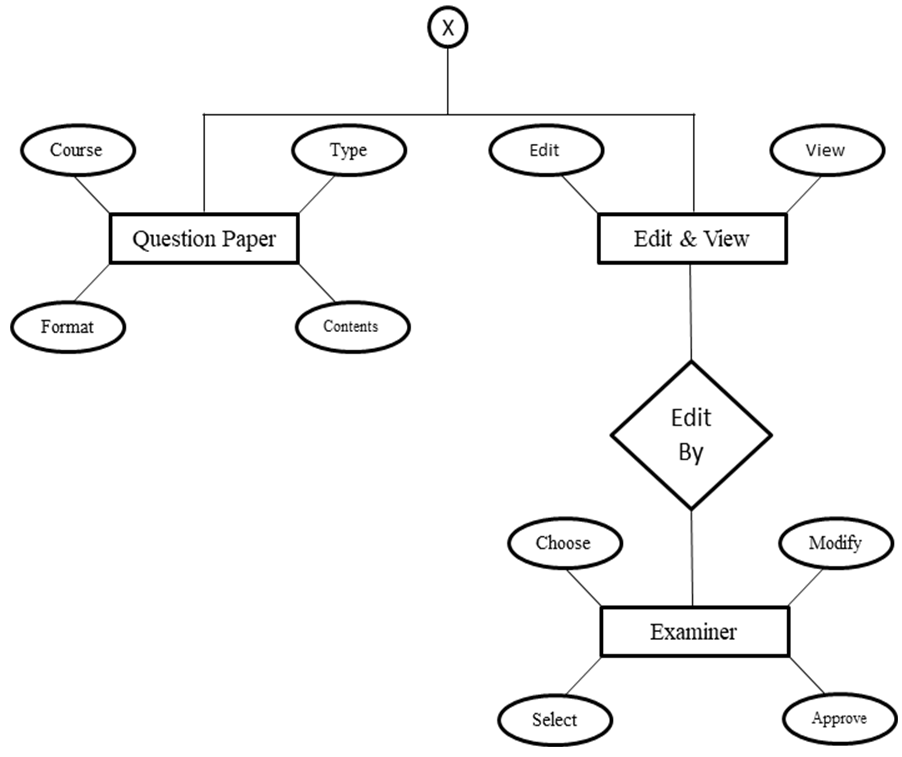
ER Diagram:

Main Modules of the Project

Administrator

 He administrates by giving approval to Examiner and Professor’s Signup. He also creates Courses, Departments, and Designations in order to fetch the correct and appropriate question paper for that course and department.

Course Details

 It is created by the Admin and it consists of Details of specific courses like BCA, BBA, BCOM, and more. The professor sends the Question paper on the basis of the Course.

Department Details

 It is created by the Admin and it consists of Details about the entire department which is created. The Department section consists of the Department name and Address of that Department.

Designation Details

  It is created by the Admin and it consists of Details about the Designation of a particular professor. This section consists of  Designation names like Ass-professor, HOD, and so on, it also has a description section under the Designation name which helps us to know which particular department the professor’s designation is from. 

Professor’s Signup

 In this section, any professor can sign up. But the request is only approved by the Admin. This section consists of the Login name, name of the professor, password and confirms password to confirm, phone number of that particular professor-main ID, and at last the address of that professor.

Examiner’s Signup

 In this section, any Examiner can sign up. But the request is only approved by the Admin. This section consists of the Login name, name of the examiner, password, and confirm password to confirm, and here it consists of designation and department where the examiner can select any of the given designations and department. At last, it asks for the Address and a photograph of that particular Examiner.

Approval for both Professor & Examiner

 This action is performed by the Admin. He approves both professor and Examiner. 

Login for professor & Examiner

 A Professor who has been approved by the Admin can now log in to the Login section and the same for the Examiner too.

Details of Question paper

 Every Question Paper must be sent with appropriate details so as to know more about the paper at a single glance.

View and Edit the Question Paper

 It is viewed and Edited by the Examiner and it is submitted to the University.

Final Reports

It creates and shows all the database records of this project.

Screenshots of Online Question Paper Submission System:

  • Home Page
  • Admin Login Page
  • Admin Main Screen Lists Section
  • Admin Main Screen Create Section
  • Admin Main Screen Approval Section
  • Admin Department list
  • Admin Designation List
  • Course Creation Section
  • Department Creation Section
  • Designation Creation Section
  • Home Screen Signup Section
  • Professor Signup
  • Professor Approve Section
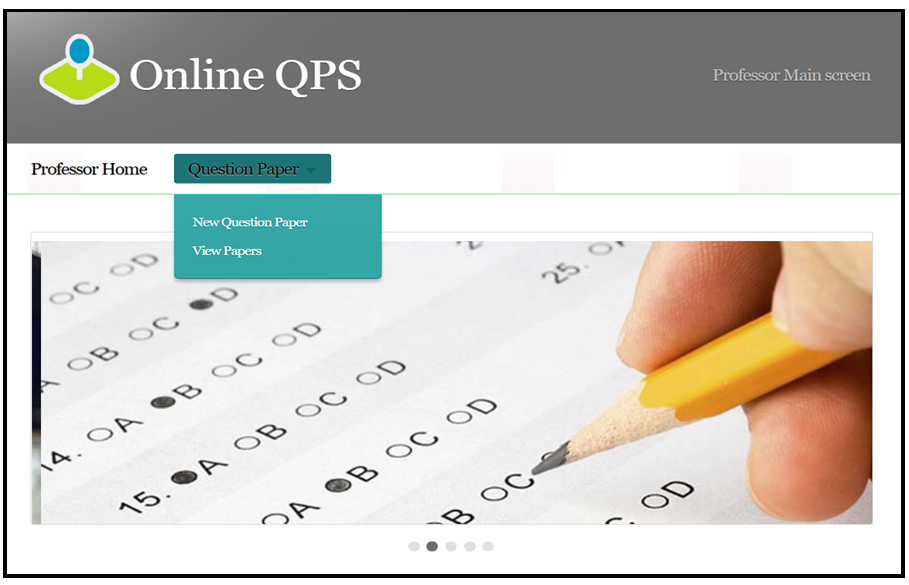
  • Professor Main Screen
  • Examiner Signup Section
  • Examiner Approve Screen
  • Examiner Approve Page
  • User Login Page
  • Examiner Main Screen
  • Examiner Document Viewing Screen
  • Professor New Question Paper Screen
  • Examiner Acknowledgment Screen

Conclusion

It is believed that in the future Online Question Paper Submission centralized document system with the concept of cloud technology will recede in importance as a strategic application to become a competitive necessity that must be adopted by most government departments.

India is striding smoothly towards integrated E-Governance.  In the next five years, situation will be entirely different.  Most companies are adopted cloud technology for the maintenance of documents.

Online Question Paper Submission creates a new trend in maintaining and verifying documents online and it reduces the workload. 

Future Enhancements

  • The news feed is essential for our day-to-day purpose; hence we will add a section about the news. There, we are going to display the news about examination dates, deadlines for submitting papers, etc.
  • We are going to add some more security to our system like an OTP number for verification of the Professor’s and Examiner’s Phone numbers.
  • Authentication of Professor and Examiner is also important, thereby uploading the College Approval Letter by Principal (Signed and Sealed), makes it Admin easy to verify them.
  • We will add a few more Image File Formats such as TIFF, GIF, PNG, JPEG, etc. in order to make Professor and Examiner upload photocopies easily.
  • To make a question paper, Professor has to be experienced; therefore we will add a new section while signing up called Years of Experience. In that section, the professor has to enter how many years of experience he/she has in the teaching profession.
  • Live communication between Professor and Examiner makes it easy to fix the problems; therefore we will add live messaging on the portal.

Download the complete asp.net, vb.net project code, and SQL database on the Question Paper Submission project.

Book Reading Event System MVC App Using ASP.Net SQL & Bootstrap

This Book Reading Event App is a combination of tools and processes that manage book-reading events across India. A book reading event where book lovers come together for a community reading of their favorite book. One or more readers read the book loudly and optionally people even play roles from the book.

INTRODUCTION

A book reading event app is an online web application that is a single-point entry for all book lovers across India. Any registered and verified user who wants to keep a book reading event can create an event, invite people they know by specifying their email ids, or can keep the event open for all. The invited people need not be registered users. Due to some problem, if someone is not able to create an event, s/he can ask some other registered user to keep an event on their behalf of her/him. The registered user can check for the public events happening by just browsing into to portal and for private events, one can check the invited list of events by logging into the portal as well as by checking their invitation mail. Admin can see all the events (whether it is public or private) and all the registered users. As per the requirement, the admin can Edit as well as Delete any future public or private event details.

OBJECTIVE

The objective of this Book Reading Event System Project was to manage all the book reading events properties created by one user and send an invitation to the guests by entering their email ids or by keeping an event public. Managing these resources may itself be sufficient enough to give any user a big jump in terms of efficiency. The objective was to build a web application for people that makes use of it to manage their hectic schedule and make the best use of it in a smooth and efficient manner.

FUNCTIONALITY

The project will manage the intellectual property by creating a database of all the users and events, helping users to create an event, edit the event details, delete an event, add comment(s) on the event, invite the guest(s) for the event and to see any book reading event details happening around. Admin simultaneously verifies details of events as well as users. Admin can also edit and delete the event whenever required. Book Reading Event App has two types of users: Registered users, and Admin users.

Registered users are the normal user of the application who has the following rights:

  • View Past and Upcoming Public events
  • Log in to the system using “Email id” and “Password”
  • Create an Event and send the invites by specifying email ids
  • Edit the events created by him/her
  • View the events invitation list along with the details
  • View the list of events created by him/her
  • Add Comments to the Event

Admin Users have all rights throughout the application as follows:

  • View Past and Upcoming Public events
  • Log in to the system using “Email id” and “Password”
  • Create an Event and send the invites by specifying email ids
  • Edit any upcoming event’s detail
  • View the events invitation list along with the details
  • View the list of events created by him/her
  • Add Comments to the Event
  • View list of all the users
  • View a list of all the events

METHODOLOGY AND APPROACH

The following technologies were used for building this project:

  • Frontend – Hypertext Markup Language (HTML) CSS (Cascading Style Sheets), JavaScript, Bootstrap
  • Backend – ASP.NET (Active Server Page) Model View Controller (MVC)
  • Database – Structured Query Language (SQL) Server
  • Framework – Entity framework is used to connect to the database which helps in object-relational mapping

This project is built in an MVC pattern where M is the model which determines the classes, V is a view that determines views shown to the user and C stands for the controller which is used to handle the request. This project follows three layered architecture. The first layer is the presentation layer which includes views, and the second layer is the business layer which includes the services which work as a mediator between the presentation and data access layer. And the third layer is the data access layer which directly interacts with the SQL server database using entity framework and code first approach.

OBSERVATIONS

Graphical User Interface (GUI) – The website contains many links and tabs for various requirements like Create Event, Edit Event, View Invitations, etc. The users of the application consist of users from India. It will lay stress on each

page’s layout and the features to be depicted on that page.

HOME PAGE:

This is the first landing page. Any user can see the Public Book Reading Events without logging into the system by using the Past Events and Upcoming Events links. The past Events link redirects to the Past Public Events and the Upcoming Events link redirects to the Upcoming Public Events along with their details.

PAST EVENTS:

This page is landing by clicking on Past Events on the home page. Any user can land on this page without logging into the system. But one cannot add comments without logging into the system. Users can see the list of Past Public Events along with the details of each event. The working of Upcoming Events on the home page is the same.

A registered user or admin can log in using their credentials.
Depending on the type of user, s/he will have access to various functionalities of the application. In case the email id and password typed by the user do not match any record in the database, a login failure message will be displayed. If not registered already, a user can sign up by clicking on “Signup”.

USER SIGN UP

A user can register using their credentials. After successful registration user will be redirected to the login page. In case of failing the validation requirements of email id or password, a failure message will be displayed. If registered already, a user can log in by clicking on “Login”.

HOME PAGE AFTER LOGIN:

This is the landing page after the user logs in to the system. PAST EVENTS redirect to the page containing the list of past events which either the user invited, or was a public event. UPCOMING EVENTS redirects to the page containing the list of upcoming events to which either the user is invited, or it is a public event.

Navigation bar: Contains the button for CREATE EVENT, MY EVENTS, INVITATIONS, HELP, USER DETAIL and
LOGOUT functionalities.

Only user with Administrator rights has some additional button for some additional functionalities available in the navigation bar are ALL USERS and ALL EVENTS button.

CREATE EVENT:

Users can create a new event. The user just needs to enter some necessary details like Title, Date, Location, Time, Type of event, and some other optional details like Description, and Other Details. Users can invite guests to the event by entering their email ids separated by a comma. Users must provide the creator id for whom they are creating the event. If the user wants to create an event for himself/herself only, then he/she can check the creator id by clicking on DEAR – XXXXX. If the user is creating an event for someone else, then the admin will verify the details with whose creator id has been entered. If the BACK TO LIST button is clicked, the user will be redirected to the HOME PAGE.

MY EVENTS:

Users can see the complete list of events created using their own creator id. From here user can Edit/Delete his/her any upcoming event by clicking on the Edit/Delete button. Users can also create events by the button provided just under the tile MY EVENTS.

COMMENT. And can also see the comments posted by others in the COMMENTS section. The comments in the COMMENTS section are shown anonymously sorted by date and time.

EDIT EVENT:

Users can edit the details of any upcoming events from the list of events provided on the MY EVENTS page. Users can edit any of the details provided in create event form except the creator id. The layout of the page is exactly the same as CREATE EVENT page. Users can return to the MY EVENTS page using the BACK button.

INVITATIONS:

Users can see the complete list of events to he/she is invited. The list of events being shown is sorted by the date and time of the event. As this page proved to be much helpful to users in order to plan their future activities. By clicking on the DETAILS button, the user will be redirected to the EVENT DETAILS page. On the EVENT DETAILS page, users will find some additional information regarding the events such as the type of event(public/private), the number of invitees invited, and the creator of the event.

EVENT DETAILS:

Users can see all the available information regarding the event he/she invited to by clicking on the Details button available on the INVITATIONS page. Here one can find some additional information such as the type of event(public/private), the number of invitees invited, and the creator of the event. Users can also add comments for this particular event by clicking on ADD

USER DETAILS:

Users can check his/her own details by clicking on the DEAR – XXXXX button. One needs to check their user id for creating their event, so here they can find it out. Here the button name is extracted from the email id by which the user has login into the system. As it is clearly visible from the image, if someone logged into the system with [email protected] then the name before @ is shown after the Dear – button like “Dear – XXXX”. The name visible in the button is the extracted from user’s email id leaving the part from @ symbol.

ALL USERS – ADMIN ONLY:

Only users with administrator rights can access this page. This page can be accessed by clicking on the button ALL USERS available in the navigation bar. On this page, the admin user can see the whole list of users who may or may not be an admin. Admin can see each user’s name, id, and email id.

ALL EVENTS – ADMIN ONLY:

Only users with administrator rights can access this page. This page can be accessed by clicking on the button ALL EVENTS available in the navigation bar. On this page, the admin user can see the complete list of events. The list contains both public as well private events. The list contains both past and upcoming events. The events in the list are sorted by date and time. Admin can use create event functionality here also by clicking on CREATE NEW EVENT button.

Admin can see details like Title, Date, Location, Start Time, Type of Event, Duration, Description, Other Details, No. of Invitees invited, and Creator id of all the events. For some specific requirements, the admin can see the details for a particular event by clicking on the DETAILS button available in that event’s particular row which will be redirected to the EVENT DETAILS PAGE as shown before. Admin can not only edit the events created by him/her but also edit events created by other users/admins. Admin can edit any upcoming event by clicking on the EDIT button for that particular event which will redirect to the EDIT EVENT page. Admin can also edit the creator id for the event.

After being done with the usage of the portal, the user/admin can log out from the system by clicking on the LOGOUT button available in the navigation bar. After clicking on the LOGOUT button, the user will be redirected to the HOME PAGE. Users can again use the system any number of times by logging into the system using the same credentials used for the first time.

CONCLUSION

This Book Reading Event system is a user-friendly software that can be used in any locality for any user to arrange the event and to send an invite to guests just by entering their email ids. Due to some problem, if someone might not be able to create an event and send an invite or somebody might not have email ids available for all the guests, in this case, the book reading event app provides functionality to a user to create an event on behalf of someone else and it will be verified by an admin before sending an invitation to the guests and posting that event on the portal.

Allowing all the users to have access to such web-based application software can help anyone who wants to keep an event busy with the preparation of the event can easily send invitations to the guests and save his/her time. Further, this software can be developed to add more functionalities in the future, like setting a reminder for the events and notifying the user time by time, and setting a flag for the events one is interested in. This project can be further extended to keep any event (i.e., House-Party, Get to Gather) and not just only for book reading. The sheer possibility of scaling this application is immense and will definitely go to be proven the most useful software in the future times.