Implementation of E-voting Machine Project using Python and Arduino

INTRODUCTION

Our E-voting Machine project is very useful, This Project was implemented using Python and Arduino. The user is no longer required to check his register in search of records, after the voting procedure gets over, the admin will be able to calculate the total number of votes in just one click since the entire work is done using computers. The user just needs to enter his/her unique voter ID.

In today’s world, no one likes to manually analyze the result after the voting procedure gets over because the process is time-consuming and of which results get usually delayed. Everyone wants his/her work to be done by computer automatically and displaying the result for further manipulations. So this E-voting Machine project is about providing convenience regarding voting.

OBJECTIVE

  • Our objective for the E-voting Machine project is to make a user-friendly Electronic Voting Machine that makes the current voting process faster, easier, and error-free.
  • We have used Arduino in our project for the implementation of push buttons and Python as a programming language.

PROBLEM STATEMENT 

The problem statement was to design a module:

  • Which is a user-friendly E-voting Machine
  • Which will restrict the user from accessing other users’ data.
  • Which will ease the calculations and storage of data.
  • Which will help the jury to declare the result without any biasing.

FUNCTIONS TO BE PROVIDED:

The E-voting Machine system will be user-friendly and completely secured so that the users shall have no problem using all options.

  • The system will be efficient and fast in response.
  • The system will be customized according to needs.

FOR e-VOTING SYSTEM

  • (Check
  • Store
  • )

SYSTEM REQUIREMENTS

  • Programming Language Used: Python, C
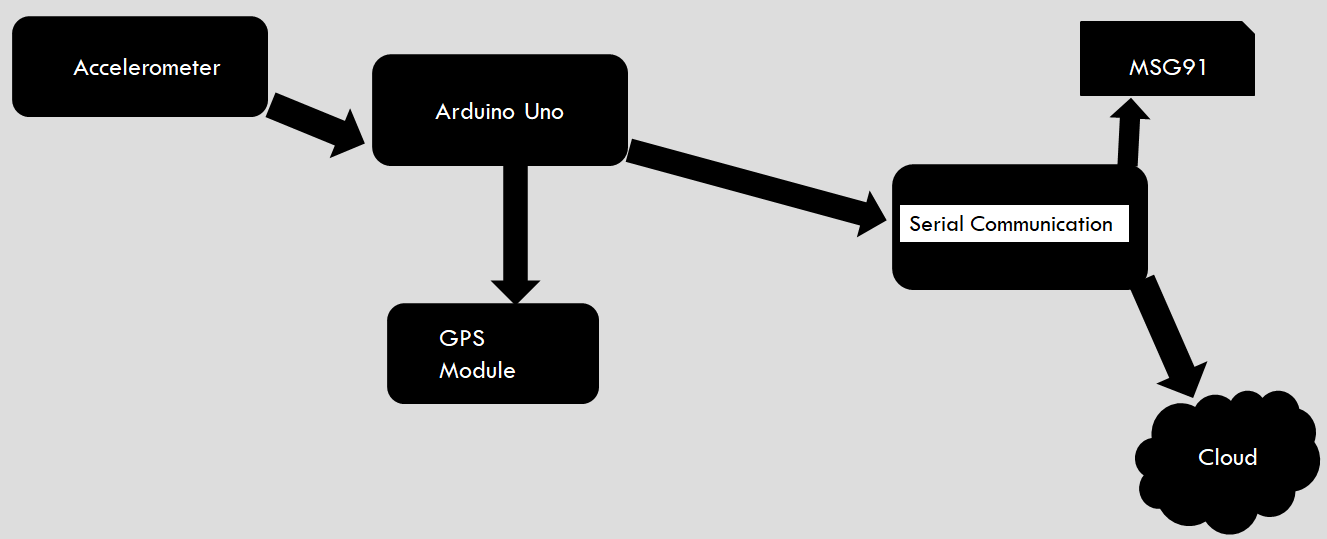
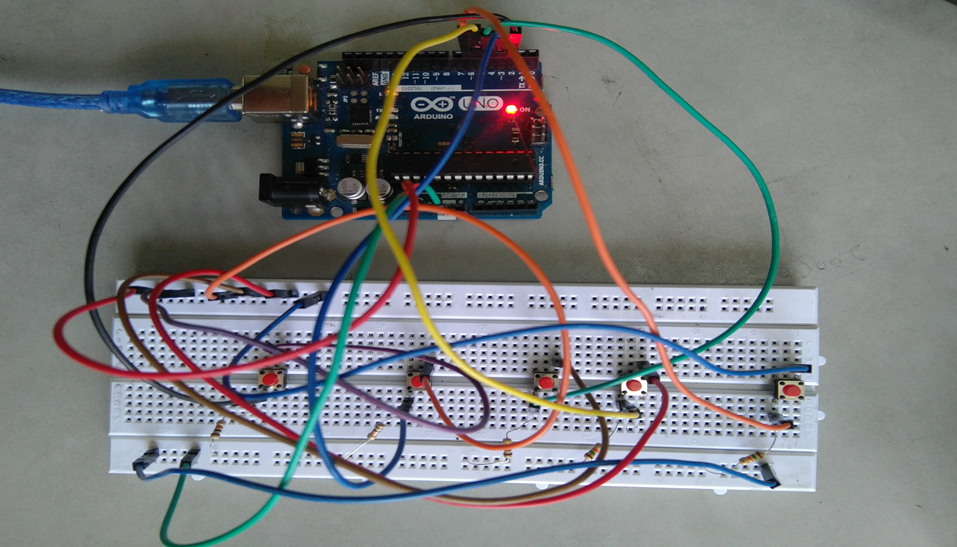
  • Hardware Used: Arduino UNO
  • Components Used: Push buttons, Connecting Wires, Resistances(100k ohm), Breadboard
  • Software Used: Anaconda 2.7.x, Python 2.7.x, Arduino IDE
  • Modules Used: Serial, SQLite, Tkinter, tkMessageBox

WORKING

  • The user has to enter his/her ID in the system.
  • After verifying the user ID, the system will show a message that whether a user is eligible to vote or not after checking his/her details stored in the system.
  • A message will be displayed accordingly. The user will then have to press the button against which the name of the candidate is written and whom he/she wants to vote.
  • The votes hence are stored in the database and the results will be announced accordingly.

FUTURE SCOPE OF THE PROJECT

My project “e-VOTING SYSTEM” will be a great help in conducting voting at various organizations. So the modifications that can be done in our project is to add one major change which can be done in this project is to add the data of the voters. This will result in the total identification of the voter.

CONCLUSION

From this E-voting Machine project, we can conclude that this program is very useful in conducting the voting procedures smoothly. It provides easy methods to analyze the voting result. It helps in conducting faster, more secure, and more efficient voting. The program can be used per the norms of the voting requirements.

Download the complete project code, report, and PPT on E-voting Machine using Python and Arduino.

GPS-based Child Tracker with Emergency Text Alerts IoT Project

The hectic life of parents makes it very difficult to personally look after the kids. To overcome the problem of personal monitoring of children, we have come up with the idea of a GPS-based tracker with text alerts when the child is not present in the specified region.

Problem Statement:

To solve the problem of difficulty in keeping a check on children while they are playing in open areas while letting the children have their freedom to play from constantly being mocked by parents and to monitor the whereabouts of children by working parents. There is a similar project on Women Security System that can be seen here

Project Working Process:

Hardware Components

  • Arduino UNO
  • GPS Module
  • GSM/GPRS Module 

Software’s Used

  • Arduino IDE
  • Android (MIT App Inventor)

In this context, the solution we propose is a GPS-based Child Tracker with Emergency Text Alerts android application that can help parents in tracking the presence of their children. This application works with the help of android mobile-enabled with the ‘SMS’ feature and ‘Global-Positioning System (GPS)’ on the GSM network.

This Child Tracker with Emergency Notifier application works in two ways, the first is GPS-based is related to Location services, and the second is SMS-based which is related to Network services. In case when the Location-based services not working then the application alternatively use Network-based services that can send and receive messages.

Block Diagram:

CHILD TRACKER WITH EMERGENCY NOTIFIER Block Diagram

The GSM and GPS module is connected to Arduino Uno. The GSM module has a sim (data) through which we can receive message alerts and the GPS helps to track the location.

The data is sent to the cloud from GSM using AT commands and HTTP. The cloud is connected to the mobile app and the data is displayed in the app installed on the parent’s mobile.

Useful Projects on Self Security in Emergency Situations:

Self Security through GPS based Protection System

Stay Safe Women Security Android App Project Report

The GPS-based Child Tracker with Emergency Text Alerts app is integrated with maps and geo-fence.

The GPS is connected to Arduino using a VCC pin, GND pin, RX pin, and TX pin. Connections: VCC to 3V3, GND to GND, RX to TX, and TX to RX respectively. GSM is connected to Arduino using VCC, GND, RX, and TX pins. Connections: VCC to 5V, GND to GND, pin 3 to TX, pin 4 to RX respectively.

A tiny GPS++ library is included. Using IBM cloud (node-red flow editor) the data is sent to a mobile app developed using MIT app inventor.

Automatic Vehicle Accident Alert System using IBM Cloud

In this Automatic Vehicle Accident Alert System project, we are using Node MCU, Arduino UNO, Accelerometer, and GPS module to store the location of the vehicle and to send an immediate alert message to the nearby hospitals, police stations…etc. Here we use serial communication to send the information from Arduino to Node MCU.

The Arduino receives the latitude and longitude values of the vehicle from the GPS module. The accelerometer reads the XYZ axis values. These values are read by Arduino. The XYZ values are compared with the condition given in the code to check whether the vehicle is met with an accident or not.

If the vehicle is met with an accident, latitude, and longitude values are copied to the NodeMCU, and the message is sent to the nearby police stations, and hospitals using the msg91 application. The GPS location of the vehicle is continuously stored in the IBM cloud.

Block Diagram:

Block Diagram of Vehicle Accident Detection

Hardware components:

  • Arduino
  • Node MCU
  • GPS Module- NEO-6m
  • Accelerometer- ADXL-335

Software Components:

  • Arduino IDE
  • IBM Cloud
  • msg91

Obstacle Avoidance Voice Controlled Robotic Vehicle Project

This Obstacle Avoidance Voice Controlled Robotic Vehicle Project work is mainly based on Arduino, Motor driver, and Bluetooth module. Arduino is an open-source prototyping platform that is based on easy-to-use hardware and software. Arduino makes use of an ATmega328 microcontroller.

Robotics has become a major part of our day-to-day life and also it plays a vital role in the development of new technology in the engineering field. This is a simple type of remote control car, where the ordinary microcontroller has been replaced by Arduino and the IR sensors have been replaced by the Bluetooth module.

The remote device to control this device can be any android or IOS mobile phone. And in this, we have also included the ultrasonic sensor which detects any obstacle present in front if any it stops the car. This project can be made used on a large scale for real-time vehicles.

hardware implementation of the circuit diagram including ultrasonic sensor

This project is controlling cars not by using sensors or transmitters but by using Bluetooth which is a very simple medium of communication in the present day. The remote device which controls this project is an android device that has an inbuilt Bluetooth module. Through Bluetooth, we can connect two devices.

Here we have inserted a Bluetooth module that gets connected to the phone‘s Bluetooth, which allows us to communicate and allows to take control over it. The main control of the car is played by the Arduino UNO which is the micro-controller ATMEGA32. Arduino has played a major role in the robotic section and it had made it easier to convert digital and analog signals to physical movements.

This project is Bluetooth-based because it gives us a wider range of control and more efficiency. It also gives us the advantage of changing the remote anytime, so that we can use any android device including phones, tablets, and computers. Physical barriers like walls and doors do not affect controlling the car. We have also included the ultrasonic sensor which helps the bot to stop automatically when an obstacle is present before it. An obstacle detector is added to protect the system from obstacles on the way by using an ultrasonic sensor that is mounted on the servo motor.

The voice-controlling commands are successfully transmitted via Bluetooth technology and on reception; the desired operations successfully take place. This project reduces human efforts in places or situations where human interventions are difficult. Such systems can be brought into use in places such as industries, military, and defense, research purposes, etc.

Hardware components to implement this project:

  • Arduino UNO
  • Motor shield
  • Ultrasonic Sensor
  • Bluetooth Module (HC-05)
  • Servo Motor
  • Jumper Wires
  • Bo Motor 300 rpm
  • Car Kit

Download the complete OBSTACLE AVOIDANCE VOICE CONTROLLED ROBOT Final Year ECE Project code & Report.