Water Tax Billing System Project

Main aim of this Water Tax Billing System project is to implement an application which deals with maintaining water tax managing activities like generating a water tax bill, customer personal records and other administrative activities. Initially, all the information about customers will be entered and maintained, which in turn helps to generate water tax bill based on the customer’s consumption of electricity. This system will reduce manual work for maintaining records in files.

This system provides effective mechanism to manage water tax bills for admin by recording each and every activity. Regular transactions which include bill generation, payment etc. and exceptional transactions that are related to  change of customer’s address, not  clearing bills within due date etc. also will have to be handled by the system

Following is the list of modules that comprise this system:

a)      Managing the generated bills

b)      Managing Customer records

c)      Tracking bill status

d)     Menu design and integrating of all   modules

Main functions of these modules are:

Managing Customer records

a)      To create customer file

b)      To update customer file

c)      To generate Reports

d)     To search for customer information

Managing the water tax bills

a)      To create Bills file

b)      To update bills file

c)      To generate Reports

Tracking bill status

a)      To update payments

b)      To notify defaulters

c)      To generate Reports

Menu design and integrating of all  modules

a)      To display system banner.

b)      To process menu.

c)      Integration of all the modules

d)     To provide security

Personal Home Page (PHP) Builder

Existing System:

In this modem world Internet pays a crucial role in every individual’s part of life. Now a days, every one are like to have this own page in the Internet, with free of cost. To rectify the users wish so many websites provided free domain page for every registered users in the registered websites.  If we lack our attention towards the last ten years, every user is interested in creating their page in the internet.

In order to fulfill the users wish many of the websites provides page for every registered users in the respective websites still some of  the websites are depend upon the cost based manner, for creating the user page. Once the user page is created they are still depending upon some amount of money to renewal the page for every annum.

Personal Home Page (PHP) Builder Home Page

When we take some websites, the content of the file size is only limited pages and display method look like an ordinary text that usually we created in notepad. So it will be inconvenient to the users to create a lengthy document in a file. When we see is exiting system, the display method look like a ordinary notepad. In proposed system, when the user wish to change the template which the user created at the beginning, it doesn’t provide facilities to select a another template for Users choice.

Drawbacks:

  • Exiting System also suffer from display formats.
  • The create page based on cost.
  • File size is limited
  • Existing system is not flexible
  • Time factor
  • Limited templates are available

Proposed System 

Proposed System plays a vital role, is bringing the users attention towards them. It provides a lot of features that are not available in Exiting system. Cost of allocation is free for users, who created a page in a particular website. The user is selecting a template, at the beginning of home page created. When the user is visiting the home page next time, he used the see some of the templates better than the previous one. The user thinks to change his previous home page, lot the time.

It provides a facility to the users to change the style of templates, depends upon the users wish. When we take a website in the proposed system, the content of the file size is unlimited. So, it all be a great benefits to the users to create their documents, lengthy format is a file.

Proposed system, a flexible one to each and every user and it doesn’t support time factor. Once we created a home page in website, the it will be accessed for a long time. There are huge numbers of templates is available and display method brings a attractiveness, towards the user, who visits a page for a first time. When we see is Existing System, the display method look like a ordinary method. In propose system.

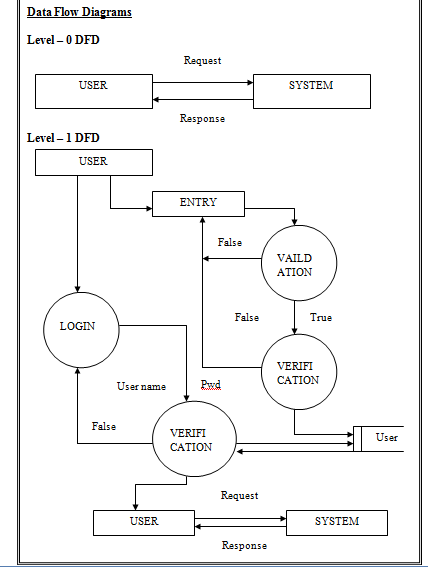
Personal Home Page (PHP) Builder DFD

Proposed System, a familiar one among the users since it provides a free cost and support a lot a feather.

AIM

To fulfill the users requirement by creating the Home page in free cost and to provide let of features that are convenient to them. 

BENEFITS 

  • Proposed System is flexible.
  • It doesn’t support time factor.
  • File size is unlimited
  • Huge number of templates available.
  • Cost allocation is free for page creating.

Conclusion

The system “PHP Builder” is tested on local intranet and works fine.  The system generates Personal Home Page for every registered user.  Whenever user wants to change his templates, the system automatically converts the existing template into new one.  When the system generates PHP for the user that page approximately takes 540 KB (or more) based on the selected template.  If more users are registered here, then more secondary storage is needed in the server.

Scope for Further Improvement

The system works fine in local intranet.  We planned to host our system in Internet. And the system has only few templates.  In future we are going to introduce more templates for user choices and there are no specific object/components for reading the uploaded file in the server, we plan to write a one DLL file in Visual Basic/Visual C++ in the server, that DLL file is carried out task.

Electronic Employment Management System

Abstract: The project entitled “Electronic Employee Management System” fully describes about the process of employment office schemes and provides the strong connection between job seekers and job providers. In this portal the job seeker has to register their details into the employment office database. Once they register the identities the system automatically post the complete details like Renewal time, validity and the cost if any required to the registered candidate.

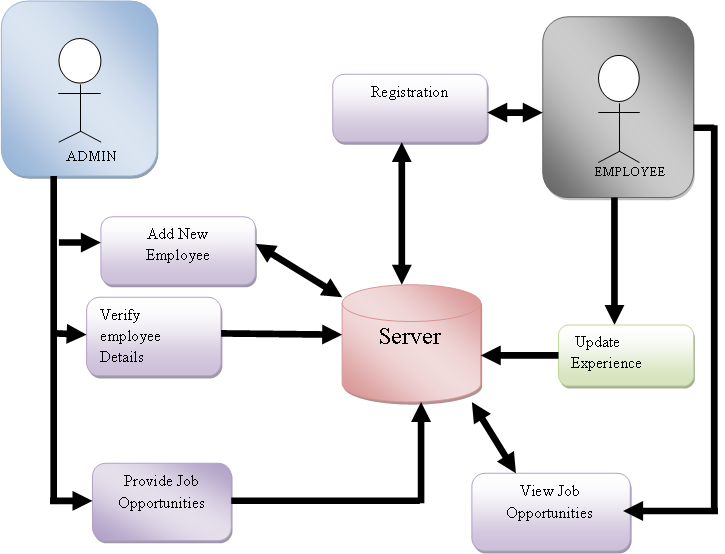
Electronic Employment Management System Architecture

The candidate can view the current opportunity through the job portal of the respective candidate. The system provides complete opportunity to the job providers to upload the job details immediately into the site; many candidates/job seekers get benefits from this system. This system provides one more add-on like if the date is expired to renew then the system automatically alert the candidate by sending mail to them whenever the site gets logged in. For all the entire system handles the process of employment office and provides the bridge between job seekers and the job providers.

MODULES

  1. AUTHENTICATION
  2. Employee REGISTRAION
  3. VERIFYING employee detail
  4. Experience renewal

AUTHENTICATION

The authentication module that allows the user provides to the identity of their own into the system, and gets full access rights to handle the website. Basically this website starts with the authentication port once the user properly registered in this website after that making the process. The employee management system provides the secure authentication and authentication process. The employee can login into the system with correct username and password and get all benefits of the site.

REGISTRATION

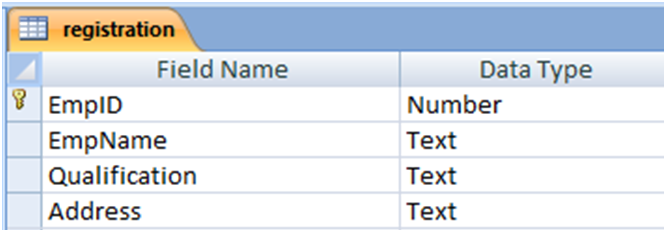
The registration process allows the user to enter the proper identity into the system. The identities are nothing but it is the basic information about the respective individual. The information like name mail id address username and password, which in be store to the server. The employee management system is to provide the registration process. In employee side the registration process is based on the personal detail like as name, Mail Id, address etc.

VERIFYING employee detail

This module is used to view the working employee details and relieve employee details. It is used to calculate the overall manpower of company, and calculate the overall employee salary details. And this module allows to verifying the present employee details like name, employee designation, and address. 

Experience renewal

Experience renewal module allows to renewal the employee experience. This module helps to improving the employee salary based on their qualification and their experience. The company gives the promotion for employees based on their experience. This renewal portal is used to update each and every employee experience up to date.

Electronic Employment Management System Registration Table

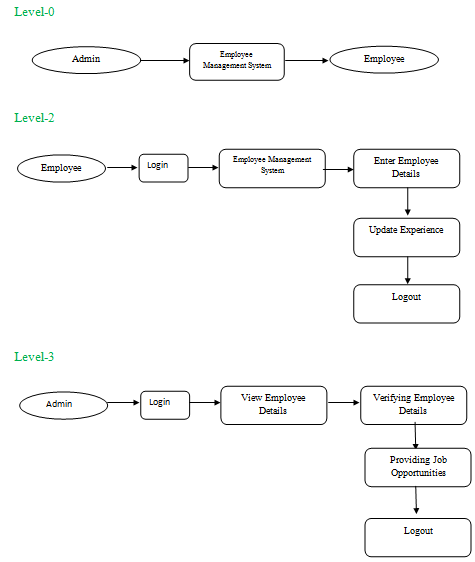
DATAFLOW DIAGRAM

Level-0

Level-2

Level-3

Electronic Employment Management System DFD

SYSTEM ARCHITECTURE

SYSTEM SPECIFICATION

Hardware Requirements: 

  • System                            :   Pentium IV 2.4 GHz.
  • Hard Disk                      :   40 GB.
  • Ram                                 :   512 Mb. 

Software Requirements:

  • Operating system           :    Windows 7 Ultimate (32-bit)
  • Coding Language           :   ASP.Net
  • Data Base                         :   Ms-Access

Time Table Generation System in ASP.Net

The aim of this project is to create software for college and for the purpose is to maintain the “TIME TABLE GENERATION” for both the students and staff.  Each Department head is having problem in work scheduling to their sub ordinates and work status feedback.  This project solves the above problem.  This software gives permission to the students and staff to view their allotted subject and Time Table.

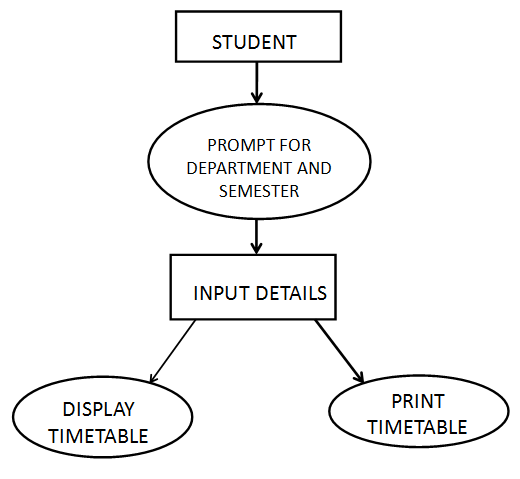
Interaction Between The Student And The System

This software is used to maintain the details of staff and student’s Time Table details and college Time Table details.  Visual Basic.NET is used as front end that is used to design the user interface.  Microsoft Access is used as back end and used to design the database and stores the details.

The tables used here are Course Details, Department details, Staff Details, Time Table Allocation details, Subject Details.

The project is more user-friendly so that anyone have minimum computer knowledge can access and handle the software without having any complexity.  This system provides security to the users by providing proper login.

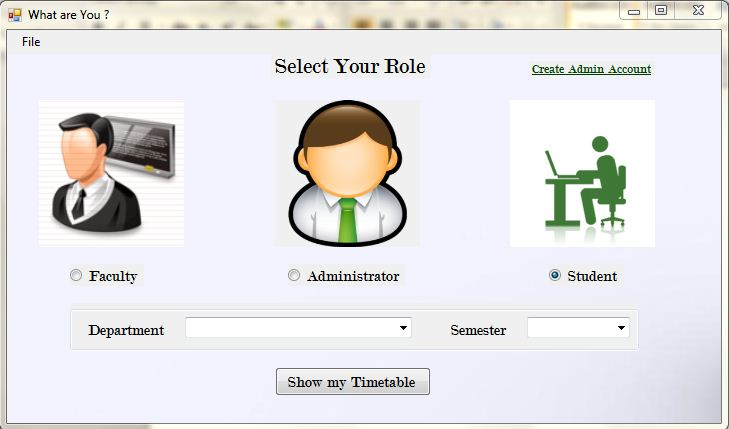
Time Table Generation System

Modules in this project are,

  1. Course Details
  2. Department Details
  3. Staff Details
  4. Time Table allocation Details
  5. Subject Details

Course: 

In this module both the entry and view of the course details can be done.  If the entry should be done, then the details will be checked.  After that the details will be added in the database and a message will be displayed to confirm the entry.

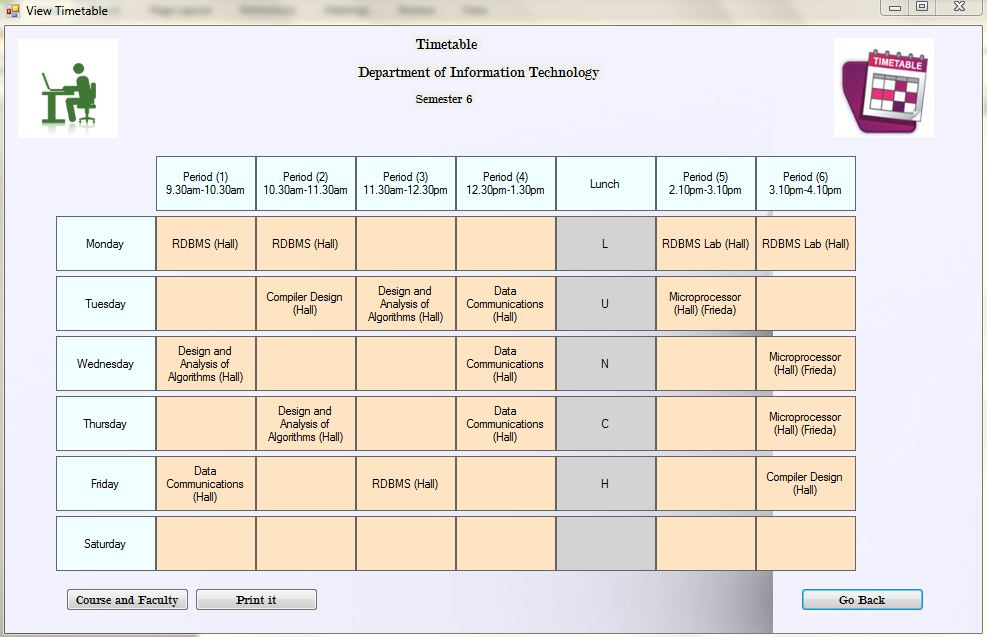
Time Table Generation System Semister wise

Department:

If the Department details entered then the Id of the corresponding Department must be entered, then the entered Id will be checked against the database. If the match is found, then the Department details of the Corresponding Department will be shown in that module, Else an error message will be displayed.

Staff Detail: 

In this module both the entry and view of the staff Details can be done.  If the entry should be done, then the details must be entered and checked for duplicate.  Then the details will be added in the database and a message will be displayed to confirm the entry.

Time Table Allocation:

In the Time Table Allocation Details the staff, subject of the Corresponding staff will be entered, then the entered staff Name will be checked against the database.  If the match is found, then the Time Table Allocation details of the corresponding staff will be generated and stored in database, Else an error message will be displayed.

SUBJECT DETAILS:

The subject details master includes subject name, id and the staff handling the subject will be entered and stored in database. In time table generation the details will be retrieved and used as per the requirement.

Existing System 

In the existing system, each task is carried out manually and processing is also a tedious job.  The Organization is not able to achieve its need in time and also the results may not accurate. Because of the manual maintenance there are number of difficulties and drawbacks exist in the system. Some of them are

Drawbacks of the Existing System:

  • Increased transaction leads to increased source document and hence maintenance becomes difficult.
  • If any student, staff entry is wrongly made then the maintenance becomes very difficult.

PROPOSED SYSTEM 

The proposed system is designed to be more efficient than the manual system. It invokes all base tasks that are now carried out manually, such as the forms transactions and reports which is added advantage.

Advantages of the Proposed System:

  • Gives accurate information
  • Simplifies the manual work
  • It minimizes the documentation related work
  • Provides up to date information
  • Friendly Environment by providing warning messages.

ENVIRONMENTAL SPECIFICATION 

Software specification 

Platform                      :           Microsoft Windows XP

Front – End                 :           VB .Net

Back – End                 :           MS Access

Environment               :           Microsoft Visual Studio .Net 2005

Flight Booking Portal

Abstract

The project entitled “Flight Booking Portal” is all about and for passenger assistance as the name states.  Now-a-days passenger traveling on a Flight gets confused very Often and is in contact only for the duration of the course that they undergo. Only one third of the passengers in a Flight Onboard are able to frequent travelers and interact with each other. The primary objective of this project is to announce the passenger list, Takeoff time and landing time of each flight. Flight details, Airport details and Airline timings are maintained in this project. The passenger list tells about the details of each passenger and the takeoff time tells about when the flight will takeoff and landing time tells about when the flight lands. This project is used to eliminate problems that arise in the manual system. This site provides the facility to handle the details and data easily and accurately.

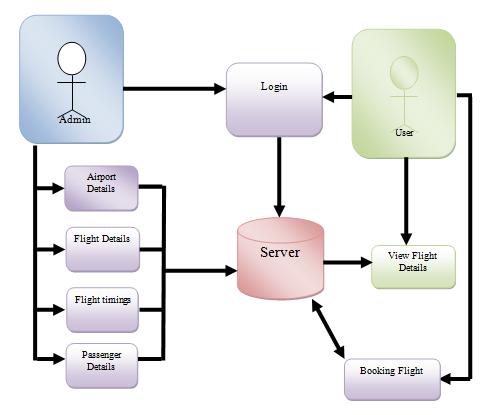
Flight Booking Portal System Architecture

Primary Objective

The primary objective of this project is to announce the passenger list, Takeoff time and landing time of each flight. Flight details, Airport details and Airline timings are maintained in this project. The passenger list tells about the details of each passenger and the takeoff time tells about when the flight will takeoff and landing time tells about when the flight lands. This project is used to eliminate problems that arise in the manual system. This system is user friendly to maintain the records easily and accurately. 

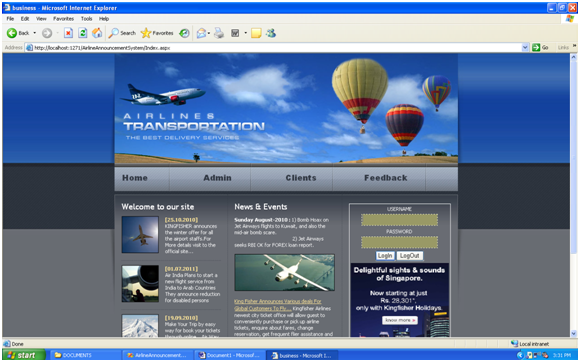
Flight Booking Portal Login Page

Working Nature of Flight Booking Portal

The working nature of the flight booking portal does not facilitates only the booking and cancellation of flights and also it maintains the complete working scenario of the airport and the flight landing and take-off strategies as well as the clear passenger details into the concern. Once the passenger book for the particular flight it confirms the passenger details like in which class they book for the particular flight and in which day the flight is turned on to fly and so on. Basically the working scenario of the entire system fully handles the working nature of the airport and provides facility to the passengers to book for the flight and know the complete details regarding the corresponding flight to move on.

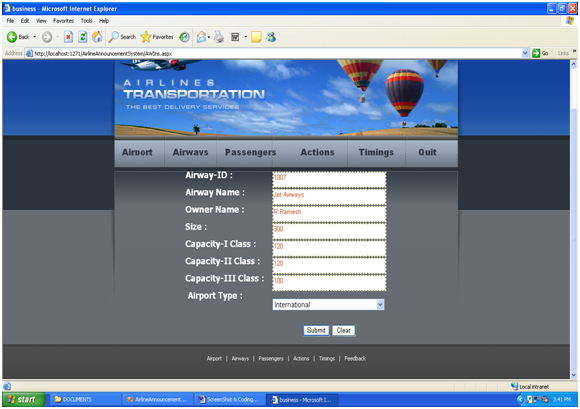
Flight Booking Portal Flight details

Scope of the System

The scope of the flight booking portal starts from the maintenance of airport strategies and the maintenance of passenger details. Once the flight details are entered into the system the employees and flight capacity are decided by the administrator end such as the particular flight contains this much of seats and the capacities like class I, II and III. For each class the passengers can book their seats based on the necessities. This system maintains one interesting scenario that is the Age Fare Concession, once the passenger details are collected it automatically calculates the fare based on the age of the respective passenger.

Development Environment 

Hardware Requirements:

System                           :   Pentium IV 2.4 GHz.

Hard Disk                      :   40 GB.

Ram                               :   512 Mb. 

Software Requirements:

Operating system           :    Windows 7 Ultimate (32-bit)

Coding Language           :   ASP.Net

Data Base                      :   Ms-Access

Organics Management System

ABSTRACT

The project titled “Organics Management System” is a Web-based compensation model for companies which help in managing all the activities in the Organic Farm. Organics is a public limited company engaged in organic farming and having a keen attitude towards establishing a research based agri-business. Organics provides equity and preferential shares, organic products and many services to the public.

The purpose of this application is to have a consistent and reliable system which can track all the activities within the company. It also provides supervisors and directors a tool that manages and estimates the company productivity on a monthly or weekly basis.

The system functional specifications can be used for streamlining activities, provide information flow and manage all the activities effectively. The process of “Organics Management System” is to provide software for the company which helps in tracking the team and individual transactions with the company.

The main objective of the project is to develop and provide an effective management system which can be used for managing shares, products and services. The module is developed based on the requirement gathered from the company. All the shares, products and services are sent to the administrator of the company for his approval before each transaction can be completed.

PROPOSED SYSTEM

The main aim of proposed system is to provide an automated managing system which can track all the daily activities in the Organic Farm. The development of a well-structured, secured and approval based system will allow staff and customers to understand better and will be able to contribute to the growth of the company.

Reduce the manual process flow of discussion and approval from management; promote efficient and scalable products with the company’s growth. It also helps in tracking the profit and quality of the products and also helps establish the company as a major competitor in the field of organic agricultural farming.

BENEFITS OF PROPOSED SYSTEM

The aim of this project is to develop a management system with the following objectives:

  1. To create a management system that can be used to track all the activities within the company.
  2. To reduce the time of management and long discussion process.
  3. System can be implemented on daily or weekly or monthly basis.

SYSTEM REQUIREMENTS

The software requirements for developing the application are Microsoft Visual Studio 2008 to handle front end basically – .NET controls, windows forms and SQL Server to take care of the database part (back end) and Windows 7 as operating system.

Hardware Specification

Processor                        :        Intel Core 2 Duo

RAM                              :         1 GB RAM

Hard disk                        :        2GB

Software Requirements

Operating System                   :            Windows 7

Front-End                   :            Microsoft Visual Studio 2008

Back-End                   :            SQL SERVER 2008

Health and Social Organizations Information Portal

Description of the project:

This is an information portal which holds all the information regarding the events conducted by some social organizations (like NGO) and their registered volunteers. It is a website which acts as a platform between the charity/social organizations and the volunteers who participate in those events.

As per the event requirement an organization sends a request to the website (like “an organization wants to launch a blood donation camp and needs a work force of total 30 members where 10 members are doctors and others are volunteers who take care of other things”).

Depending upon the requirement of the event one organization is going to launch the posts requests to some volunteers who are presently in inactive state (i.e., presently not involved in any other event). At this stage the request posted by the organizations will be in pending mode. This request will be pending till the volunteers required for the event are met. In case for the first time if the requirement is greater than the resources the admin sends this event information to some other volunteers.

After the requirement is met a mail is sent to the concerned charity/social organization that their event has been approved and these are the people who will be participating in this event. In the same way a message is sent to all the people who have been selected for that event as volunteers.

We also have a registration field for the new people who are willing to participate in the event as volunteers. Here we have two specifications for a new volunteer that is (a) knowledge transfer and (b) general volunteer. In detail:

(a)               Knowledge transfer registration à this is a scenario for a volunteer who is a busy doctor but is really interested in helping or participating in an event so with his help we get some valuable information in the form of document, video and audio files. Which will be available for the users after the doctor approves the material prepared.

(b)               General volunteer registration à this is a general volunteer registration scenario where a normal user and the doctor who is interested to participate in that event. Now it could be any of the above two ways new volunteers have registered they can login and view the events going to be launched and send their accepted views of participation. Only thing is that no volunteer can be assigned a new event if he is already under an event.

Modules: 

  • Admin module: In this module admin deals with the uploading of all the related information of a topic , selecting the volunteers, sending request to volunteers and organisations and accepting/rejecting response sent by them.
  •  User module: In this module registers into the site and can access all the information related to the posted by the admin, replies to the request sent by the admin to attend as a volunteer for an event.(doctor can also be treated as a user when he is willing to attend as a volunteer to the Event).
  • Charity organisation module: In this module charity can post an event requesting n No. of people required to conduct an event. Gathers all the necessary information required to conduct an event. Messaging is done with the volunteers who are assigned to conduct an event. 

Technical Environment:

  • Microsoft framework 2.0
  • Microsoft C# language
  • Visual Studio 2005 IDE
  • Microsoft SQLserver2005
  • Internet Information Services (IIS)
  • Microsoft Windows 2000 Sp4 or higher
  • Microsoft ASP.Net 2.0

Academic Project Management in .Net

We are proposing an automated Academic Project Management in .Net where we can overcome all the disadvantages of academic project management and come up with new system that works effectively and efficiently

Login Page: 

This Entry Point of this Academic Project Management project when the project is run then first this page is execute.  Here every user of that website have to enter  his credential then they can enter in his home page.

In the Login page we bind the all Role of the Academic Project Management project(Admin, Internal Guide, Student, HOD, Project Incharge) in the dropdown list. Role separate Class is declare  and in the login page we create object of Role class and call the getAllRole method by using the object and fill the data from Role table.

If user click on the Login button without inserting the credential in the text box the it give the error and say enter username and password in the textbox’s. When user click on login button without selecting the Role the client site validation will be raised and give error that select the Role.

Validation class is writing for checking the user is valid or not. In the login for we just declare the object of the validation class and call the studentLogin method  and check the user is valid or not  from Login table. If user is valid the it display his Home Page otherwise it display the error message user is not valid.
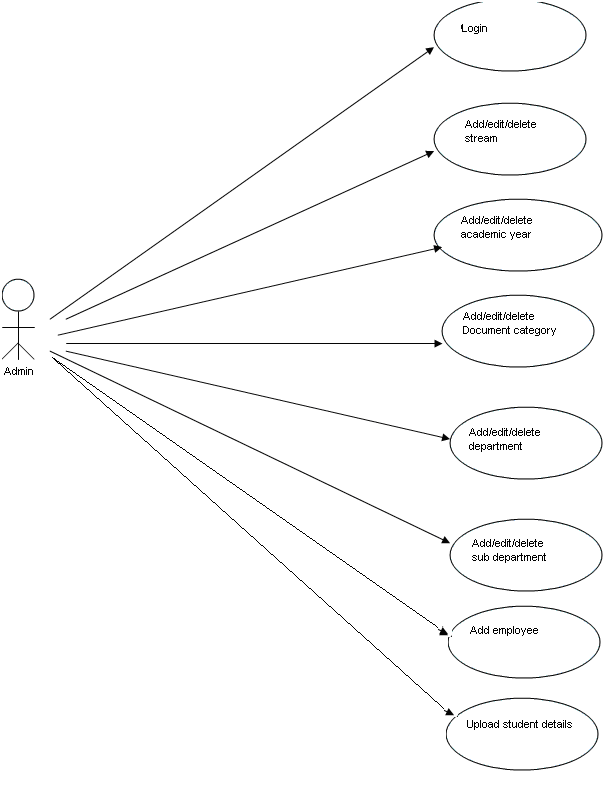
Academic Project Management Use case diagram

Admin Module:

Add Role:

In the Add Role Admin can Add the New role in the Academic Project Management project as well as he can change the role and delete the role also.

In the Add Role page one grid view is placed to display existing Role which is available in the project. It Display in the Grid view. Grid view have one property call Autogeneratecolumn if it is true the grid will create column for the display. Here in the project we create column manually to display the role.
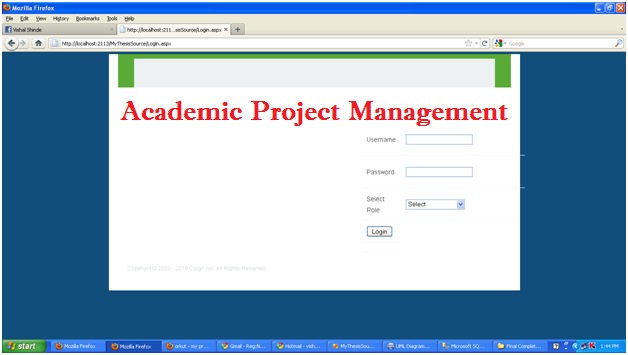
Academic Project Management login page

Here Admin can Delete role as well as change the role name. For that operation we just bind the Delete, Update, Edit, Cancel button in the dropdownlist when user is click on the Edit button the row should edit and button is change as Update and Cancel if Admin Change the Role and click on Update button the Role should update in the database. If Admin click on cancel the gridview display as it is and text is change as Delete and Edit. If Admin Click on Delete button  then  that perticularrole should be deleted in the database.

There is another button Add new role is Admin Click on that button then one text box is visible and Add button also visible for the admin if Admin Enter role in the text box then role is insert in to the Role table.

Add Streem:

In the Add Role Admin can Add the New streem in the project as well as he can change the  and delete the streem also.

In the Add streem page one grid view is placed to display existing streem which is available in the Academic Project Management System project. It Display in the Grid view. Grid view have one property call Autogeneratecolumn if it is true the grid will create column for the display. Here in the project we create column manually to display the streem.

Here Admin can Delete streem as well as change the streem name. For that operation we just bind the Delete, Update, Edit, Cancel button in the gridview when user is click on the Edit button the row should edit and button is change as Update and Cancel if Admin Change the streem and click on Update button the streem should update in the database. If Admin click on cancel the gridview display as it is and text is change as Delete and Edit. If Admin Click on Delete button  then  that particular streem should be deleted in the database.

There is another button Add new streem is Admin Click on that button then one text box is visible and Add button also visible for the admin if Admin Enter role in the text box then streem is insert in to the streem table.

Add Academic Year:

In add academic year one dropdownlist is bind with an academic name. This  Academic name we bind from Streem table. If we Select any year  then  year is display in grid view control .

Here Admin can Delete Academic year as well as change the Academic year. For that operation we just bind the Delete, Update, Edit, Cancel button in the gridview when user is click on the Edit button the row should edit and button is change as Update and Cancel if Admin Change the Academic year and click on Update button the Academic year should update in the database. If Admin click on cancel the gridview display as it is and text is change as Delete and Edit. If Admin Click on Delete button  then  that particular Academic year should be deleted in the database.

There is another button Add new Academic year is Admin Click on that button then one text box is visible and Add button also visible for the admin if Admin Enter role in the text box then academic year is insert in to the streem table.

 Add Document Category:

In the Add  Add Document Category page one grid view is placed to display existing Document Category which is available in the project. It Display in the Grid view. Grid view have one property call Autogeneratecolumn if it is true the grid will create column for the display. Here in the project we create column manually to display the Document Category.

Admin can Delete Document Category as well as change the Document Category. For that operation we just bind the Delete, Update, Edit, Cancel button in the grid view when user is click on the Edit button the row should edit and button is change as Update and Cancel if Admin Change the Academic year and click on Update button the Document Category should update in the database. If Admin click on cancel the grid view display as it is and text is change as Delete and Edit. If Admin Click on Delete button  then  that particular Document Category should be deleted in the database.

There is another button Add new Document Category is Admin Click on that button then one text box is visible and Add button also visible for the admin if Admin Enter role in the text box then Document Category is insert in to the DocCategory table.

Add Sem-Year:

In add sem- year one dropdownlist is bind with an academic name. This  Academic name we bind from Streem table. If we Select any year  then  year is display in grid view control .

Here Admin can Delete Sem- year as well as change the Sem- year. For that operation we just bind the Delete, Update, Edit, Cancel button in the grid view when user is click on the Edit button the row should edit and button is change as Update and Cancel if Admin Change the Sem- year and click on Update button the Sem- year should update in the database. If Admin click on cancel the gridview display as it is and text is change as Delete and Edit. If Admin Click on Delete button  then  that particular Sem- year should be deleted in the database.

There is another button Add new Sem- year is Admin Click on that button then one text box is visible and Add button also visible for the admin if Admin Enter role in the text box then Academic Year  is insert in to the Academic Year  table.
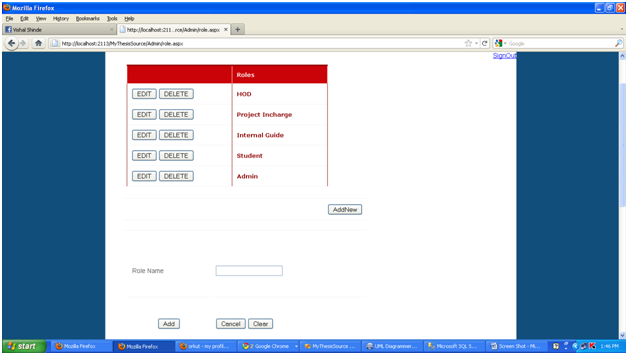
Academic Project Management details

Add Department :

In add Department one drop down list is bind with an Department name. This  Department name we bind from Streem table. If we Select any Department then Sub Department is display in grid view control .

Here Admin can Delete Department name as well as change the Department name. For that operation we just bind the Delete, Update, Edit, Cancel button in the grid view when user is click on the Edit button the row should edit and button is change as Update and Cancel if Admin Change the Department name and click on Update button the Department name should update in the database. If Admin click on cancel the grid view display as it is and text is change as Delete and Edit. If Admin Click on Delete button  then  that particular Department name should be deleted in the database.

There is another button Add new Department name is Admin Click on that button then one text box is visible and Add button also visible for the admin if Admin Enter role in the text box then Department name is insert in to the Department table.

Add Sub Department:

In add Sub Department drop down list is  two there. one drop down list is bind with an Department name. This  Department name we bind from Streem table. If we Select any Department then Sub Department is display in  other dropdownlist .

If Admin Select Department then sub Department dropdownlist is bind with sub deparment from Department table. If admin select sub department then sub department is display in the grid view.

Admin can Delete sub Department name as well as change the sub Department name. For that operation we just bind the Delete, Update, Edit, Cancel button in the grid view when user is click on the Edit button the row should edit and button is change as Update and Cancel if Admin Change the  sub Department name and click on Update button the sub  Department name should update in the database. If Admin click on cancel the grid view display as it is and text is change as Delete and Edit. If Admin Click on Delete button  then  that particular Department name should be deleted in the database.

There is another button Add new Department name is Admin Click on that button then one text box is visible and Add button also visible for the admin if Admin Enter  sub Department  in the text box then Department name is insert in to the Department table.

 Employee Credential :

In add Employee Credential two dropdownlist is there. one dropdownlist is bind with an role. This  Employee Credential we bind from Streem table. If we Select any role then  name of Employee is display in  other dropdownlist .

If Admin Select role then Employee name dropdownlist is bind with Employee name from EmpProfile table. If admin select name  then Employee Details  is display in the grid view.

In the grid view we just display information about Employee if Admin Select  any employee the all the information about employee is display in the grid view.

Add Employee:

Admin have the authority to add the employee. When admin add the employee at that time he have to add all the information of the admin he cannot insert null value in the database. He have to add all information about Employee.

In the Add Employee form four dropdownlist is placed and bind the data at run time fill that data into the dropdown list. In the first dropdown list all the streem are bind. In the second dropdown list department are name are bind its display when admin select streem after this dropdown list is fill at run time. In the third dropdown list Role are bind all the role which are present in the database. And it bind with run time. When the admin Select the Department then after Sub Department is bind in the dropdown list.

When Admin click on submit button without select any dropdown list value Then client side validation will raised and display error that Select the value means admin have to select the value first.

After select all the dropdown list value Department information is ready after that admin have to add personal information about Employee Means Employee id his name Email id phone no. all should be require Admin have to enter without enter info about employee and click on submit button then client side validation will raised and it give error that enter require values.

After Enter all the information correctly and click on submit button then all data in inserted into EmpProfile table.

Upload Student Details:

In the Student Details Form five dropdownlist is placed and bind the data at run time fill that data into the dropdown list. In the first dropdown list all the streem are bind. In the second dropdown list Academic year is bind at runtime at bind after admin select streem. In third dropdown list Sem-year is display it will bind after admin select streem. In the fourth dropdown list department are name are bind its display when admin select streem after this dropdown list is fill at run time. In the third dropdown list Role are bind all the role which are present in the database. And it bind with run time. When the admin Select the Department then after Sub Department is bind in the dropdown list.

Without select dropdown list admin click on submit button then client side validation will raised and it give error to the admin that he has to select dropdown list value. Means Admin cannot insert null value in the database.

Here Admin can upload the batches. For that one fileupload control is placed using that control admin can add that batches. Here admin have to upload excel sheet which contain student information that excel sheet admin will add.

Generally in the project we user Sql Connection to connect will Sqlserver but here we use we load excel sheet that why we have to use oledb connecton.

After filling all the information if admin click on the submit button then all the data should be save in to Student profile table.

Student Module:

Upload Abstract:

In the upload abstract  student can upload abstract. When student uploading the abstract he have to write information about abstract means this abstract in which project description about project company name and abstract in which is written in the docs file student have to upload that abstract in to database for that upload control is placed in the form and some control student have to fill the information and click on submit button when student click on submit button then that data is stored in to database and docs file is placed in the solution explorer.

If student not enter the details in text box and click on submit button then client side validation will raised and give error and say enter the all details after submit the form.

Upload Document:

In the Docs Category one dropdown list is there which we bind the document category student have select that document categoty before uploading the document.

Means here student upload the document and select the category of the document which is store in the database. Before Uploading the document student have to select the Docs category if he not select category then it give validation error to student that he have to select the document category.

One file upload control is to upload the document  in to the database. Means his path will be stored in to the database and document will stored in the solution explorer.

Project Incharge:

Assign Batches to Internal Guide:

In the Assign Batches form five dropdown list is placed and bind the data at run time fill that data into the dropdown list. In the first dropdown list all the streem are bind. In the second dropdown list Academic yeear are bind its display when admin select streem after this dropdown list is fill at run time. In the third dropdown list Sem-year are bind all the Sem year which are present in the database. And it bind with run time. When the admin Select the Department then after Sub Department is bind in the dropdown list.

In the form one grid view is placed on the form when project incharge select the all the dropdown list then regarding to this data will display in the grid view. And name of that project incharge is a display in the sixth dropdown list.

Batch Upload:

In the Assign Batches form five dropdown list is placed and bind the data at run time fill that data into the dropdown list. In the first dropdown list all the streem are bind. In the second dropdown list Academic yeear are bind its display when admin select streem after this dropdown list is fill at run time. In the third dropdown list Sem-year are bind all the Sem year which are present in the database. And it bind with run time. When the admin Select the Department then after Sub Department is bind in the dropdown list.

Here Project incharge can upload the batches. For that one fileupload control is placed using that control Project incharge can add that batches. Here Project incharge have to upload excel sheet which contain student information that excel sheet Project incharge will add.

Internal Guide:

View Batches:

Internal Guide can view the batches which is assign to him. In the view Batches page one Gridview control is placed which display batches which is assign to him.

HOD:

In the HOD home page we placed one Gridview control which display all the information like Document Batches information all the information HOD can see and it bind in to Gridview control.

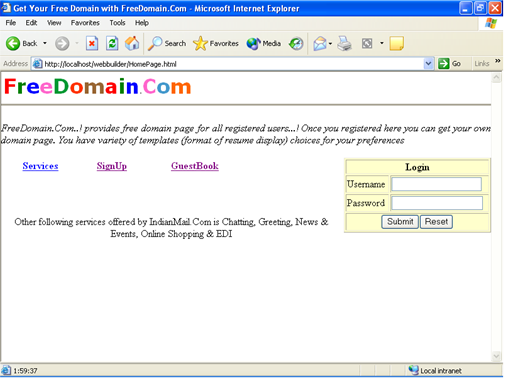
Holiday Trip Planner .Net Project

Description of the project:

Holiday Trip Planner travel planning functionality makes it easy for users to plan holidays in a matter of minutes. By pre-planning your dream holiday, you can then proceed to book with ease. Holiday Trip Planner is an online travel management system. It aimed to offer a range of best-value services to ensure that the tour runs smoothly and efficiently. It offers a complete range of services for business and individual travelers.

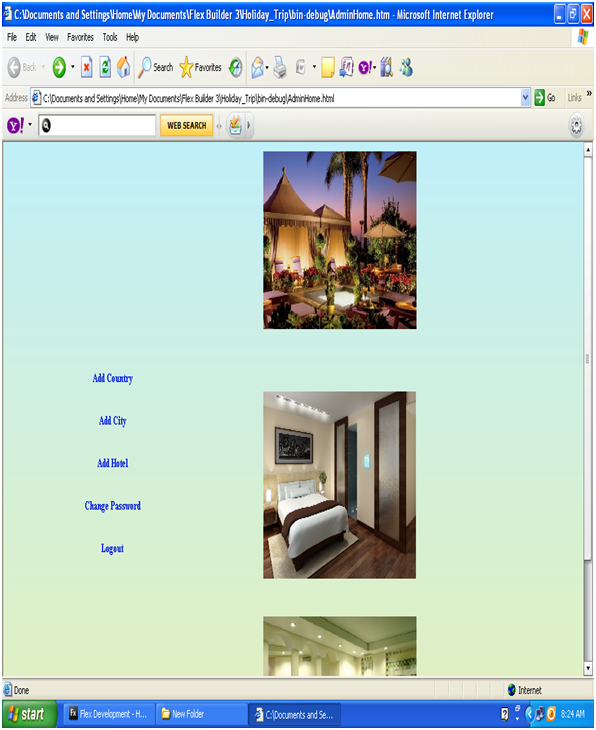
Holiday Trip Planner Home

The user is provided with an option to select the location where he wants to spend his holidays. As soon as the location is selected the user can see the gallery of the selected location. Users can also be provided with an option to take a virtual tour of the selected location. After selecting of location, the user has to give the accommodation details and no.of days of stay. The user will be redirected to the payment option where the user has to give the credit card details for payment.  Admin is the person who maintains the website.

Existing System:

There are many websites that offer tour packages. But they are not user-friendly. The user is not provided with many options like a gallery and a virtual tour of the selected location.

Proposed System:

Holiday Trip Planner is designed in Adobe Flex with which screens become user-friendly. Users can view the gallery and virtual tour of the selected location before booking.

Modules:

It provides the following functionalities:

Online Booking: The user can book the holiday trip by giving the details and selecting accommodation details.

Payment: Users will have to pay through their credit card details. 

Administration: Admin has the ability to add location details and maintain the details. And also admin can view the bookings posted by users.

Gallery n Virtual Tour: The user can view the photos of the location and can take a virtual tour of the location.

Product Features

  • Web-enabled allows tourists from any state or country to explore places.
  • Do not have to visit the travel agency or travel desk to plan the trip.
  • Allows the tourism dept to invite more customers and hence more revenue.
  • Just a click away to ensure booking, schedule, or cancellations.

Improves performance on time.

Project Scope

  1. Provide detailed tourism information about the state.
  2. Provide information about the packages, and schedules that can be used as a planner for the visiting tourists.
  3. Provide a facility to book, view schedules, and cancel their bookings.
  4. Provide a facility to pay online using credit cards.
  5. Know their pick up, and drop as well as their itinerary during the stay.
  6. Facility to prepone and postpone tour schedule. 

System Analysis: 

User friendly

Different aspects such as the name of the city, different tourist locations in each city along with the gallery, virtual tour, to provide accommodation hotel bookings and online payment will be given different tabs/modules so that it is easier for the user to access the website of his wish.

Separate modules will be provided for transactions with a credit card. 

Transaction management:

The user can pay for the entire trip directly from the site. This site provides security to the user details.

Software requirements:

o   Flex Builder 3

o   Microsoft .Net framework 3.5

o   Microsoft Visual Studio 2008

o   ASP.NET

o   Microsoft C#.Net language

o   Microsoft SQL Server 2005

o   ADO.NET

Hardware Requirements:

Processor:            Intel Pentium 4 or more

Ram:            1 GB or more

Hard disk:            40 GB hard disk is recommended for the primary partition.

Download the Complete Holiday Trip Planner .Net Project code, report, PPT

Interview Management System

 Interview Management System- IMS

Contents: 

  1. Existing System
  2. Proposed system
  3. Scope
  4. Features of IMS
  5. How does the IMS work?
  6. Reports and Analysis
  7. Functional Requirements 

Existing System:

In existing system whenever the company is conducting interviews, process involves that taking the jobseeker details, conducting written test, correcting or evaluating the written test papers etc. This entire process is done manually. So, the disadvantages of this process are:

  1. It takes more manpower
  2. It takes much time
  3. Some time the results may be wrong in this approach

Proposed System:

In proposed system, we have to computerize our process where each and everything is done systematically and computerized.

The Interview Management module assists in capturing all-relevant information about the jobseekers which is automatically captured in a database, and a professional quality temporary disposable/photo Jobseeker badge is printed. No need to encode regular Jobseekers again.

Features of IMS:

  1. Secured
  2. Easy to use
  3. Reliable & accurate
  4. No need of examiner

How does the Interview Management System work?

Step 1: Jobseeker Data Entry; in this step, all required information will be captured along with his personal and professional details

Step 2: Take a digital photo of the Jobseeker

Step 3: Take digital fingerprint of the Jobseeker

Step 4: Take digital signature of the Jobseeker

Step 5: Print a Temporary Disposable Badge with Jobseeker’s photo and relevant visit information

Step 6: Jobseeker has to login to the site and enter the username and password to write the online test

Step 7: Online examination questions can be categorized according to the technology.He/she has to select his/her technology and then click on start exam to start exam A serial number is provided with questions from different topics

Step 8: After completion of test time automatically test will get closed. And marks will be displayed to him/her.

Step 9: Logout

Reports and Analysis:

               The IMS simplifies full reporting and auditing of Job Seeker activities and stores your reports.

Functional Requirements:The H/W Requirements:

  • Desktop PC & Monitor
  • Digital Camera
  • Fingerprint Scanner
  • Digital Signature Pad
  • Printer

S/w Requirement:·

  • .NET Framework
  • VisualStudio tool
  • SQL Server 2005