Information Aggregator – Dashboard Java Project

Abstract:

The purpose of this project is to define scope and requirements for an Information Aggregator – Dashboard, to be developed for Top Management in Sales, Product and Merchandise functions of a Retail house. Replacing the traditional flash reports every morning pouring in from various locations. A live dashboard on intranet will provide a status on various metrics that corporate office wishes to monitor.
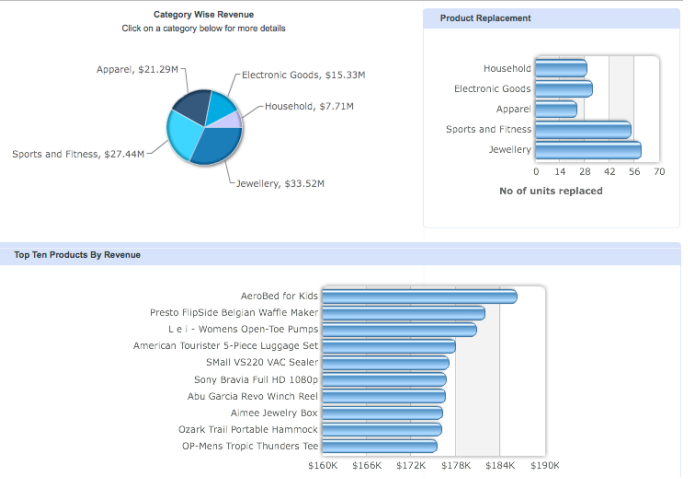
The dashboard will be a simple snapshot of Category wise revenue, Product Returns and Top Ten Revenue generating products.

This document is the primary input to the development team to architect a solution for this project.
Retail Challenges In retail, the individual product performance is very critical, as their procurement sources could be different, factors like delivery turnaround time, defect piece handling, returns, trendiness, buyer segment appeal determine which products should be discontinued and new items to be introduced. Retail business has to take care of the small time window availability arising from the festive season or otherwise seasonal changes especially in case of merchandise. Study of product sales patterns, buying habits and popularity is vital to success of the retail business.

Just by adding analytics to the daily purchase and billing data empowers a decision maker to roll out realistic plans.

System Users

The Corporate office Management will be users of the Information Aggregator, Dashboard.

Assumptions

1 . Dashboard will be integrated with the Retail House’s intranet, thus use the login and authentication mechanism of intranet only.
2 . On logging in the user gets to view the landing page displaying dashboard.
3 . The dashboards are normally created using data from the core applications in the organization. In the case of Retail houses, the data gets stored on the central server from the Point of Sales (Billing) at each location. In this project, the data feed is coming from CSV files generated by the central database server of the Retail House.
4 . The developer of this tool is expected to read and familiarize with Google Chart tools.
5 . There are two types of charts PIE and Bar Chart being used for creating a Dashboard.

INTRODUCTION:

The Dashboard tool will read data uploaded from back end as per the formats given below and process the data to generate Product Analytics like a sample view provided below.
The Dashboard has 3 sections; you may change the look and feel to ensure best fit of charts that will get integrated using Google Charts API.
The retail house markets 5 categories of products; Apparels, Electronic Goods, Household, Jewelry and Sports & Fitness.
The category wise revenue displays a pie chart of total sales value billed under each category.
Product Replacements section plots the category wise count of items returned under them.
Top Ten Products by Revenue, plots 10 items that have had maximum sales for all the categories by default.

Input Data
The following input data is required to be uploaded as CSV to generate these charts.

REQUIREMENTS
Information Aggregator - Dashboard Java Project
Product Category (Master)
Category id and Category Name

Items (Master)
Category id, Item id and Item name

Revenue Data (Transaction)
Bill Date, Category id, Item id, Qty and Value

Product Return (Transaction)
Bill Date, Category id, Item id, Qty and Value
Tip: While generating output the category name and item name shall come from master tables.

Charts – Must haves
1 . Each chart in the section must have a title, data labels and series title wherever applicable.
2 . On mouse hover, the actual data values be it % or Sales Value is displayed.
3 . User should be able to select the month if required to look at previous data. By default the current months figures till date should be displayed.
4 . For the adventurous developer, you may make the pie chart category selection refresh the page for other sections to display data specific to the pie chart category selected.
Dashboard will be developed as a web application using Java/JSP and DB2 database. Eclipse will be used as the IDE for the same. Knowledge of XML is a must for this project.
Refer to the charts tools from Google to integrate in the dashboard https://developers.google.com/chart/

Vehicle Tracker and Speed Notifier Java Project

Purpose: In our daily life, we find many situations where it is necessary to find the vehicle location . This project targets to develop a mobile application in order to provide vehicle location and it also used to send speed notifications to user. It uses internet and can be accessed from anywhere.

Software Requirements-

  • Java
  • XML
  • Eclipse ADT
  • MySQL

Specifications of the project

  • Location tracking.
  • Sending speed notifications.
  • Basically we need two android applications in which one acts as parent app, another one acts as child app.
  • Whenever a parent application needs his respective child application location then we have to provide location and speed.
  • By saving latitude and longitude values in local server ,we can access child location.
  • Speed calculation like after reaching the destination, Distance/time.
  • We have to write an trigger like if speed reaches 50, then push an notification.

Working Of Vehicle Tracking

By using built-in GPS(Global Positioning System) child     application will send the respective Latitude(X) and Longitude(Y) values through a link to guardian/parent application through Notifications, E-Mail and SMS whenever guardian/parent wants to know their respective children.

Here Guardian/Parent can fix some speed limit if respective child cross that speed limit then guardian/parent will get continuous notifications through the application.

https://www.google.co.in/maps/@X,Y,Zz?hl=en

X is the value of Latitude.

Y is the value of Longitude.

Z is the value of Zoom in google maps.

  • If you click on the above link it will show the location of respective child.

Personal Learning Assistance Center Java Project

Abstract:

“ PLACE ” Personal Learning Assistance Center Java Project is an education based website, which helps the students to get all the resources and study materials for every course available online. Students can access this website anytime and from anywhere. It is reliable and time efficient approach compared to all links of the website provided by any search engine while searching for course materials.

Objectives:

  • Self-Paced Learning
  • 24/7 accessibility to study materials
  • Interaction between student and professor through discussion forum
  • Accessing the website can be done from anywhere and anytime
  • Day-to-Day updating of the study materials
  • Increases retention
  • Easily manageable by everyone

Existing system:

  • In a manual system, students can get information from books or study materials provided by professors manually or through some online resources such as Free Engineering study Materials and Youth4work.
  • Through this system, students may not get the related and sufficient information according to our syllabus.
  • The above resources do not provide discussion forums between student and professor to clarify their doubts.
  • This system does not provide proper guidance to the students.
  • These are the main disadvantages in the present scenario, to avoid this we are going to introduce a web-based application called “PERSONAL LEARNING ASSISTANCE CENTER”
  • Problems:

  1. Students face difficulty in getting the correct and related information according to our syllabus
  2. A teacher’s lecture is generally one- size- fit- all. This results in the student’s inability to keep pace with teachers
  3. If the professor is not available due to some issue, then the queries are not clarified in time
  4. Missed classes are difficult to gain

Proposed system:

  • The main aim of this project is to provide sufficient and related study materials to our college students according to our syllabus from which students can easily download study materials of their relevant course.
  • Through this website, each and every student can easily access the study materials without any effort.
  • The first step is to register in order to access this website.
  • In this system, we are providing discussion forums between student and professor where students can easily clarify their doubts.

This website mainly consists of four modules:

1.ADMIN:

  • Maintains the details of registered students, mentors, and professors
  • Makes secure registrations of the users
  • Maintain record of queries and solutions
  1. STUDENT:
  • Students should first register and then login in order to view or download any study materials provided by their professors
  • If they have any doubts related their subject, there is a module called discussion forum which helps in solving their queries through chatting.
  1. PROFESSOR:
  • Prepares and uploads the study materials for the students
  • Solves the queries raised by the students in case if mentor is unable to solve them
  • Gives guidance to the students regarding their problems
  1. MENTOR:
  • Solves the queries which are raised by the students
  • Asks professors for solution, if they can’t get solution for particular   problem

Software Requirements

Operating System:   Windows 7 or Higher Version

User Interface:   Html / CSS

Client-side Scripting:   JavaScript

Programming Language:   Java

Database:   Oracle 10G

IDE/Work Bench:   My Eclipse 8.6

Conclusion:

From the above discussion, we conclude that “PLACE” is an innovative technique used in providing learning experiences to the students online through the use of internet services. “PLACE” is a very useful center where students can build up their academic profile. This is the center where students get complete satisfaction in clarifying their queries with the help of discussion forums.

Finance Corp Network-based Java Application

APSFC is a network-based application, programmed for the banking sector namely Andhra Pradesh State Finance Corporation. The activities such as information of the employees working in the organization, Industries to whom the loans are issued and different types of loans available are designed and the interest rates applicable are set in the master tables.

The information and status populated using the appropriate menus such as employee detail report, customer detail report; loans detail report, interest report, customer loan detail report & payment detail report.The system security is taken care by a login form, which allows only authorized users to utilize the system.

The automation of the activities is being processed by this computerized package.In the computerized package it will be easier to check the customer details by entering the loan number all the other information is displayed. Monthly installments are exactly calculated according to the number of months and the interest rates applicable. Payments can be tracked easily. The two basic modern design strategies employed in the software design are Top down design and Bottom up design.

Top down design is decomposition process, which focuses on the flow of control, at later stages it concern itself with the code production. The important feature is that at each level the details of the design at the lower level are hidden. In the bottom up design one first identifies and investigates the parts of design that are most difficult and necessary designs are made and the reminder of the design is tailored to fit around the design.

It vaguely represents a synthesis process.The major hardware and software requirements on both the Client and Server are Internet connection with 33.6 KBPS modem, Pentium 233 MHz 42 GB, 256 MB RAM (server), any P.C with Windows/Unix compatibility, 12 MB RAM (client), operating System (Windows/Unix/Linux), JDK 1.4.1, Web Server, running on any platform, JDBC/ODBC drivers installed, Servlets 2.0 and JSP, functional Java enabled browser and Data base (Oracle 8i).

E-Approval System Java Project

What is an E-Approval System (EAS)?

The E-Approval System provides an internet platform for sharing electronic documents, submitting files, completing tasks and tracking approval process. It was developed due to the global nature of many organizations which involve key persons often based in different parts of the world.

The approval process must flow seamlessly to ensure decisions are made efficiently and work is approved in a timely manner. Automating an organization’s approval processes can save time and money while reducing chances of human error.

Key benefits and features

Using a proper source and a tool for an organization is key to operate efficiently, yet many organizations still manage their approval process through email and spreadsheets. As the workload and transaction volume increase and turnaround times decrease , the inadequacy of these sources are obvious.

  • Easier system administration for multiple documents with transactional approval process.
  • Maintain complete track of the approval process.
  • Allow users to see where the document is in its approval process.
  • Improve efficiency and productivity with reduced manual labor.
  • Process documents in automated style
  • Can keep history of transaction processing of documents.
  • Instant approval status enquiry of the documents.
  • Documents will not be lost as they will be reaching the approvers via Admin.
  • Digital signature is required by the approver to accept or reject the document.
  • User can track the progress status of a submission and add comments once approved.

The EAS Application & Snapshots

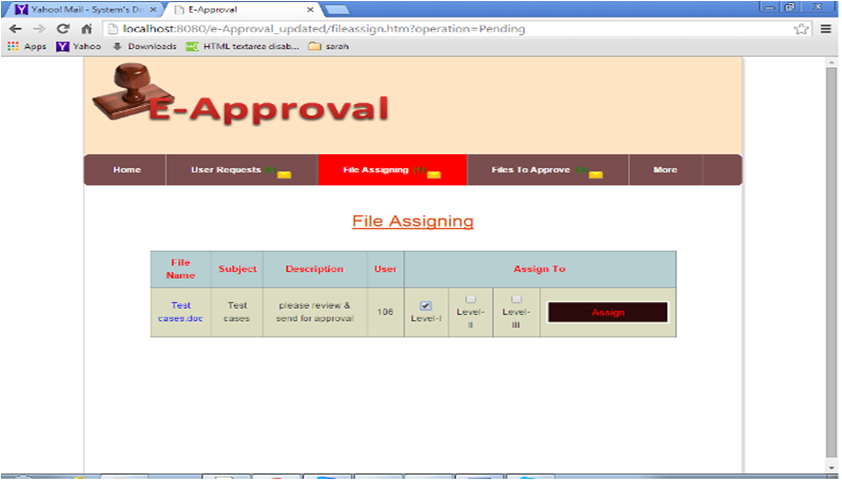
E Approval System Main Page

Admin File Assigning

Conclusion

The EAS has been successfully developed to ensure organizational decisions are made efficiently and tasks are approved in timely manner. The approval system is developed in Java and MySQL is used to store data. The frameworks, Hibernate and Spring, make the system more reliable and easy to operate.

The EAS realizes several functionalities such as: reducing redundant tasks; giving productive workflow with efficiency; and, providing centralized and consolidated feedback from the approver, reduced risk of errors, increased functional security, message encryption, and improved tracking progress status.

Future Enhancement

Although at this time, it has been thoroughly tested and implemented, it still may be enhanced with the following improvements in the future:

The EAS can add a chatting feature, which will help the User and Approver communicate, share ideas or make announcements within the system effectively.

The EAS can offer to build an internal document search engine, an easy way to search for previously approved documents.

The EAS can build a reminder feature, where the approvers are sent reminders to complete the approval process in timely manner.

The EAS can include additional functionalities in terms of user management and data security in the Admin module.

Magic Bouncing Ball Java Game

Magic Bouncing Ball

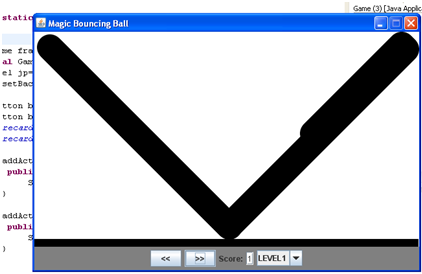
For the Game the displaying window is Frame. The Frame is window is imported from java.awt.Frame API. Some of the important methods in Frame class are setVisible and setSize without these two methods frame won’t be visible and the size will not be defined. The other methods used are setLocationRelativeTo(null) and     setResizable(false). The method setLocationRelativeTo(null) is used to display the frame in the center of the display screen. And the method setResizable(false) Will ensure the frame size is fixed you cannot minimize or maximize it. The background color of the frame is black.

Magic Bouncing Ball
Magic Bouncing Ball

Drawing the Ball:

We will be using paint method to draw a ball. The initial x and y co-ordinates are 0, 0. The diameter is 40, 40.

publicvoid paint (Graphics2D g) {

g.fillOval(x, y, DIAMETER, DIAMETER);

}

the moveBall() method we are incrementing the “x” and “y” co-ordinates with 1.

Which will move the ball from its position and by using repaint() we are achieving it.

super.paint(g) cleans the screen.if its hidden this what going to happen.

Magic Bouncing Ball1

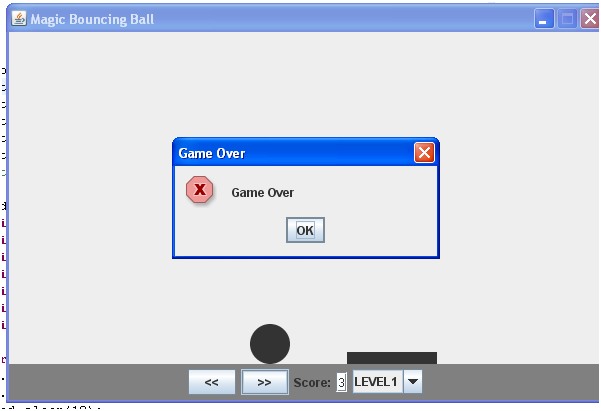
Score is displayed: it is displayed in a textfield which keeps on changes as the number of times the ball makes contact with the shaft below once it misses then the game is ended and a dialog box appears saying end of game and after clicking ok button the frame is closed.

Magic Bouncing Ball2

g2d.setRenderingHint(RenderingHints.KEY_ANTIALIASING,RenderingHints.VALUE_ANTIALIAS_ON); it makes the border of the ball smoother.

In the below section of code we see that there are two properties “xa” and “ya”, which represents the speed in which the ball is moving. If xa = 1, the ball moves to the right, one pixel every round, if xa = -1, the ball moves to the left. In the same way ya = 1 moves the ball down and ya = -1 moves the ball up. This is do ne with the lines, “x = x + xa” and “y = y + ya” of the moveBall( ) method.

When the ball reaches the right border or when (x + xa > getWidth() – 30), what we`ll do, is to change the direction of the movement on the “x” axis or what is the same we assign -1 to “xa”; “xa = -1”.

Events used:

Use of MouseEvent:

addMouseListener(new MouseListener() {

publicvoid mouseReleased(MouseEvent arg0) {

setBackground(Color.gray);

}

publicvoid mousePressed(MouseEvent arg0) {

setBackground(Color.green);

}

publicvoid mouseExited(MouseEvent arg0) {

setBackground(Color.gray);

}

publicvoid mouseEntered(MouseEvent arg0) {

setBackground(Color.blue);

}

publicvoid mouseClicked(MouseEvent arg0) {

setBackground(Color.cyan);

}

});


All 5 methods of Mouse Listener is used here for changing the background color of the frame.when the mouse enters the frame the color changes to blue and when the mouse is exited from the frame the color changes to gray.

addKeyListener(new KeyListener() {

publicvoid keyTyped(KeyEvent e) {

}

publicvoid keyReleased(KeyEvent e) {

racquet.keyReleased(e);

}

publicvoid keyPressed(KeyEvent e) {

racquet.keyPressed(e);

}

});

KeyEvent:

addKeyListener(new KeyListener() {

publicvoid keyTyped(KeyEvent e) {

}

publicvoid keyReleased(KeyEvent e) {

racquet.keyReleased(e);

}

publicvoid keyPressed(KeyEvent e) {

racquet.keyPressed(e);

}

});

publicvoid keyReleased(KeyEvent e) {

xa = 0;

}

publicvoid keyPressed(KeyEvent e) {

if (e.getKeyCode() == KeyEvent.VK_LEFT)

xa = -1;

if (e.getKeyCode() == KeyEvent.VK_RIGHT)

xa = 1;

}

In the keypressed method as you can the see the event object gets the key code which might be left,right,up,down. So based on the it is compared to KeyEvent.VK_LEFT if it it is equal it will move the shaft to left or Right. Based on the xa value.

ActionEvent:

b1.addActionListener(new ActionListener(){

publicvoid actionPerformed(ActionEvent e) {

Racquet.buttonClicked(e);

}

});

b2.addActionListener(new ActionListener(){

publicvoid actionPerformed(ActionEvent e) {

Racquet.buttonClicked(e);

}

});

publicstaticvoid buttonClicked(ActionEvent e)

{

if(e.getActionCommand().equalsIgnoreCase(“<<“))

xa=-1;

if(e.getActionCommand().equalsIgnoreCase(“>>”))

xa=1;

}

publicvoid buttonIdeal(ActionEvent e)

{

xa=0;

}

For the buttons b1,b2 when have two action events when you press any of the button the method getActionCommand will get the text on the button and will match it with the equals method text which is << ,>> whichever is matched it will move the shaft to that direction based on the xa value.

ItemEvent:

                 It is added to combo box where you are given an option to select the level you want to play. It will only display the JOptionPane instead of switching to the next level.

final JComboBox combo=new JComboBox();

combo.addItem(“LEVEL1”);

combo.addItem(“LEVEL2”);

combo.addItem(“LEVEL3”);

final String speed=null;

combo.addItemListener(new ItemListener() {

publicvoid itemStateChanged(ItemEvent ie) {

if(combo.getSelectedItem().equals(“LEVEL1”))

{

  1. showMessageDialog(null, “Level Increased 1”);

return;

}

if(combo.getSelectedItem().equals(“LEVEL2”))

{

JOptionPane.showMessageDialog(null, “Level Increased 2”);

return;

}

if(combo.getSelectedItem().equals(“LEVEL3”))

{

JOptionPane.showMessageDialog(null, “Level Increased 3”);

return;

}

}

});

WindowEvent:   In the program we have used Frame so we must write the closing frame code for closing the frame. windowClosing() will be used to close the frame.

frame.addWindowListener(new WindowListener() {

publicvoid windowOpened(WindowEvent arg0) {   }

publicvoid windowIconified(WindowEvent arg0) {}

publicvoid windowDeiconified(WindowEvent arg0) {         }

publicvoid windowDeactivated(WindowEvent arg0) {       }

publicvoid windowClosing(WindowEvent arg0) {

  1. exit(0);

}

publicvoid windowClosed(WindowEvent arg0) {                 }

publicvoid windowActivated(WindowEvent arg0) {           }

});

Magic Bouncing Ball4

Automatic Remark Notice Generation

Introduction:

This Automatic Remark Notice Generation project deals about generating an automatic notice about the mistakes made by a student. Earlier in all educational institutions when a student commits a mistake they used to manually maintain record of the students mistake and generate notices manually.

But with the “Automatic remark notice generator” we maintain a database which consists all the details of the student and the mistakes done by the student.

Once the data is entered into the remark database a notice is generated automatically and posted to his/her respective department and to the administrative office.

Every college has rules and regulations which every student must follow, and these generally fall in two categories.

One is ‘general college rules’ and the other is ‘examination rules’.

Our project is about maintaining records of the student in a database that violate the above rules and generating a notice.

Once the notice is generated, this notice is automatically mailed to the corresponding head of the department and to the administrative office.

A notice is generated only when a student commits a serious mistake.

Existing System:

Many educational institutions maintain the details of the student as hard copy.

In the existing system a person should manually generate a notice every time the student commits a mistake.

Generating such notices needs lot of human intervention and time.

Drawbacks of Existing System:

1. Maintaining these records as hard copies is a tough task.

2. Generating a notice manually is a time taking process.

3. To analyze how many times a student made a mistake is tough.

Proposed System:

1. Stores the mistakes made by the student in a database.

2. Based on the mistake a notice is generated automatically.

3. The generated notice is automatically mailed to respective department.

Automation of Department Library Java Project

Introduction:

The Automation of Department Library project is aimed at developing an Automated System for the Department library. Department library as the name itself indicates that the library system within a department.

Existing system:

Here faculty will request the book, then the administrator will search for it and if the book is available it will be issued to them.

Collecting books from central library:

Books, journals and other are provided to each and every department. After receiving the books the administrator will send an acknowledge to the library.

Updation of files :

All the updations regarding book issues and returns are done manually.

These files are used for further references.

Demerits of existing system:

  1. More manual work as the number of books increases.
  2. More time consuming for searching and updating the files.
  3. Consumes large volume of paper work and time.

Proposed system

In the proposed system the administrator will do all the updations like issues, returns and any other operations automatically, which reduces the time consumption and increases the efficiency of the system.

Requirement analysis:

Functional requirements

This section describes the functional requirements of the system for those requirements which are expressed in the natural language style.

Administrator will login to the system, and mention the required book details so a list will be generated automatically and he checks the status of the book, he can update, verify the faculty registration details etc.,

Architecture:

Automation Of Department Library Architecture

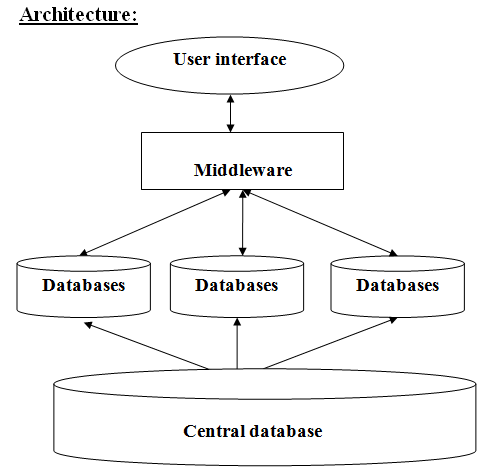
  • The architecture has central database, which provide the base for the system.
  • In the next layer we have a separate database for each department.
  • Then the middleware which connects user interface to the requested data in database.
  • User interface is top most layers through which the end-user interacts.

Scheduling:


Scheduling is an activity that distributes estimated effort across the project planned duration by allocating the effort to specific software engineering task.

The table above shows the schedule that we incorporate into our project to make the project meet all its requirements in time.

Risk management:

“Risk is the potential future harm that may arise from some present action”. Risk Management is a process that is used to minimize or eradicate risk before it can harm the productivity of a software project. With only 28% of software projects finishing on time and on budget, risk and the management of risk play an important role in software development.

Assessing Overall Project Risk

The following table shows some question and answers regarding the analysis of risk.

Question Answer
1. Are requirements fully understood by project team?
2. Do end users have realistic expectations?
3. Are requirements stable?
4. Is number of people on the project team adequate to the job?
5. Does the project team have right mix of skills?
6. Does the project team have experience with the technology to be implemented?

The degree of risk in the project is low.

Cost Risk:

Cost risk is the degree of uncertainty that the budget will be maintained.

Support Risk:

It is the degree of uncertainty that the resultant software will be easy to correct, adapt and enhance.

Performance Risk:

It is the degree of uncertainty that the product will meet its requirement.

Progress:

We are as per the schedule i.e. now we are planning stage. Some of the work regarding planning has been completed and remaining has to be done.

Recipe Publishing Management System Project

The purpose of this Recipe Publishing Management System Project is to define scope and requirements for recipe publishing tool  to be developed for Specialty food chain. This chain has become popular in various kinds of cuisines across country.

A brief background for this initiative goes back to company’s marketing strategy of sharing their most popular recipes on their website. Recipes added to the site did not appear in the Google’s recipe search of content with rich snippets. They lacked the necessary format for narrowing down search based on parameters like Ingredients, calories, cooking time etc.

On analysis of their implementation it was discovered that the recipes were published in a plain HTML, whereas Rich Snippets required adherence to the Microdata format as mentioned in www.schema.org.
Recipe Publishing Management System will provide:

1 . Simple interface to enter recipes.
2 . Automatically generate the recipe html for publishing on the website.
3 . The recipes published as Rich Snippets, will comply with the Microdata
format requirements of Google’s recipe view.
This document is the primary input to the development team to architect a solution for this project.

System Users:

The Chefs and the food chain’s Management will be users of the tool.

Requirements:

The recipe tool is required to capture and store the recipes in a format understood by the Google’s recipe search. The following layout is a sample search result of a popular Indian dessert ‘Kheer’.

The recipe view displays the content in Rich Snippet format providing information about the name of the recipe, website, preparation time, a brief description. The left panel displays the options for narrowing down the search ingredient or calorie count wise.
Create/Maintain Recipes:

The tool will display an intelligent form for capturing required recipe details to ensure automatic HTML publishing, compliant with recipe micro format by construction.

The form will include the Rich Snippet fields such as Picture, Preparation time, Cooking Time, Overall Time, Key ingredients, and Calorie count. It also allows classification of the Recipe as ‘Entrée, Main Course or a Dessert’. In addition, it includes information like Name of the Dish, Recipe Published date, Summary, Nutrition information, Ingredients, Steps to prepare the dish, and a Video if available.

The recipes can be saved as draft and published once the information entered is complete. The user can modify the recipes once they have been published.

The HTML will be published in the directory based on the category of the recipe. For example, under HTML root there can be directories like “entrée”, “main-course” and “dessert”.
For testing purpose, set-up a simple web server and point it’s HTML root so that it maps to the recipe’s category directory structure.
About Microdata:

While HTML tells the browser how to display the content, Microdata format adds semantics to the content being published by HTML. With these additional tags, search engines are able to recognize the underlying meaning of the content.

Using Microdata you can help search engines and other applications better understand your content and display it in a useful, relevant way. Microdata is a set of tags, introduced with HTML5, which allows you to do this. Read more about Microdata on http://www.schema.org/docs/gs.html.
Recipe specific schema can be found at http://schema.org/Recipe URL. Google’s guidelines for recipe may be found at http://support.google.com/webmasters/bin/answer.py?hl=en&answer=173379 URL

About Rich Snippets:

Rich Snippets make the search results meaning full for the user by providing highlights of the entry in a manner that either meets the user’s expectation or invokes interest to click on the link and get to the details. Referring to the recipe view shown earlier in the document, analysis of the search results shows each entry is displaying the key highlight of the dish e.g. Picture of the dish, brief description, preparation time, review ratings, calorie count etc. This kind of information contributes towards making a Rich Snippet of the Recipe. You may read more on
http://googlewebmastercentral.blogspot.in/2009/05/introducing-rich-snippets.html URL.
Testing Guidelines:

The published HTMLs must be validated using Google’s Rich Snippets Testing Tool available at http://www.google.com/webmasters/tools/richsnippets URL.

Development Environment:

Recipe Publishing System will be developed as a web application using Java/JSP and DB2 database. Eclipse will be used as the IDE for the same. Knowledge of XML is a must for this project.

Health Record Management System Project

INTRODUCTION:

The Health Record Management System is used in order to simplify the conventional way of checking in patients where we can increase the availability and usage of the information in the record, improve the quality of information as well as health care and benefit each patients checking in as well as the whole of medical community.

MOTIVATION:

We choose this area of interest because it helps us maintain and store the records of the total health care management inclusive of patients, doctors, nurses as well as the pharmacists.

MODULES:

  • Registration
  • Case Records
  • Daily Entries
  • Drug Store

PROJECT GOAL:

The main motto behind this project is to generate the automated information of the patients there by checking the previous history of the patients and reducing the time consumption.