Existing System
Following are the S/W for Procurement Process and Managing the database for all the projects of Programme ANSP from Demand – SO – Payments – Stores Inventory.
Challenges: Following are the Challenges in using the above-mentioned Inventory Management S/W
- Multiple Client–Server Applications for data capturing.
- Systems are very old and hence they are not able to cope with the latest S/W and H/W.
- No communication between the applications.
- No linkage between the projects, every project has a separate schema and instance.
- Few processes cannot be automated.
- The database may not be in normalized form.
- Database structures may not be uniform across systems.
- Effort duplication might be happening for data entry and reporting.
- Software Maintenance may be a major concern.
- No online approvals.
Proposed System
To Overcome the above-mentioned problems, an attempt is made to develop a Web-based product Stores & Inventory Management Project which is centralized, fully integrated having/ all the required functionalities of the existing system. Product Stores & Inventory Management Project will have FIVE major modules, Master, User Management, Procurement and Store Inventory, Payments
General Features
- A centralized, fully integrated System that can integrate all required functionalities of existing systems.
- Should be able to handle any number of Projects without having any additional instances.
- Organizational Changes should not impact the system.
- Optimization in business process Automation.
- Leverage the advantage of new technologies like Java, Spring, Hibernate, and Oracle RDBMS 11g.
- Multiple users would access this application software with proper Authentication.
- The proposed system should work both on LAN and WAN (TBD Internet), is a web-based application, and is easy to configure. This system would be developed in a user-friendly way.
- Business Rule and Workflow for optimizing resources and reduction in Data entry redundancy.
- Online approval can be done based on their roles and their responsibility.
Functionality Features
- Reports(Item/BOM/System/sub System/Article wise summary, Lifted Items, Shortage Lists, Expired items list, and Final Built-in Report), Various reports to be generated throughout the Procurement, Inventory and other stages such as Proposal, Sanctions, Demands, Enquiry, Inventory, IR and Voucher Gate Passes
Transaction logs
- Transaction log shall keep track of data items added, changed, or deleted.
For records that are added, the data items logged shall be:
- User ID of the user who activated the functions.
- Function name
- Date/Time of the action
- Data items added
For records that are modified, the data items logged shall be:
- User ID of the user who activated the change
- Function name
- Data items after and before the change of action
For records that are deleted, the data items logged shall be:
- User ID of the user who activated the function
- Function name
- Date/time of the action
- The add/change/delete functions which shall be logged in the transaction log shall be a different functional requirement given in this document.
Access Control
- A valid user ID and password should be entered in order to access the Product Stores & Inventory Management application. Only the project administrator can create or disable user accounts.
- A timeout to log out feature would be set for non-active sessions or sessions idle beyond a certain time period. Proper session management for the application would be set so those non-active sessions would be automatically logged out.
System Overview
The purpose of this document is to present a detailed description of the Web Publishing System of the “Product Stores & Inventory Management Project” for ANSP (Advanced Naval Systems Program).
System Architecture
- Layered Approach
Product Stores & Inventory Management Project application would be developed in a layered approach. This would enable the team to work on different components independently and also for faster development. It increases flexibility, maintainability, and scalability. It helps in configuring different levels of security. It also helps in testing components independently.
- The user interface layer is which all end users would view. All UI components are created and integrated with the business layer.
- In the business/ service layer, business objects help us in defining entities. Using these business objects, business logic is developed and attached to services. These services are exposed through an application programming interface (API).
- The data access layer would connect to the database by using hibernate. Hibernate is a high-performance object/ relational persistence and query service. It not only takes care of the mapping from java classes to database tables and from java data types to SQL data types but also provides data query and retrieval facilities.
- The repository includes a database and file system. The file system would include all the attachments uploaded through the application.
- Audit log, security & external application integration would include auditing, and tracking of all actions and activities done by users. All integrations like SMS, email, and any hardware integrations are done in this layer.
- Detailed Application Layer Architecture
This Inventory Management application would be developed in three-tier architecture i.e. Client, application and data tier. In the client tier, all end users can access by using a web browser and interact with the Product Stores & Inventory Management Project. UI components would include JSP, CSS, java scripts, and JSON. In the application tier, the application design would be included with presentation, business logic, and data access layers. As discussed earlier, these layers would help applications for faster accessibility and faster development. Architectural styles would include REST i.e. representational state transfer and architectural pattern would be MVC (Model View Controller). In the data tier, services would get the data from the Oracle database and present it in the presentation layer so that the end user can view and take necessary actions.
Functional Modules
The Inventory Management Project contains the following Main Modules
- Stores & Inventory Management
Store inventory management is a module that enables the maintenance of accurate inventory of its products. The following are the modules.
- Issue of items
- FIM Issue using Gatepass
Store Inventory Module:
The Store Inventory would deal with functions like receiving items into inventory and issuing items from the inventory to the requested user based on approval. The system should generate vouchers as per the store’s format for both issues and receiving. Procurement and Store Inventory uses well-designed Web Forms for specific actions required by the users.
Operating Environment
This product will be developed mainly using open source technologies like apache, Java, Spring, Hibernate, Ext-JS, and Windows Operating System for developing this product.
|
Server Operating System
|
Ubuntu Linux or any other flavor of Linux
|
|
Language / Tools
|
Java, J2EE, Hibernate, ExtJS
|
|
Client O/s
|
Windows 7 and Above
|
|
Database
|
Oracle 11g
|
|
Application Server
|
Jboss/Apache Tomcat
|
|
Web Server
|
Apache2
|
|
Browser Support
|
Chrome, Mozilla Firefox 10+, Internet Explorer 9.0 and above
|
Server Hardware requirements:
|
Processor
|
Intel Xeon Processor 2.1 GHz
|
|
Memory (RAM)
|
16 GB or higher
|
|
Storage Capacity (HDD)
|
Minimum 500 GB
|
|
Port Speed:
|
10 Mbps Public & Private Networks
|
System Features & Requirements
Capability Requirements
This subsection provides a high-level overview of the major capabilities of the Project.
Users Capabilities
The System will provide the following capabilities to users:
- The Product Stores & Inventory Management Project will enable all authorized users to:
- Provision to Raise Material Gate Pass
External Interface Requirements
User Interfaces
The user would then enter the required data for processing and press the Save or Submit button, after which the processing would be done and the user would be returned to the main page.
The user would then be able to use the different functionalities of the Product Stores & Inventory Management Project by clicking on various links that are provided on each page.
There would also be a Logoff button which would help the user to end his session with the application and he will be transferred back to the login screen.
Functional Requirement
Login
Description & Priority
This feature will be used to LOG IN to the application (only permitted users can use the PMS). It is done in order to prevent any misuse of PMS
Login users:
User, HOD, PGD, PD, Admin, PJB, PMB (Approval Members), and Office users/Clerks can log in with their assigned User names and password.
Stimulus / Response Sequence
When the user gives the correct username and password combination, he/she is transferred to the main screen or the PMS main page.
Functional Requirements
Purpose
To check the credibility of a user and to prevent any misuse of the product.
Inputs
The input will be a username, password combination, and project associated with the program.
A user can have multiple roles and a role can have multiple features. The change password feature should be with admin only; if the user wants to have a change password feature user has to enter a security question that is provided by the user at the time of user registration.
Output
The user will be transferred to the PMS main page on successful validation and will be alerted if the validation is unsuccessful.
Validations:
Login Credentials.
- After login user access only assigned project-specific and assigned role-specific data. Here users can be assigned multiple roles and multiple projects.
- There will be one default project and default role configured.
PMS Login Use Case
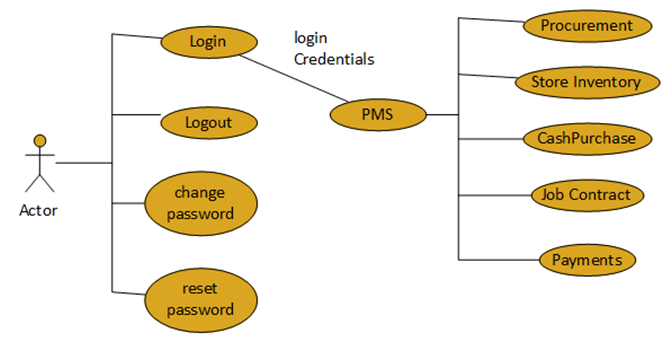
PMS Login Use Case
MATERIAL GATE PASS
Free issue material is the item that is issued to the respective supplier in order to develop/manufacture the required item.
FIM has been categorized into two types.
- Returnable
- Non-Returnable
Generation of returnable and non-returnable gate passes.
- Before gate pass generation user has to raise the gate pass requisition in a specified format with an auto-generated gate pass requisition number.
- If the type of gate pass is returnable then PDC (Proposed Date of Completion) has to be mentioned (Mandatory).
- If the gate pass purpose is FIM then QA/QC approval is required.
- After the gate pass requisition is approved the generation of the gate pass is done by the admin.
- The below Screen is for requisition for gate passes. To generate a gate pass, the admin has to select the gate pass requisition number on the gate pass generation page and get the gate pass requisition details with some entry fields like packed by & date, supervised by, SOB Number, and date.
- After taking the concerned officer’s approval gate pass with items went to the security office for the check, if approved out of control number.
Gate Pass System
- For the issue of an item/ BOM for an outside organization or supplier then the issue has been done by raising gate pass requisition.
- Gate Pass requisition of two types 1) returnable and 2) non-returnable.
- After gate pass requisition approval takes place and approval has been done the store admin raises the gate pass with item information.
- Sends the item with gate pass to the security to out that item.
- For gate passes also concerned officer’s approvals are mandatory
Gate pass requisition
Returnable:
In the case of items issued on returnable gate passes, the cost of FIM will not be added to items received in the supply order.
- Requisition gate pass raised by user &approved by project director
- Gate pass raised by store member/ issued by store member which required authorized officer’s approval.
- Issue of returnable gate pass max period allowable is 11 months (In PDC, it has to be mentioned).
- The system has to prompt/alert two weeks before the expiry of the above period in returnable gate pass.
- FIM BG (bank guarantee) by vendor needs to do for a specific time and date.
Provision for a check box indicating the required FIM BG amount is available in the preform
Non-Returnable
Non-returnable gate pass would be generated for the following:
- Transfer to other work centers (other labs/inventory) on a permanent basis
– FIM BG (bank guarantee) by vendor needs to do for a specific time and date.
– External issue voucher prepared by the stores with a gate pass
– Inclusion of FIM cost lot-wise/Total cost of supply item when delivery takes place.
– External issue voucher with a gate pass both need to approve
- Requisition gate pass raised by user & project director
- Gate pass raised by store admin which required authorized officer’s approval.
- External issue vouchers are prepared for all items irrespective of their destiny.
– Deduction from stores will be done after approval of external vouchers from respective users and authorities and receipt of Voucher (Acknowledgement) details from another unit.
– FIM gate pass going to labs conversion issue voucher prepared for items flight hardware.
– Nonflight items FIM to other labs external voucher, transfer voucher, and gate pass issued
– Certified received voucher (CRV) from the other inventory once received, the external voucher is prepared.
Note: All items go through returnable/non-returnable gate passes only.
In case a vendor brings an item for entry into the project, a pass is prepared by MMG and sent to Security online to allow the firm inside.
In order to deny permission for entry to those items that were sent on returnable gate passes, it is suggested that a format/ screen be provided for the user to request for the issue of pass by MMG. In that format, the User has to state whether the items being brought inside by the vendor have gone out on returnable gate pass or are being supplied on S.O He has to give reference to S.O or returnable gate pass.
Where a gate pass is prepared whether returnable or Non-returnable, periodically the control no and date issued by Security is to be entered against the gate pass. In case of returnable gate pass corresponding control no and dates are also to be recorded.
Gate pass generation
- After gate pass requisition approvals, store admin generates gate pass to out the items which are issued to outside organizations/ suppliers as requested item/ BOM (FIM) wise.
- By taking concerned authority approvals stores admin sends the same to security to out the item/ BOM.
Generation of returnable and non-returnable gate passes.
- Before gate pass generation user has to raise gate pass requisition in a specified format.
- If the type of gate pass is returnable then PDC (Proposed Date of Completion) has to be mentioned (Mandatory).
- If the gate pass purpose is FIM then QA/QC approval is required.
- After the gate pass requisition is approved the generation of the gate pass is done by store members.
- The below Screen is for requisition for gate passes. To generate a gate pass, the admin has to select the gate pass requisition number on the gate pass generation page and get the gate pass requisition details with some entry fields like packed by & date, supervised by, SOB Number, and date.
- After taking the concerned officer’s approval gate pass with items went to the security office for the check, if approved out of control number.
Gate Pass Requisition Screen for Returnable/ Non-Returnable:

Gate Pass Requisition User Interface
TBL_GATEPAS_REQUISTITION
TBL_GATEPASS_ITEMS