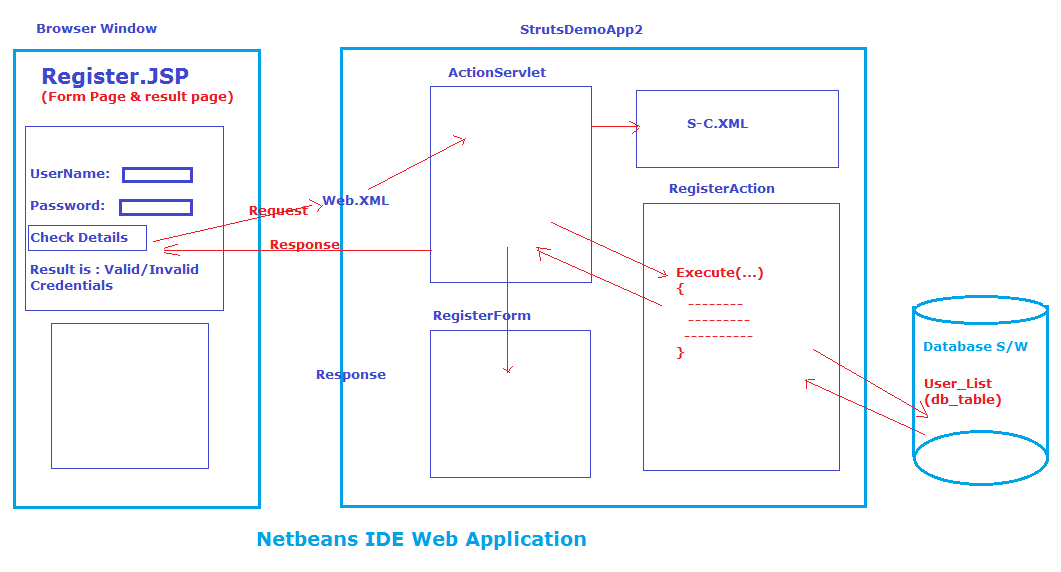
Netbeans Introduction:-
- Type: IDE software for java environment.
- Vendor: sun Microsystems (oracle corp).
- Open source software.
- To download from www.netbeans.org gives glassfish as built-in server also allows configuring other extend servers.
- To get help: www.netbeans.org version: 6.7.1 (compatable with jdk1.5/1.6).
- Netbeans IDE is good for web application.
Database table of Struts application:-
SQL> create table user-list (username varchar (20), password varchar (20))
>insert into user-list values (‘ramu’, ‘jalli’);
> insert into user-list values (‘ramu’, ‘pass’);
Query of the Struts application:-
Select count (*) from user-list where username = “ramu” and password = “jalli”;
Count (*) ->1 (Valid credentials) (or) count (*) -> 0 (invalid credentials)
Procedure to develop in the above diagram Struts application by using NetBeans IED:-
Step1:- create java web project in Net Beans IDE by adding Struts capabilities to it.
File –> new project –>java web –>web applicatio –>Next –>
Project name: StrutsDemoApp2 –>Next –>Next –>
Select Struts 1.3.8
Select ass Struts tld –>finish –> Delete endex.jsp, Welcome Struts.jsp files.
Step2: Add ojdbc 14.jar file to the libraries of the project.
Right click on libraries –>add jar –>ojdbc14.jar file browser & select.
Note:- Jar files added to the my computer class path environment variable is not visible & access with projects created in IDE s/w. so add them to the libraries of IDE project separately.
Step3: Add form bean class to project (RegisterForm)
Right click on source packages folder –>new –>Struts Actionform bean
Classname: RegisterForm
Package: app.ram –> finish –>delete existing code of RegisterForm class
–> declare private string username, password; –>select this line & right click –>
–>insert code(Alt+insert) –>getter & setter methods.
Step4: add Action class to Struts application (project)(RegisterAction)
Rightclick on source package –>new –>Struts Action
Classname: RegisterAction
Package: app
Action path: /register –>next
ActionFormbean name: RegisterForm
Scope: .session O request –> finish.
Step5: add action forward configuration to RegisterAction class configuration pointing to register.jsp.
In Struts-config.xml
<action name = “RegisterForm” path = “/register” scope = ”session” type = “app.
RegisterAction”>
<forward name = “result” path =”/register.jsp” />
</action>
Step6: add register.jsp to the profect
Right click on web pages –>new –> jsp
Filename: register –> finish.
Register.jsp
<% @ taglib uri = “/WEB-INF/Struts-html.ltd” prefix = “j” %>
<% @ taglib uri = “/WEB-INF/Struts-bean.ltd” prefix = “bean” %>
<% @ taglib uri = “/WEB-INF/Struts-logic.ltd” prefix = “logic” %>
<j: form action = “register”>
Username: <j: text properties = “username”/><br>
Username: <j: password properties = “password”/><br>
<j: submit value = “checkDetails”/>
<j: form>
<br><br>
Result is: <logic: notEmpty name = “msg”>
<bean: write name = “msg”>
</logic: notEmpty>
Write the following code in the execute () of RegisterAction class:-
Public ActionForward execute (-,-,-,-) throws exception
{
//type casting
RegisterForm fm = (RegisterForm) fm;
//read form page form data from form bean class object
String user = fm.getusername ();
String pwd = fm.getpassword ();
// write jdbc code
//create jdbc con object
Class.forname (“oracle.jdbc.driver.oracleDriver”);
Connection con = DriverMananger.get connection (“jdbc: oracle: thin: @localhost: 1521:
orcl”, “scott”, “tiger”);
// [ctrl+shift+I – gives import statement dynamically]
//create jdbc statement object
// preparedstatement ps = con. Preparestatement (“select count (*) from user-list where
Username =? and password =?”);
// set values to programs.
Ps.setString (1, user);
Ps.setString (2, pwd);
// send & execute SQL query in D>B> s/w
ResultSet rs = ps.execute Query ();
// process the result
Int cnt = 0;
If (rs.next ())
Cnt = rs.getint (1);
If (cnt == 1)
Request.setAttribute (“msg”, “valid credentials”);
Else
Request.setAttribute (“msg”, “ivalid credentials”);
Return mapping.findForward (“result1”);
}
}
Step7: Run the project.
right click on project –>Run
- Most of the IDE software’s redeploy’s the project (web application) once modification are done in the source in the source code of the project.
- In order to make ActionServlet as front controller we need to configure the ActionServlet class in web.xml file either with extension match url-pattern or Directory match url-pattern.
Procedure to make first Struts application working with directory match url-pattern based ActionServlet class. (with respect to 1st app.)
Step1: configure ActionServlet in web.xml file having directory match url-pattern
In web.xml
<servlet-mapping>
<servlet-name> action </ servlet-name>
<u-p> /x/y/* </u-p>
</servlet-mapping>
Step2: configure the target action class of form page by having the following action path.
In Struts-config.xml
<action path = “/x/y/register” type = “app.RegisterAction” name = “rf”>
<forward name = “result” path = “/register.jsp”/>
</action>
Step3: design form page Action url as shown below
<% @ taglib uri ———-
—————-
<html: form action = “/x/y/register”>
Username: < ——
Password: < ———–
<html: submit
</html: from>
Step4: develop remaining resource of application like other regular struts applications.
Conclusion:-
It is always to recommended to configure ActionServlet with Extension match url pattern.

