Stay Safe Women Security Android App Project Report

This system is for women’s safety and overcomes existing systems. This GPS system is the “Women’s Safety App”. It consists of a GPS device, an Android phone. The unit will provide status information such as latitude, the longitude of the user.

The proposed App is based on advanced sensors. Each time a user makes a phone call, an emergency signal will be generated automatically and then an information alert will be sent to the contacts that have been added to the emergency call.

low-battery alarm: when the user’s battery will be less than 10%, a low battery alert message will be sent to the emergency contacts.

In the new application, we provide a user-friendly connection where the user can send notification information in a simpler and more intelligent way. The user did not need to forget all the important contact numbers for their siblings or friends. The new system is also interactive for users and gives them the opportunity to get to know the police, the hospital, and their location.

GENERAL FUNCTIONALITY


• User-friend interface.
• Time construction.
• Easy integration and access.
• Internal communication. SMS communication and information will be sent in case of an emergency.

PRODUCT FUNCTIONS

1. Scream Alarm: It works for both women and other users who need some kind of security alarm if they see if someone is following them or following them. At the same time, it consists of two other types of allergic reactions to radiation. It is the first move that will take some time and allows the user to get rid of the problem.

• Male voice scream
• Police siren.

The user can choose one of their options from the “Settings” program, as two other shooting devices have been added to this application because security and safety are everyone’s concerns today.

2. Fake Call Timer: Allow the fake call timer to allow the user to make false calls when needed. It helps the user to avoid any unwanted situation with an important call reference from anyone who needs it/he/she should hurry up and stop, depending on the user’s creativity. This feature also helps to save the user from social events
In order to make a false call, the user needs to select the icon “Fake Call” and after that, the user can specify from which name he/she wants a false call. Users can also set the timer as needed. Users can also select the default time from the “Settings” application in the application.
In a critical situation, the user is only forced to buy a very long false call button and automatically receive a false call in the settings according to the desired settings.

3. Where Are You: Your friend is at the party for the night. How can you control where that person is? That feature allows the user to find the latest location for friends and family if needed without the attention of the person being tracked.
When the first request is sent by the sender. The candidate is forced to select the “Where You Are” icon and then open a new dialog box with “Choose Friend”. The sender can select any friend and send the request to the recipient. One finally accepts this request and a message is sent to the recipient from the place where the user is currently receiving it.

4. Track Me: Our Track feature allows the user to see the dynamic location of the victim. The first user must send a Track Me application at the end of the receiver. The person agrees to the request and then his or her name is displayed on the friends you are running under the application. The user can select that friend from there and then it will be automatically redirected by Google Maps to the location where the user can see the exact location of the victim and also where he is going.

5. Friends List: This entry shows all contact numbers for family and friends that have been added by the user to the media. This can be done by selecting the contact icon in the lower right corner of the friend’s name.

6. Settings: The “Settings” function consists of the following features -:

• Emergency Services: This allows the Security Security application to send emergency and SMS messages to the right places from emergency contacts.
• Low Battery Alert: The low battery alarm feature allows the Stay Safe application to send emergency equipment and low battery batteries for emergency communication.
• Set Scream Sound: The user can select any beep sound as needed.
• Fake Call Timer(On Long press): The user can set the default time as required for false calls.

7. Emergency Distress Signal (SOS): An emergency signal is generated by the user in an emergency. In order to generate an emergency signal, the user has to shake his phone, then an emergency signal is displayed at the end of the user with a standard clock of 5 seconds. Finally, an emergency signal will be sent to the emergency contacts registered by the user. The application sends SMS and user information as well as the actual location of the user via a push message at the end of the receiver before the user sends the first emergency signal to activate the rescue functions from the application settings.
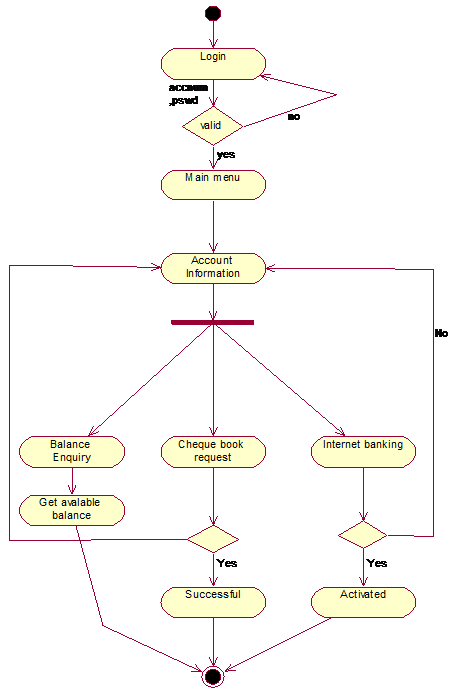
Data Flow Diagrams:

ata Flow Diagram Level 1
Data Flow Diagram Level 1
Data Flow Diagram Level 2

Output Results of the App:

When the user starts the application on their Android phone the first screen that saves the login desktop. First, it is necessary for the user to record the entry of information such as the name of the line and the contact number of the user.

After you enter the correct information to register, the authentication code (OTP) will be sent to the user in their contact address.

After logging in by the user, a pop-up window will open for the main program, which consists of the following functions:-

• Scream Function: The cookie function allows the user to avoid an unknown situation.
Users can also select the screaming style from the “Settings” icon as needed.

• Fake Call: Timer allows fake calls to be made by the user when they need to make false calls. It allows a quick call to be important to anyone who needs it/him/her quickly, to help the user get out of an uncertain situation. After a long time, the printout on the icon will also trigger a false call for the user.

Where are you? : Where you have the function to look at the static location of the user and the SMS will be sent at the end of the receiver with the actual static locations of the user.
After selecting the Where You icon, users need to select a friend from the friend’s address, and wherever they want you will be sent to the end of the receiver. The person accepts the request and the site will be sent to the end-user.

Track Me: Our Track feature allows the user to see the exact dynamic location of the victims. The first user must send a Track Me application at the end of the receiver. The person agrees to the request and then his or her name is displayed on the friends you are running under the application. The user can select that friend from there and then it will be automatically redirected by Google Maps to the location where the user can see the exact location of the victim and also where he is going.

Friends: The Friends list identifies the friends with whom the user is connected. The user can purchase a friend by selecting the “Add a friend” icon in the lower right corner. The user can add any contact number. directly or indirectly from “Contacts”.

Distress Signal (SOS): The emergency signal is generated by the user in an emergency. To create an emergency signal, the user needs to shake their phone, then there will be an emergency signal at the end of the user. The proper time to send this signal is 5 sec. A custom timeout is set so that the user can remove the signal from his / her end. Eventually, an emergency signal will be sent to the victim’s actual location for emergency contact. At the same time, a push message will be sent to the end of the user with all the details.

Download the attached Stay Safe Women Security Android App Project Report

Stock Market Analysis Python Project Report

Stock Market Analysis and prediction is a project for technical analysis, visualization, and estimation using Google Financial data. Seeing data from the market, especially some general and other software columns. Pandas used to take stock of the information, looked at different aspects of it, and finally looked at it in some way to assess the risk of a stock based on its recent performance history. Competing with the Monte Carlo method in anticipation of future prices.

OVERVIEW

Stock exchange analysis is only intended for the analysis of stock company data for various organizations. Using this method of data analysis, any organization can easily extract relevant information.

AIM OF THE PROJECT

The main goal of my project is to analyze the data of all the institutions in which form we need.

PROBLEMS FOR THE ANALYSIS

Share financial data with quandl for the following companies:

  • Apple
  • Amazon
  • Microsoft
  • Google


Perform basic data analysis

  • Get last year’s data
  • Check Apple values
  • Indicate the final price
  • The stock market has seen a rate hike
  • Gather all the company data together for the final price


Make daily return analyzes and show the relationship between the different stocks

  • Percentage change plan for Apple product
  • Find a shared website for Apple and Google
  • Use PairPlot to show the relationship between everything

Perform risk analysis


CONCLUSION AND FUTURE SCOPE


We evaluated two basic measurements of the analysis and found no conclusive evidence about their estimated value.
These predictions are also very long-lasting and will see a year in the future. Suggestions on this scale are not the main project time. Instead, we will focus on predicting daily market trends. Because of these problems, we avoided basic analysis.

Performing risk analysis Results:

Download the attached  Stock Market Analysis python Project Report


Banking System through Voice Java Project Report

ABSTRACT

Overview:

This application is about the banking system through voice. The main aim of this application is to provide an easy way to fund transactions from one account to another account with the help of telephonic conversation.

Current Scenario: 

  • The present scenario has only two ways for transfer the funds from one account to another account. They are either doing the manual transactions on bank or using internet services.
  • This will become as a drawback for the people those who don’t have the internet service and those people who don’t know how to use internet.
  • We may not have a chance to every time come to bank.

Proposed Scenario: 

  • To overcome this type of problem, we are finding a new way which is used very easy by every common man is “VOICE BANKING”.
  • This will become very use for the people those who don’t have the internet service and those people who don’t know how to use internet. 

Application Features: 

  • Should provide the security for account holder name and credit card number.
  • Provides easy way of transfer the funds from anywhere.
  • Getting account holder information. 

Purpose of the project:

The purpose of this project is to use the services of bank like money transfer, knowing about the loan information, our account balance; our statement and we can also make and activate our cheque book request and internet banking services through voice only and without using any internet service. 

INTRODUCTION

There are a number of applications for speech coding. One of its applications is in “VOICE BANKING”. Speech coding plays an important role in voice banking where the compressed words from a telephone line are to be recognized by the speech recognizer used at the banking end. The speech recognizer at the banking end tries to understand the compressed spoken words in some way or the other and acts thereafter. With voice banking, the user can access the following services.

  • The user can check for balance on all his savings, current and loan accounts.
  • The user can know the history of his account like the debits, recent deposits, interests and check payments.
  • The user can make loan payments and Funds Transfer between two accounts.
  • The user can check for interest rates on various types of loans and on deposits.
  •  The user can stop the payments to be made.
  •  The user can make a report about the stolen or lost card.
  •  The user can have information about the ATM locations, bank branches and working hours.
  •  The user can speak at any time of the day to the bank’s customer service centre.

SOFTWARE REQUIREMENTS:

  1. Prophecy -8.0.98.2
  2. Jdk 1.5 (or) 1.6.
  3. Oracle 10g database.
  4. Tomcat web server.

INPUT AND OUTPUT

Inputs:

  • Users enter his or her account number and password.
  • User should select one from main menu
  • For fund transfer user should enter receiver account number and amount.
  • For any request user should prompt yes or no. 

Outputs:

  • Account information.
    • Balance enquiry
    • Successful creation of cheque book request
    • Successful activation of internet banking.
  • Loan information details.
  • Get the details of education,home,business and car loans
  • Fund transfer.
  • The amount of rupees 5000 is successfully transferred from sender account number. (When it is valid receiver account number).
  • Sorry the mentioned account does not exist. (When it is invalid receiver account number).
  • Call transfer.
  • User may contact with manager/assistant manager. 

Entity Relationship diagrams:

System Work-Flow:

Use Case Diagram for Main Menu:

Use case for fund transfer:

Class Diagram:

The sequence for the main menu:

Sequence for Account Information:

Sequence for Loan Information:

Sequence for Fund Transfer:

Sequence for Statement:

Sequence for Call Transfer:

Collaboration for Loan Information:

Collaboration for Fund Transfer:

Collaboration for Statement:

Collaboration for Call Transfer:

State chart diagram:

Activity diagram for Main menu:

Activity diagram for Account Information:

Conclusion

Voice banking is a very useful banking service in our daily life. Using it the users can access to their account information and other banking services like to know about the loan information and user also transfers their money to other users in 365 days a year, 7 days a week and 24 hours a day just by making a simple phone call.

Easy Market Android App Project Report

Presently handheld devices such as smartphones are using very huge. In short, we are using them to easy to solve our work. One application that falls into this category is Easy Market developed for Android phones. This application will help salespersons in managing the various types of Records such as client details, supplier details, product list and help to easily sell the product. The salesperson recording the details of the clients, suppliers, profit on paper is a time-consuming process. Also difficult to retrieve the previous records of clients, suppliers, product details.

This Easy Market Android App will solve the problem. The user can add a new product into the list by name, price or delete any product from the list which is not available in the market. It allowed changing the price of the product not affect the price registered in the catalogue of products. It shows how much the quantity of each product present in the inventory. It has an option to filter the products. It allows to record the customer details and show when he last came, what products he bought that day, the total price of the products. It records and shows the supplier details like the name of supplier, last visit, amount. It also displays how much profit he earn that day and how much is initial money at the opening of day and total money at the closing of the day.

The project “Easy Market” is developed with the objective of making the system reliable, easier, fast, and more informative.

Advantages:

  • Easy to maintain data.
  • Less time-consuming.

Easy Market is a mobile application used by the shopkeeper to record and manage the details of their shop like sales money. It is used to easily manage the details of the inventory and sell the product easily.

This application developed in android technology can install in any smartphones devices. This application contains various pages as clients, suppliers, sales, inventory etc. By logging in into the application shopkeeper can go to any page without recording in books.

Scope

To develop a product called “Easy Market” which is composed by an application for Mobile Devices and other Web management roles, users and information providers

The perspective of the product

Easy Market in a solution that will allow trade settlements through mobile devices like the Tablet, manage the operation of its business.

Product Functionality

The features that must have the applications are:

For mobile devices

  • Login
  • Client Details
  • Supplier Details
  • Inventory
  • Sales
  • Login Details

Assumptions and Dependencies

It should be developed for Android devices.

Predictable System Evolution

The system must be portable and scalable so that support users increased significantly and can be adapted to any type of establishment e.g. neighbourhood or shop etc.

Nowadays in general shopkeeper who used to record their shop details like client, product selling price, product purchase price, what is the discount on that product on paper and searching in the book. He/she used to search in books whether the client has to pay any amount in past and how much quantity of material still remaining in the shop. He uses a calculator to calculate the total amount of the bill.

Disadvantages of the existing system

  • Time-consuming.
  • Waste of paper.
  • Difficult to search and remember the details.

Proposed system

The proposed system aim is to reduce the difficulty of remembering the details and manage the shop details easily.

Advantages of the proposed system

  • Less time-consuming.
  • No paperwork.
  • No use of Calculator.
  • Reduce human effort.

Specific Requirements

Common Interfaces Requirements

Hardware Interfaces

• Input and output data are stored on the SQL Server 2014 database server.

• Development must support at least version 4.0 of Android.

Functional Requirements

Images of an example of what should be the requirements are attached in the next chapter.

Login

The application will ask for a username and password, previously created in the Database. The system must ensure that the username and password are valid, which otherwise will be left to the user in the login screen.

Client Module

• Enter this module list clients created with the value of the debt.

• You will have an option of creating customers where would deploy the user a screen where it will ask the following information:

Or required fields: name, Aadhar, phone, address, email address and gender.

Or non-obligatory data: the value of the initial debt. By default must be zero.

In the creation of the client should be validated by the number of identification card there is no customer.
• Created client list must have an option to edit customer data, in where it will display a window with the data of the client, allowing you to modify all data except for identification card and the value of the initial debt.
• Allow client search by the following filters: name and identification card.

• Whenever client doesn’t money to pay bill his debt will add to his details.

Supplier Module

• This module you enter providers that are created, data listed are as follows: Nit, the name of the manufacturer or distributor, a balance which is due.

• It will have a choice of provider creating, selecting this option would deploy a window to the user where requests the following information:

or – mandatory data: Nit., name, phone, address, visit (Monday, Tuesday, Wednesday, etc.) this field is multiple selections and frequency of visits (weekly, fortnightly and monthly.

or Optional data: name of contact and contact phone.

• When user unable to pay the total amount to supplier he can save the debt amount in this whenever required.

• The date when supplier last visit also record here.

Inventory Module

• Upon entering this module it lists the products created in the store. The following will show code of the product, the product description, quantity in the inventory, the price of sale and utility value.

• You will have a choice of creating the product. Selecting this option show the user a window where will ask for the following information:

or barcode: mandatory, to enter this field the system must validate if the product exists in the teacher’s products, if any product, you must bring the following information: name, group and line

or name: required field. It is the name of the product

or unit of measure: optional field. This field is for fruit and vegetable products. It allows selecting the type of measurement that will be used for the product (Kg and G) none for soap or others. It is not a mandatory field.

or purchase price: required field. It is the purchase price of the product.

or sale price: required field. It is the selling price of the product.

or quantity: required field. It is the amount that is the product.

or VAT: optional field. It is the value of VAT on the product. To create the product are:

• You will have an option to edit the product. Selecting this option will display the product data and allows to edit the following details: price sale, purchase price, taxes and supplier.

• You will have an option to search for products, search filters are as follows: barcode, name, internal code and provider.

• You will have an option to filter the list of products. The filters that you can arrange Products.

• Upon creating the product user need to arrange the product into his inventory. The first shop does not have any goods or products so the user needs to transfer his data from product module to the inventory module. Upon clicking the inventory module user will able to see his products which are present in his shop but not in the storeroom. He able to sell the items which are present in the inventory because the sales module navigate screen to inventory module only. So he needs to transfer shop products from storeroom to inventory.

• From product module user able to transfer products to inventory by entering the following data

Mandatory:-Quantity.

Not-Mandatory:-Unit of Measurement. Or any changes.

• Unit of measurement (UOM) is not mandatory because for bananas and sugar UOM is not the same.

Sales Module

• Allows to associate a client with the sale, the customer can be one registered (should be selected from a drop-down list) or one casual which is by default when this module is loaded.
• Be permitted creating users and payment of debt, as described in the customer module

• The user can register products on sale by either:

Or through a reader of the barcode in which case the screen the product price. Whenever You read the product is adding to the amount of reading product.

Or manually, where the user must have the following filters: name, barcode, code

Internal and the last 4 numbers of the barcode. When you select the product, will add the product on sale.

• Maybe delete some proceeds from the sale. Whenever you add a product on sale system calculate the Subtotal of sale, VAT and total sale.

• Should be allowed to change the quantities and price of a product manually. If the price is modified, this should not affect the price registered in the catalogue of products. However, if it should be recorded in the sales.

• At the end of the sale the user may choose different means of payment which are: Effective: would deploy a window with the total of the sale, a field to enter the value which is paying customer and a calculated field of change where it is calculated: the value paid by the customer, less the total of the sale.

This single payment method may be by customers of the store, for an occasional client does not appear this payment method. When you select this payment method displays a summary of the sale: the total sale, the name of the client and the client’s debt total. The system must add the total of the sale to the client’s debt.

• Discount value reduces the actual price cost.

• At the end of the sale system must subtract the quantities of each product in inventory.

• At the end of the sale system allows printing the invoice, where detailed invoice number, product, price, quantities and the total value of the sale.

• At the end of the sale system allow to modify and update the inventory module.

Login Details

• The time when the user last login details saved details as follows

Username, Date, Time.

Non-Functional Requirements

Performance Requirement

The Proposed system that we are going to develop will be used as a chief performance system in supermarkets. Therefore, it is expected that the database will perform functionally all the requirements specified by the user.

More Informative

The application is more informative because more information is stored in the database than paper stored information.

UML Diagrams:

Use case Diagram for Easy Market:

Class Diagram for Easy Market:

Sequence Diagram for Easy Market:

Activity Diagram for Easy Market:

Output Screens:

  • Login layout
  • Menu list layout
  • Client layout
  • Client Registration layout
  • Supplier layout
  • Supplier Registration
  • Inventory layout
  • Product Details layout
  • Product Registration layout
  • Product Details layout
  • Sales layout
  • Custom Sales layout
  • Saving Sales layout
  • Login Details layout

Conclusion

After the completion of the project, one can clearly say that our developed application will help shopkeepers in many ways to record the details. This is the easy way to record the details manage them. It can use by any persons who have a shop and who does not want to record the details of the shop not on paper to reduce his effort and time-consuming.

Online Book Store PHP Project Report

This Online Book Store PHP Project follows the concept of e-commerce in depth. This final year project is designed to sell products online from various categories of book collections mentioned in the project.

This project definitely helps the user to buy something from the internet because in the book store the user able to buy anything by selecting the book details and entering your online payment transaction details.

By using this output design, the user can save their time by buying the product that is wasting while roaming the market. From here they can probably get all the things they want as well as fast moving entertainment products. They have several options in the Single Collection.

First of all, I would like to say that the project is an essential part of our present educational system. If we are only by theory, it can not give us perfect knowledge.

This project report from the online book shopping website is against you for the project as a subject in

This site is developed with the purpose of studying the Computer Student. Provides computer e-book. It is also providing educational software for students. On this site, you only need to register the Buyers, which is also free. For this student, you must have a valid e-mail account, such as Yahoo, Rediff, Hotmail etc. This site Bookshopping.com is developed in JSP language.

This web application is quite easy to operate so that any student can use it easily.

Their collaboration in the form of suggestions and comments is welcome, to improve any knowledge and project.

We developed this site “Online Book Store System” which is developed in PHP as Front End and MySql as Back End.

I put a lot of effort into the design of this site. I did my best to meet all requirements efficiently.

This site provided services such as the email-based user account and will provide the student with the free download of the computer’s e-book. Besides providing software that is useful to students and a lot?

DATABASE NAME: Bookshop

1.Book Table
2. Category Table
3. Contact Table
4. Subcat Table
5. User Table

Screenshots Of Project

  • Homepage
  • Registration Form
  • Admin
  • Category
  • Item Details
  • View Cart
  • Book List
  • Contact

Software Requirement

1. Mysql

2. Web server

3. PHP (PHP Hypertext Preprocessor)

4. Notepad++

5. Macromedia Flash 8

Download the below attached Online Book Store PHP Project Documentation / Report

Online Job Portal Java Project Report & Source Code

Objectives of the project:

  • Registration
  • Login
  • Authenticating
  • Updating Profile
  • Posting a job and removing or modifying job
  • Searching for a job
  • Taking online exam
  • Feedback

LITERATURE SURVEY

There are many applications developed related to this Online Job Portal, but, however, these systems are very complex for their own purpose. Most of them do not have the centralized database and easy access to users. So in this project, we are implementing this application through a centralized database and easy-to-use access for job seekers and job providers. The administrator is the primary actor to maintain the database, and also accepts comments from job providers and job seekers to improve and develop the application’s graphical user interface. Registered job seekers can also take the company online exam. In addition, qualified applicants can be classified according to this system based on their qualifications and company requirements.

Limitations

• The current Online Job Portal system is not a fully computerized and manual system for entering job candidates and job provider data and managing it.
• There is no centralized database maintenance
• There is no easy access to records of people seeking work in particular
• Job seekers can not easily navigate through the database

Benefits

• It is a fully automated system for managing the Online Job Portal database
• This system provides centralized database maintenance
• This system provides easy access to certain job seekers or their complete details
This system gives job seekers easy to navigate through the application to get more information in the most secure way.

IMPLEMENTATION

5.1. MODULES

The system is divided into three major parts depending upon the requirement they are.

  • 1) Administrator
  • 2) Job Provider
  • 3) Job Seeker

Administrator

All the users are controlled by admin. Administrator services are

  1. view job providers
  2. view job seekers
  3. view feedback

Examination

The job providers prepared questions and update the providers and conduct examinations to the job seekers and also send the particular examination results.

And the job seeker searches the particular job then attends the exam and also views his results after completion of the exam.

Software Requirements: 

Operating System: Windows XP/2003 or Linux/Solaris

User Interface: HTML, CSS

Client-side Scripting: JavaScript

Programming Language: Java

Web Applications: JDBC, JSP

IDE/ Workbench: Eclipse with My Eclipse Plug-in

Database: Oracle

Server Deployment: Apache Tomcat 6.0

Screen Shots:

  • HOME PAGE
  • LOG-IN PAGE
  • ADMIN PAGE
  • JOB PROVIDERS IN DB
  • JOB SEEKERS IN DB
  • FEEDBACK PAGE
  • JOB PROVIDER PAGE
  • UPDATE PROFILE PAGE
  • ADD NEW VACANCY PAGE
  • SEARCH JOB SEEKER PAGE
  • RESULT PAGE FOR SEARCH JOB SEEKERS
  • EXAM MANAGEMENT PAGE
  • PREPARE EXAM PAPER PAGE
  • PREPARING QUESTIONS PAGE
  • ADDING QUESTIONS PAGE
  • RESULT PAGE FOR SEARCH JOBS
  • EXAM MANAGEMENT PAGE
  • TAKING EXAM PAGE

TEST CASE REPORTS 

Name of the page: Admin Login

Sno TEST CASE Expected Result Actual Output Remarks
 1 New Admin logged on without sign in. Should return a message sign in  before log in. Sign in First Success
2. Invalid password Enter correct password Wrong password Success
3. Invalid username Invalid User Enter valid name Success
4. Special character entered in password field. Verify your password You Entered Invalid password Success

Name of the page: Job provider Login 

Sno TEST CASE Expected Result Actual Output Remarks
 1 New provider tried to log on without sign up. Should return a message sign up  before log in.   Failure
2. Invalid password Enter correct password Wrong password Success
3. Invalid username Invalid User Enter valid name Success
4. Special character entered in password field. Verify your password You Entered Invalid password Failure

 Job Seeker Login 

Sno TEST CASE Expected Result Actual Output Remarks
 1 New seeker tried to log on without sign up. Should return a message sign up  before log in.   Failure
2. Invalid password Enter correct password Wrong password Success
3. Invalid username Invalid User Enter valid name Success
4. Special character entered in password field. Verify your password You Entered Invalid password Failure

Name of the page: Exam Management 

Sno TEST CASE Expected Result Actual Output Remarks
 1 Provider tried to add exam paper without scheduling Schedule first NULL Failure
2. Seeker tried to write same exam again exam already taken Can Write Failure
3. Displaying a message after time up in exam Time up Time up Success
4. Selecting exam before scheduling date Invalid test NULL Failure


A Study on Online Examination System Internship Project Report

INTRODUCTION TO THE MODULE

The Online Examination System project mainly intends to provide insight into the functionality and behavior of the Online Examination System. This project integrates computer and Internet technologies for the purpose of student assessment. It provides the options of the examinations available on the system according to the user privilege.

Based on the choice of the user, the system provides the questions related to that area. Mostly the questions are in the form of multiple-choice questions, they can also be filling in the blanks, matching, and essay questions. At the end of the questions, the user will be given the option to report or cancel the scores.

When a person enters the online test, a system will ask for a login id and password. If the person is authorized, by simply giving his login id and password he will enter filling the registration field based on the privilege. If the user is new he has to register as a user by filling in the registration details. While filling in the details he has to take care of privilege. If the user is a candidate, he has to take the privilege as “0”, the operator as “1” and admin as “2”. Once these details are filled, the user will be provided with a login id. With this login id, he can enter based on his privilege.

If the user is a candidate, as soon as he submits the login id he enters the area section. There he can select the area depending on which he wants to take the test. As soon as he selects the area he will be ready to take the test.

Depending upon the area selected questions the be displayed with four options and the candidate has to select the correct answer and proceed to the next question till the end of the test. The time is set for the test. The test should be completed within that time period. If he does not complete the test within the given time the test will be lost automatically.

After the test is completed, the candidate has the option to report or cancel his scores. If he wants the hard copy of the score report he can take it.

If the user is an administrator, as soon as he submits the login id he enters into the administration section where he has to handle both operator and candidate functions.

If the user is an operator or administrator, as soon as he submits the login id he enters into the administration section. In this, he can change the information of the candidate, view the candidate result, and status by simply giving the respective login and he can also modify or update questions in any area.

Product goals:

  • The goals of this Online Examination System are:
  • To automate the testing activity. The system will function with centralized control over all the units that are involved in the online test system.
  • Provide data security from unauthorized users.

OUTPUT SCREENS

when the user is an operator or administrator opts for the operator section the process will direct to the above screen. This screen can get the user to user edit, candidate view, current examinees, exam report, and areas report screens on clicking the corresponding link.

The candidate on starting the test comes to this screen; here according to the selected area, the questions are generated automatically from the data basest candidate has to select the correct answer by clicking the radio button corresponding to the question. He can stop the test by clicking the stop button else going to the next question.

The above screen is the start of the test, in which the user should validate his/her login id and password by clicking submit button, after entering their identity. New users can register their information by clicking the register button.

This screen is used when the user is not registered. It is used for registering new users by entering their personal information and then by clicking on the save button.

When a user wants to view candidate details he can get this screen by clicking the link of candidate view in the operator section. This screen gets the information of the status, Name, and login id of the desired candidate.

The current examiner’s screen gets the information of the login id name, status, and date he/she appeared for the test for the specified candidate. On clicking the details the exam report is generated. We can get a copy of the details by clicking the copy.

Based on the privilege of the user, he is directed to the next screen. If he is a candidate the user comes to the above screen. In this, he got to confirm the login id and should select the area where he is intending to take the test. The user can start taking the test by clicking the start button.

This question editor screens enable the user (admin/operator) to create and update the new question in the desired area and specified difficulty level. The user can also create a new question by clicking on the new question button.

This screen is used to display the details of the code and the related areas selected. This screen links the user to questions related to that area. Here the user can also create a new area by clicking the new area button.
This screen is used to create a new area code and name of the area by mentioning them in the specified text boxes and then clicking on the save button.

The candidate on starting the test comes to this screen; here according to the selected area, the questions are generated automatically from the database. The candidate has to select the correct answer by checking the radio button corresponding to the question. On clicking the ok button. The answer he opted for is stored in the data store and the next question is generated. He can stop the test by clicking the stop button. This happens to generate the exam report.

This screen enables the user to answer the numeric ability questions posted to him by clicking on the radio buttons which are given to choose the right answers. The user can also create a new question by clicking on a new question button.

This screen is viewed when the user types either the wrong name or password in the given text box and the button back is used to move back to the login page to re-enter the right login id and password.

The current examinee’s screen gets the information of the login id, name, status, and date he appeared for the test for the specified candidate. . It also tells about the total number of questions and right answers given by the candidate.

CONCLUSION

The Online Examination System has been successfully completed. The goal of the system is achieved and problems are solved. Final reports are generated as per the specification of the client. The package is developed in a manner that is user-friendly and requires help is provided at different levels.

The Online Examination project can be easily used in the process of decision making.

FUTURE SCOPE

To modify the Online Examination System project to the .Net platform to take the advantage of geographical remote areas. By shifting the project to the Dot Net platform the project can be made into a Mobile Accessible Application by which the restrictions of the software & hardware requirements can be scaled down, which is not possible using ASP.

we can even apply the unique identity of the user by keeping certain formalities that must be answered by the user while entering the test (like the user need to answer again the questions which he did while registering himself for the test) the questions selected will be in random order from his personal data only (like the mole present on the user, etc …) so that it may confirm that the user itself is writing the test.

we can even use the thumb mark of the users to confirm their identities.

We can even add the photos of the users in this to confirm the user Identity.
Thus by applying these steps we can make sure that the user itself is writing the exam, not the others.