Online Cafe and Salon Management System Angular Project

During the Internship, Students worked on various static websites which include websites of café and event management companies. My internship also includes work on the Angular project Salon management system. This management system includes my main contributions in the registration portal, login portal, password changing portal, membership and offer cards, and other registration and contacts forms. This summer internship provided me with team experience and helped me in developing my skills in Web development using HTML, CSS, and JavaScript. Students have worked with the development of the front end and design of a Company’s Website and Dashboard.

Overall, the Internship program helped me in different ways to grow my knowledge in my field and also gave me insight into how to work in a team with proper coordination and in a timely manner.

ACKNOWLEDGEMENT

Working on these Cafe and Salon Management System projects has given us a wide opportunity to think, implement and interact with various aspects of computer technologies as well as learn new skills. One of the most fruitful benefits of working on this project is that we got a proper experience of working as a team, working on our assigned tasks, supervising and correlating with others, and management of the entire team with their tasks and completing the whole project.

I would also like to express our sincere thanks to our HOD and Course Directors, because of them we got the opportunity of having this group project as a subject in our current semester, and as a result, provided us the seed of execution of such a wonderful idea into action.

Overview of Projects

  • The Salon is a salon management system that has functions like admin management, customer tracking, and product shopping from the web.
  • The Café is a static site that has been designed for the users to get acknowledgment about the café. It has functionalities like booking tables, ordering online food, and menu details.

Objective

  • The objective of the salon management system: The Salon is to keep track of its daily expenses, customer, manage staff, and Publicity of its salon.
  • Static website Cafe management system which is designed also has the main objective of reaching more and more people through the help of the internet and making their marketing more strategic in the market.

Tools and Technologies

When the idea of making a web-based application came to our mind, the first thing that was required to be done was to gather information about the things that were required to be learned by us in order to make this project come to life. Hence after some brainstorming and group discussions, we followed the following figure and according to that learned the things in order.

After conducting this brainstorming and learning the process the tools and technologies that we had to use were as follows:

For Salon:

  • Angular
  • NodeJS
  • Stackoverflow (to learn about our software requirements)
  • GitHub (to learn about our topic)

For Static Website (The Cafe): 

  • Html
  • CSS
  • JavaScript
  • Bootstrap

IDE’s:

  • Visual Studio Code

Roles and Responsibility

  • Contributed to the making of a few modules for the Salon which includes modules like registering customers, forgetting passwords, and reset
  • Also contributed to live project

Implementation Environment:

 The backbone and the main aspect of the software side of the project were to run the HTML code, perform the JavaScript and make the site more user-friendly by adding CSS. So the implementation was carried out in such a way that the correlation of different files would be done easily. Hence, the use of an IDE was a must. Initially, we thought of using IntelliJ IDEA but the idea was dropped later on and we began working with the visual studio code 2020.

Sometimes to organize we even had to use some text editors like sublime text, atom, etc. Implementation of the code was done altogether after we researched and sorted the image data that we obtained. The basic approach that we used was the partial compilation method and went on integrating the small amount of the code into larger ones, module by module.

CONCLUSION

 In the end, we would just like to briefly explain how this project helped us to excel at our own best level and made us learn a lot of new things, technologies, and team management. And also implement all of the skills that we previously acquired or learned later on as a part of the completion of the project. Moreover, this project helped us to learn about the real scenarios of working in a team for real tasks and to cope with deadlines, quality management, and each and every aspect of the project. This project gave us the motivation to think differently and express our own ideas to implement them. Also, it taught us how to deal with errors, quality-related, time-related, and other management-related problems.

Most importantly with the medium of this project, we learned Many new skills, ranging from soft skills to technical skills. Qualities related to management, problem-saving time saving, etc. were also learned by us. We tried to make an honest solution for people out there facing problems and learned how all the skills combined: with the help of a perfect team and proper management along with proper skills is the key to providing the solution to any possible problems out there. And we believe that we did a great job implementing all our knowledge, and are grateful to present this execution of one such idea.

Thanking all those who helped us in a big or a small way with this project. Every contribution that has been given is very valuable to us and is the true reason for this project to stand out as a pioneer-based preliminary project and success of this project. With that being notified we heartily present our project and welcome all suggestions or improvements with open hands.

MOODIFY – Suggestion of Songs on the basis of Facial Emotion Recognition Project

Modify is a song suggested that recommends the song to the user according to his mood. ‘Modify’ will do the job leaving the user to get carried away with the music.

I/We, student(s) of B.Tech, hereby declare that the project entitled “MOODIFY (Suggestion of Songs on the basis of Facial Emotion Recognition)” which is submitted to the Department of CSE in partial fulfillment of the requirement for the award of the degree of Bachelor of Technology in CSE. The Role of Team Mates involved in the project is listed below:

  • Training the model for facial emotion recognition.
  • Designing the algorithm for image segregation.
  • Algorithm designing for music player.
  • Graphical user interface designing.
  • Testing the model.
  • Collection of data for model and music player.
  • Preprocessing of the data and images.

Dataset:

The dataset we have used is “Cohn-Kanade”. 
This dataset is classified so we cannot provide the actual dataset but the link for you to download is :
http://www.consortium.ri.cmu.edu/ckagree/index.cgi
And to read more about the dataset you can refer to:
http://www.pitt.edu/~emotion/ck-spread.htm

Feature Extraction and Selection:

1. Lips
2. Eyes
3. Forehead
4. Nose

These features are processed by CNN layers and then selected by the algorithm and then they are converted to a NumPy array then the model is trained by that and the following three classifications are made.

How this project works:

  • First Open the Application, CHOOSE THE MODE IN WHICH YOU WANT TO LISTEN to THE SONG
  • Then it shows “YOUR MOOD, YOUR MUSIC”
  • Press “OKAY TO CAPTURE THE IMAGE”
  • After that press “c” to capture
  • You seem Happy please select your favorite genre
  • You seem Excited please select your favorite genre
  • You Seem Sad please select your favorite genre

CODE DESCRIPTION

  • All libraries are imported into this.
  • Model Initialization and building.
  • Training of test and testing.
  • Training our model
  • Model Building, Splitting of test and train set, and training of the model.
  • Saving a model.
  • Loading a saved model.
  • Saving image with OpenCV after cropping and loading it and then the prediction
  • Suggesting songs in Offline mode
  • Suggesting songs online(Youtube)
  • Rest of the GUI part
  • Variable Explorer

IPython Console

  • Importing Libraries
  • Model Training
  • Model Summary
  • Online Mode
  • Offline Mode

GUI

  • Splash Screen
  • Main Screen
  • Selection screen
  • Display songs and then select them, after that they will play

Summary

We successfully build a model for Facial Emotion Recognition(FER) and trained it with an average accuracy over various test sets of over 75%. Then we successfully build a Desktop application to suggest songs on the basis of their facial expression and hence completed our project. This FER model can be widely used for various purposes such as home automation, social media, E-commerce, etc and we have the motivation to take this project to a next level.

Download the complete Project code, report on MOODIFY – Suggestion of Songs on the basis of Facial Emotion Recognition Project

Employee Data Base Management Project using Data Structures with Java

We are doing a project which is about storing the data (details) of employees of a company or any other industry.

In this project, we are providing many functions to store and manipulate the data of employees such as

  • Storing the details like name of the employee,  ID, salary, date of joining, etc.
  • Adding new employee details to the existing list.
  • Providing the report of required employees.
  • To provide details of a specific employee.
  • To give the sorted list of employees based on name, ID, salary, and date of joining.
  • This project also gives the report of employees with certain specifications.

For this project, we are using a data structure-linked list to store the details of employees, and also we can add details of a new employee to the existing list. We are implementing the method to search for an employee and give details provided his name or ID. In this project, we also have a method to sort the list of employees based on name, ID, salary, and date of joining using different data structures. This project allows users to get the details of a certain number of employees from the list. We can also use this project to get the list of employees with certain specifications like the number of employees whose salary is in the given range.

INTRODUCTION

Our project “Employee Data Base Management”  is an application that we have created that helps to manage the details of employees associated with the company.  Since in a company, there are many employees who have worked or are working, to manage all their details such as their name, ID, date of joining and salary, etc., so to manage these data by conventional methods is cumbersome so we have developed this small application which is very helpful nowadays. This application will reduce the workload in generating the report, maintaining the data, and updating it as per the user’s requirement.

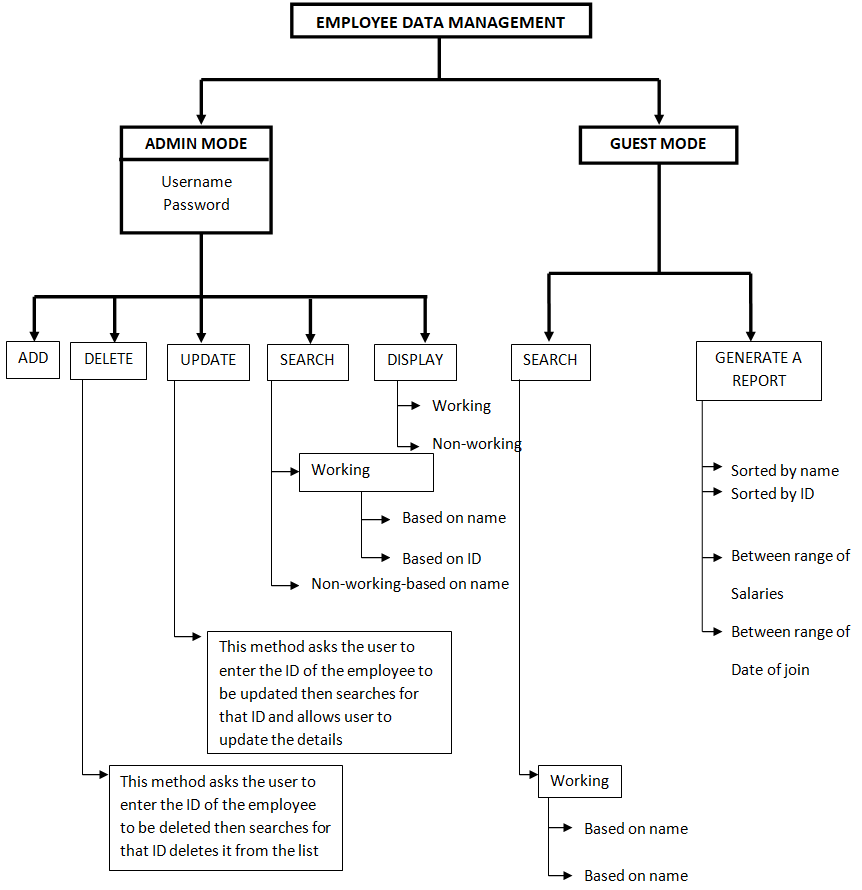
In our project, we have provided two user modes. First is the administrator and guest mode.

In our project, the administrator mode gives the user the ability to

  • Add a new employee’s details.
  • Update the details of an existing employee.
  • Delete (fired from the company) the details of a specific employee from the database.
  • Search for the details of an employee based on name or his/her ID in both working and nonworking categories.
  • Display the list of all employees either in the working or nonworking category.

In our project, the guest mode gives the user the  to 

  • Search for the details of an employee based on name or his/her ID in both working and nonworking categories.
  • Generate a report as the guest user desires for example generating the report in a sorted manner based on name, and ID.

OBJECTIVE

The main objective behind the development of this project is to create software with the following features:

  1. Highly user-friendly
  2. Enterprise independent
  3. Cross-platform
  4. Easy-to-use
  5. Tested system to track unnoticed error
  6. Data entry is restricted to valid domains to avoid errors

We are using the node ENode to form a doubly linked list and in each node, we are storing the details of one employee.

In each node, we are having different fields as follows

  • Left- Address of the previous node
  • Name-Name of the employee
  • ID-Employee’s ID
  • Position-Employee’s position in the company/firm
  • Gender-Gender of the employee
  • Salary-Employee’s annual income
  • Date of join-Date on which employee joined the company
  • Right-Address of the next node

Flow Chart:

IMPLEMENTATION

Class ENode

In this class, we have fields to store the details of employees. In each node, we are having different fields as follows

  • Left- Address of the previous node
  • Name-Name of the employee
  • ID-Employee’s ID
  • Position-Employee’s position in the company/firm
  • Gender-Gender of the employee
  • Salary-Employee’s annual income
  • Date of join-Date on which employee joined the company
  • Right-Address of the next node

Class EList

In this class, we have implemented the following methods

  • addEmp : this method does the job of adding the ENode node of employee details to the list-elist. And also this method is used to add ENode read from the file(“employee.dat”) again to the elist.
  • delEmp : this method does the job of deleting the node ENode from the working employees list elist and calls the method naddEmp and passes the deleted node as a parameter.
  • naddEmp : this method does the job of adding the ENode node of employee details which is deleted from elist to the list-nlist. And also this method is used to add ENode read from a file (“nemployee.dat”) again the nlist.
  • update : this method allows to edit and resave the details of an employee asked by the user.
  • fread : this method reads the data from both files “employee.dat” and “nemployee.dat” which creates a node and calls addEmp method to form the doubly linked list.
  • display : this method displays the list of employees in a display window

Class ESearch

      In this class we have implemented the following method

  • nsearch : this method searches for the entered name and displays the details of that employee. If the name is not found in the list then an error message “The name you entered not found” is printed.
  • idsearch: this method searches for the entered ID and displays the details of that employee. If the ID is not found in the list then an error message “The ID you entered not found” is printed.
  • Salsearch : this method gives the list of employees who all have salaries in the given range. If no employees in the database are having salary within the entered range then an error message “The salary range you entered not found” is printed
  • dojsearch : this method gives the list of employees who joined the company in the specified range of date. If no employees in the database have joined within the entered range then an error message ”No employees joined during this time” is printed.

Class ESort :

      In this class, we have implemented the following methods

  • nsort : this method gives a sorted list of employees based on their names. If there the list is empty then the message “NO DATA EXISTS” is printed.
  • idsort : this method gives the sorted list of employees based on ID. If there the list is empty then the message “NO DATA EXISTS” is printed.

Class EFile :

     In this class, we have implemented the following methods

  • fwrite1 : this method writes the data of list-elist the list into the file “employee.dat” whenever the list is edited. We are using @ as delimiter.
  • Fwrite2 : this method writes the data of list-nlist the list into the file “nmployee.dat” whenever the list is edited. We are using @ as a delimiter.

CONCLUSION

This was our project based on an Employee database management System. We think this system will give a better way for a shopkeeper to maintain his shop. Though every task is never said to be perfect in this development field even more improvements are possible in this system which we have mentioned below and some more improvements can also be done to give a more user-friendly system that can help the shopkeeper more efficiently. This project has contributed a lot to my knowledge that has proved to be a valuable addition for me.

SCOPE FOR IMPROVEMENT

  • All frame objects are created as static hence when we move to the next frame and return back to the previous frame the content of the frame will be stored. Therefore we are using the reset button everywhere.
  • In our project in some of the frames, we have a button PRINT to get the printout of the report generated but we have not given any action to that button.

Download the complete project on Employee Data Base Management.

Food for Life PHP Minor Project Synopsis

Introduction

”FOOD FOR LIFE” is a food relief web project to serve food for the needy. Nowadays, One-third of the food produced is being wasted and about 9 percent of the people in this world go to bed on an empty stomach. In this Minor Project, various party palaces or hotels have to give information about their unused food on our website and we or other organisations have to collect the food and distribute the food to the needy.

Technologies to be used

 This Food for Life project will be a Web application to be developed in PHP having below technologies:

  • PHP
  • HTML
  • MYSQL
  • JavaScript

Technical feasibility

The technical needs of the Food for Life system may include:

Front-end and back-end selection

When we decided to develop the Food for Life project we went through an extensive study to determine the most suitable platform that suits the needs of the organization as well as helps in the development of the PHP & MySQL project.

Front-end selection:

    1. Scalability and extensibility
    2. Flexibility
    3. Robustness
    4. Platform independent
    5. Easy to debug and maintain

Back-end Selection:

1. Multiple user support.
2. Efficient data handling.
3. Provide inherent features for security.
4. Efficient data retrieval and maintenance.
5. Easy to install.
6. Various drivers must be available.
7. Easy to implant with the Front-end.

Objectives 

The main objectives of this Food for Life project are:

  • The main objective of our academic minor project is to reduce food wastage as many of us throw unused food in dustbins
  • The objective of this is to help the organization that serves food to the hungry people

Conclusion 

This ”Food For Life” project is to feed hungry people with the help of our system. Organizations such as hotels or restaurants have to publish the details of their food on our Food for Life website.

Order Management System for Steel Fabrication Factory Java Project

The web-based “Steel fabrication Order management system” project is an attempt to simulate the basic concepts of order management systems. The system enables the customer to do the things such as view all available products, and products by category-wise distribution. The user can place the order, the delivery agent will get the order details and it will be delivered to the customer at their residence. Users can request customized products with their own requirements and budget.

The Order Management System provides a facility that enables users to view details about products without logging in. But if the user wants to place the order, then it is required to log in first. Users can view all available products with detailed descriptions, reviews, and ratings. Users can choose a particular product. The system checks for the availability of the quantity of the product. If the product is available then the system allows the customer to select the product and place an order. To order a product the system asks the customer to enter his details such as first name, last name, city, street, landmark, state, pin, phone number, etc.

Scope 

  1. Order Management System for Steel Fabrication Factory is a web-based application that allows the admin to handle all the activities online quickly.
  2. So, the aim of the project is to provide products to customers. The customer can choose the products from the category and place the order. Users can request customized products to their own requirements and budget. Staff then can contact the user with the details provided by the user at the login time
  3. Staff will arrange the products as per the order and make them available for collection.
  4. Once the order is ready, the delivery agent will collect the products and they will be delivered to the customer at their residence

SYSTEM ANALYSIS AND DESIGN

System analysis is the performance management and documentation of activities late to the life cycle phase of any software namely:

  1. The Study Phase
  1. The Design Phase
  1. The Development Phase
  1. The Implementation Phase
  1. The Testing Phase

Software analysis starts with preliminary analysis and later switches to a detailed one. During the preliminary analysis, the Analyst took a quick look at what is needed and whether the cost benefits. Detailed analysis studies in depth all the cornered factor, which build and strengthens the software.

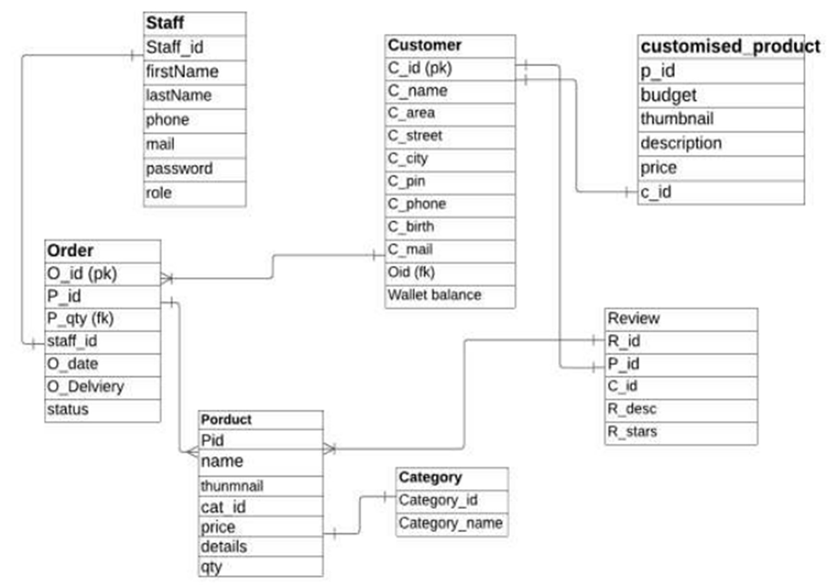
ER Diagram:

PROJECT FEATURES

Admin module

Admin is the main role in the overall system. Admin can log in into the system using credential where admin credential was already stored in the database.

After successful login into the admin dashboard, there are various operations that the admin can do mentioned below –

  1. View customer: Admin is able to view the list of customers who are already registered into the system. Customer data is stored in a database so the admin can fetch those data to view the list of customers
  2. Add remove staff: Admin can add staff by giving a particular role also admin is able to delete it from the system
  3. View feedback: Admin can view feedback which is given by customers on products after purchasing

Manager module

Like the admin, the manager can log in to the system with the credentials stored in the database. The manager carries out the most of operations on the owner’s side. The manager can perform the following functionalities mentioned below:

  • Manage products: The manager can add products into the system with all the necessary details. As the products are managed category-wise, the manager can add distinct categories first and then products under that specific category. Managers can also update products by changing the price of products or the available quantity of product
  • Manage delivery: The manager is able to see all the orders. After placing an order by the user, the manager assigns that order to the particular delivery That order is visible to that delivery agent’s dashboard with details.
  • View feedback: The manager can view feedback and ratings given by customers on products after purchasing. The manager can review and analyze the feedback
  • View order customization: The manager can review the customized orders that users have requested, and contact that specific user from the contact details given at the login time

User module

User can login into the system, or even without login users can see product lists, detailed descriptions of products, reviews, and ratings of products. Even without a login user can check all available products. But to place an order user needs to log in first to the system.

Registration and creation of user profile

The system shall require a user to register, in order to carry out the process to place an order. For registration it will ask the user for the following information first name, last name, city, street, landmark, state, pin, phone number, email, and password. The system will automatically generate the user’s profile.

Making Order

After registration user’s credential is saved in databases and using the credential user can log in to the system. For place an order user must do login first otherwise the system will not allow the user to place an order.

After login into the system successfully now the user is able to place an order. The first user needs to search for the available product or the user can search for a product by category, one more option is available the user can select a product and customize it according to their need.

If a user wants to place an order of multiple products, then the first user selects one item and moves it to the cart using the ‘add to cart button, after adding it to the cart now user can go for another product and the user can add multiple products to add.

After adding products to the cart, the cart dashboard will show all the products, product quantity, and total price. Now users can place orders by selecting a payment method.

View Order History: The system shall allow a user to view all information about his previous orders. In history, the system shows the previous product, delivery status, etc.

Delivery Agent

Account Delivery agent is another important role in this system. The main role of the delivery agent is to deliver the product to the mentioned address and update the status of delivery. The delivery agent has functionalities mentioned below:

  1. Receive order: The delivery agent received the order and does a job of delivering the product on time
  2. Track order: The tracking status of the product during delivery is updated by the delivery agent. Tracking status like ‘product arrives, ‘on the way, ‘delivered’, etc. Users get to see this status on his/her side
  3. Verify payment: The delivery agent needs to verify the payment details like whether payment is already done or needs to be collected at the time of delivery
  4. Update order status: After delivering the order successfully, the delivery agent needs to update the status as ‘delivered’.

Software Required for Development

Module 1: Database Design – MySQL-for database

Module 2: Front End – HTML, CSS, JavaScript, React js.

Module 3: Back End – Eclipse IDE(Any IDE), Spring tool suite, Tomcat

Download The Complete Project code, report, and PPT of the Order Management System for Steel Fabrication Factory Java & MySQL Project.

DBMS Project on Student Management System

Student Management System is purely developed by using DBMS queries. The main functions involved to develop this project is developing ER diagram, DDL/DML, SQL constraints,  Retrieving data using the select function, Restrictions, and sorting functions,  Aggregate, and grouping, Single row function, Joins, and finally Subquery.

ER DIAGRAM OF STUDENT MANAGEMENT SYSTEM

DDL AND DML

1) Create a table name student and attribute of s_id, first last and middle name, address, email, city, and state.

2) Display the datatype of all attributes in the student table?

3) Insert values into the table student?

4) Change the datatype of s_id in the student table?

5) Update the city of s_id=001 to bby?

SQL CONSTRAINTS

1) Create a table name student with an attribute s_id that is not null?

2) Create a table name student with an attribute s_id that is unique?

3) Create a table name student with an attribute s_id which is a primary key?

4) Create a table name teacher with an attribute s_id which is a foreign key and team name?

5) Create a table name student and with an attributes city which a default constraints “KOLKATA”?

RETRIEVING DATA USING SELECT

1) Display all the columns of the table name course?

2) Display the columns c_name aliases course name of table name course?

3) Display the columns c_fee and c_name using concatenation and aliases course details of table name course?

4) Display the course fee and increase in course fee by 3000 where the course duration is 45_hr?

5) Remove the duplicate value from course duration with a student ID from the table name course?

RESTRICTIONS AND SORTING

1) Display the student ID and the first name from the table name student whose state is westbengal?

2) Display all the data of the table course whose course ID is ‘11’.

3) Display all the data of the table course whose course fee range is less than 100000?

4) Display the Lastname and city of the table student where the student’s first name starts with ‘a’ and consists of 4 characters?

5) Display the course fee of the table name course which is between 10000 to 50000?

AGGREGATE AND GROUPING

1) Display the average course fee for all the courses in the given table?

2) Display the minimum and maximum course fees in the given table?

3) Display the count number of course names from the table name course?

4) Display the total course fee in the table name course?

5) Display the student ID and minimum course fee from the course table and group by student ID having a course fee less than 102000 and sort the minimum course fee in descending order?

SINGLE ROW FUNCTION

1) Display the student ID and student first name and state from the student table where convert student first name and state into uppercase?

2) Display the student ID and student first name and state from the student table where convert student first name and state into lowercase?

3) Display the student ID and student state from table student and change the first character of all states to uppercase?

4) Display the student ID and student first name middle name last name together from the table student use the character-manipulation function?

5) Display the student ID and the length of the first name and the last name from the table student using the character-manipulation function.

JOINS

1) Display the registration number for the user’s table and the student’s first name on the table student use inner join?

2) Display the registration number for the user’s table and the student’s first name on the table student use left join and order by the first name.

3) Display the registration number for the user’s table and the student’s first name and last name from the table student use the right join and order by registration number.

4) Select all teachers and all courses in the given table using full join and order by teacher ID.

5) Select all students’ first names and last names and city in the given table using self-join and order by the city?

SUBQUERY

1) Display the first middle and last name of the student where the course fee is minimum?

2) Display the teacher ID and first middle and last name of the teacher where the course name is DBMS?

3) Display the phone number of the student of who’s registration number is 20?

4) Display the registration number who live in Jaipur?

5) Display teacher ID first name and phone number whose qualification is b.tech?

Online Learning Management System PHP Project

Objectives of the Project:-

The general objective of this Online Learning Management System project is to provide various courses to students as well as others who are interested in learning online. The use of the internet has increased and so the courses are available to be learned online. By providing this option, it would be easy for the users to learn by sitting in a comfortable place and learning based on the time they have.

The courses will be added, deleted, etc. by the admin. This project consists of the front end and back end sides. The front end side of the website is developed for the general public who are interested to know about us and to find out the courses provided by the management system. The back end is for the users who have created their accounts and admin utilities.

Scope of the Project:-

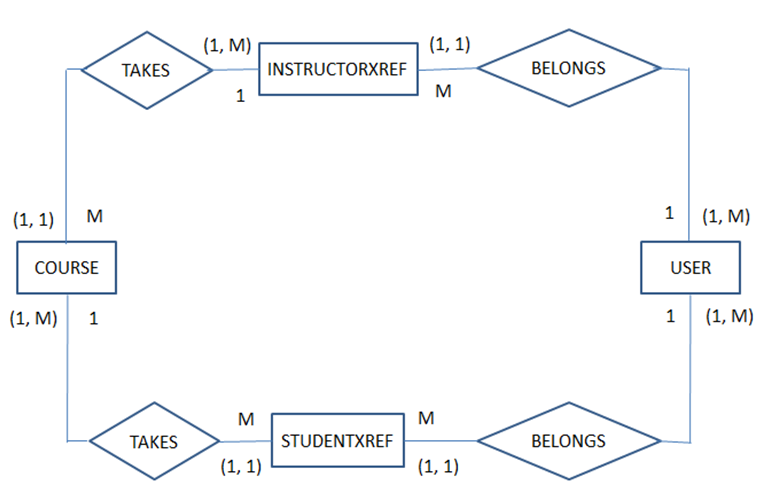
For this project, to store all the data various tables and attributes are required. As the main idea of this project is to provide courses for the students to enroll in and learn, it will also allow the instructors to teach courses. Thus the scope of this project is limited to the following tables: COURSES, USER DETAILS, STUDENTXREF, and INSTRUCTORXREF.

User requirements:-

Following would be the basic user requirements-

  1. Users should be able to view the Home page, About Us, and login/Register page of the website.
  2. Users should be able to search for the courses in which they are interested.
  3. Users will be asked to enter the user type as Student, or Instructor while creating the account.
  4. Users who have been marked as Students will be allowed to enroll in the available courses and will be displayed the courses in which they are already enrolled.
  5. Users marked as Instructors will be able to teach the course which is not taught by anyone else. They will be able to see the courses which are taught.
  6. Admin type of user will be able to add or delete courses as well as delete instructors from the courses.

*Note – User can be general public without creating an account, student, instructor, and admin.

Business Rules:-

Below are some basic business rules-

  1. One student can enroll in many courses.
  2. Every single course can be taken by many students.
  3. One instructor can teach many courses.
  4. One course will be taught by only one instructor.
  5. Users can be students or instructors based on the details entered while creating an account.

Entities and their attributes:

In this proposal, there are basically 4 entities. The description for each is given below-

USERDETAILS Entity –.When a student or instructor wants to enroll/teach for any course, first of all, they will have to create an account on the website by using the login page. All the details entered while creating an account will be stored in this table. This table will consist of the attributes as User id, user last name, user first name, user type (it can be student or instructor), and password. The primary key of this table will be the user id. Once the user has created an account, they will be able to know about the courses.

COURSE Entity – The course table will store all the details related to the courses which are offered. This table will have the following attributes Course id, Course name, course department, course description, course start date, and course end date. Course id will be the primary key for this table. Based on the above attributes, students can decide which course they are interested in. The instructors will also be able to know about the courses which are already taught by some other instructors and the courses available for them to teach.

STUDENTXREF Entity- This table will act as a reference table between the COURSE and USER DETAILS tables. The attributes of this table are student id, course id, and user id. The primary key of this table will be the student id.

INSTRUCTORXREF entity – This table is also a reference table between COURSE and USER DETAILS tables. If the user type is instructor then the details for that user id will be stored in this table. The attributes of this table are instructor id, user id, and course id. Instructor id will be the primary key for this table. Here the course id will be unique as 1 course cannot be taught by multiple instructors.

Entity-Relationship Diagram:-

Fig 1: Entity relationship diagram for Online Learning Management System.

Website Description:-

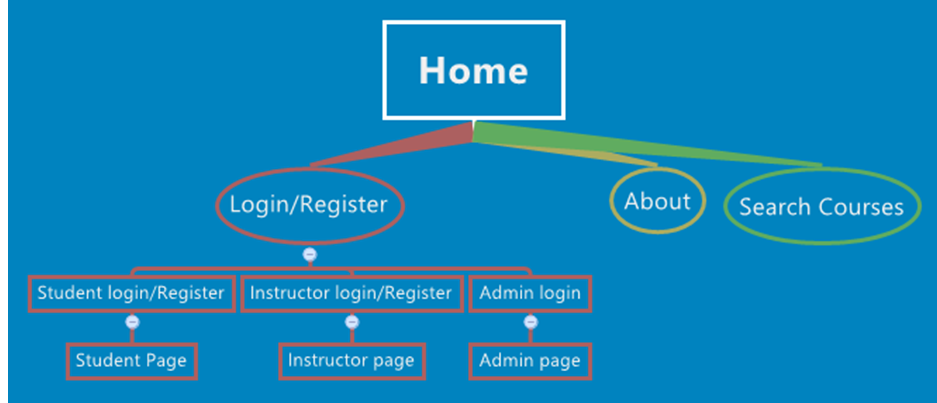
The online learning management system is a system that provides students to learn about various courses online. Various pages have been created for the users like Home Page, About Us page, Login/Register Page, and Search courses page.

The sitemap for the online Learning management system is as:

The project consists of the Front end and back end. The front-end pages are described below:

Home Page:

This page is the main page of the project. This page gives a brief description of the management system and also posts the latest courses which are going to be added in the future. This page will be linked to all other pages. Whenever the user is interested in learning any course, then they need to create an account by clicking on the Login/Register button provided on the navigation bar.

Login/Register Page:

The login page lets the user enter their username and password to login to their account. There are three different links for students, instructors and admin in the login/register page. Students can click on the enroll/register for courses link in order to login into the account. Students who are already registered can put in their username and password to login to the account. In the case of new users, they can register for a new account by clicking Join us button. In order to sign up for an account a user needs to enter an email address, preferred username and password, and date of birth. The user has to make a selection of the account type either teacher or student from a drop-down menu. Then they can simply login into their account. 

The login page lets the user enter their username and password to login to their account. There are three different links for students, instructors and admin in the login/register page. Students can click on enroll/register for courses link in order to login into the account.

Students who are already registered can put their username and password to login to the account. In case of new users, they can register for a new account by clicking Join us button. In order to sign up for an account a user needs to enter an email address, preferred username and password and date of birth. The user has to make a selection of the account type either teacher or student from a drop down menu. Then they can simply login into their account. 

About Us Page:

This page describes the goal of developing this project. This will make clear to the users what the purpose of developing this website is and how they can use it. Contact information is also provided for the users so that if they have any doubts, they can send an email with the query. 

1.6.4 Search course Page:

When a user is interested in learning any course, before creating an account he can check whether the course in which he is interested is provided by the management system or not. This search option will help them to know about the courses and then they can decide whether to enroll in those courses or not. While using the search option, users are not required to create an account.

The back end part will come into the picture when the user has created an account. Users can be students or instructors. While creating an account, the user will be asked to select the User type from the drop-down option. The pages at the backend side are described below:

Student Page:

This page (student.php) will be displayed to the user whose user type is Student. It will display the courses which are available for a particular student to enroll. He can select multiple courses for enrolling. Checkboxes are provided in front of all courses and then finally enroll button is provided.

Once the student selects any course and clicks on Enroll button, he will be shown a thank you message for enrolling in those courses. Student.php will call enroll.php when an enroll button is clicked by the student. The back button is provided on enroll.php which will re-direct the student to student.php. The student will also be displayed the courses in which he has already enrolled on student.php. 

Instructor Page:

When a user selects the user type as an instructor, he will be directed to instructor.php page. On this page, he will be displayed with the courses which he is already teaching. The instructor will be able to teach courses that are not being taught by any other instructor. A checkbox option will be provided to the instructor to select courses and then he can click on each button. This button will direct the instructor to teach.php page where he will be displayed a thank you message.

Admin Page:

Admin page is designed for the administrator to add and delete courses in the system. In order to login as an admin the user needs to select the admin-Add/Delete courses link from the Login/Register page. Two options appears in the admin page 1.Add a course and 2.Remove a course. Add a course lets the admin add new courses in the system.

The details the admin needs to provide in order to add a course are course name, course department, course description, course start date, and course end date. The admin can simply press the Add Class button. A success message appears on the page after the submission of the details. In order to remove a class the admin can make a selection from the drop-down menu and press the Delete Class button. The success message appears afterward.

Functions provided by the website are:

  1. The following are the functions provided by the online learning management system:
  2. Browse the homepage, and about us page.
  3. Search courses without creating an account.
  4. Interested users can create an account.
  5. Students can enroll in courses.
  6. The instructor can teach courses that are not being taught by any other instructor.
  7. Admin can add/delete courses.

Usability considerations:

The online management learning system website has logical navigation. Users can easily navigate around the webpage. The home page gives the users information about the whole system. All the contents are written in simple language. It has a user-friendly interface and functions well with no broken links. All the links and sub-links are clearly represented. The procedures to log in to the account, register for courses, and add or remove the courses from the system are very clear.

The system lets the users know if their attempts of adding courses or removing courses were successful. When the users put wrong credentials while logging in, it lets users know their attempt has failed because of the wrong username or password. So, that user can put the correct information and log in to the account. The website has all the required functions based on user types. That makes the website informative and user-centered. 

FUTURE ENHANCEMENTS:

  1. Based on the entries in the database, graphs can be created to provide information about the number of students in each course.
  2. A class entity can be added to provide more information about courses like classrooms, class timings, etc.
  3. Change the template to make it more attractive and user-friendly.
  4. Passwords can be stored in an encrypted way to avoid giving away personal information.

Covid-19 Testing Management System Python Project

Covid-19 Testing Management System is a small project developed using Python programming. Here are the application features below.

Project features:

• Adding new testing centers
• Search for available testing centers by locality
• Update and delete testing centers
• Show all testing centers by city, state
• Shows the number and type of testing kits available at each center.

Software to be used to develop this application:

• Python
• SQL for creating a database
• Library to interface between Python and SQL
• Either Django (to create a web app) or a GUI library to create the UI (not decided yet)

Implementation

1. Login page (This has a simple login prompt designed using a GUI library that asks for the user id and password.)
2. Menu:
a. Add a testing center
B. Delete testing center
C. Edit the number of testing kits available
D. Search for the testing center by district/city/state
E. Show all testing centers
3. Separate sections for:
a. Adding a new center
b. Deleting center
c. Updating center information
d. Searching for center
e. Nationwide data

Covid-19 Testing Management System can be developed by using PHP & MySQL Server with different functionalities below.

User Characteristics

The Covid 19 Testing Management system has 2 types of users they are Admin and user(patient)

General Constraints

The tools and technologies that are used to develop this project are:
The language used in this project is PHP5.6 and PHP7.x.
The database used in this project is MySQL 5.x.
The web browsers that are used in this project are Mozilla, Google Chrome, IE8, and OPERA.

Operational Scenarios

Scenario A:
How your application starts
Our application covid19 testing management system starts by login into the application, if the user is a new user, the user needs to register by providing the needed credentials.
New users need to provide testing information. A registered user needs to provide test information.

Scenario B:
Usage Scenarios like Customer Check-out
When a customer visits our application, he/she needs to log in by providing their credentials according to their role i.e., admin and user.
If the user is new, he needs to register if he is an old user, he can directly enter the login details and login directly.

Scenario C:
Database

The data that we are going to store in the database
1) Admin Login
Username
Password

2) New admin login
Admin name
Username
Password

3) User login
Username
Password

4) New user login
Name
Phone number
Username
Password

5) User Registration
Name
Current address
Gender
D.O.B
E-mail id
Phone number
Age
Aadhar card number

Product Stores & Inventory Management Project

Existing System

Following are the S/W for Procurement Process and Managing the database for all the projects of Programme ANSP from Demand – SO – Payments – Stores Inventory.

Challenges: Following are the Challenges in using the above-mentioned Inventory Management S/W

  • Multiple Client–Server Applications for data capturing.
  • Systems are very old and hence they are not able to cope with the latest S/W and H/W.
  • No communication between the applications.
  • No linkage between the projects, every project has a separate schema and instance.
  • Few processes cannot be automated.
  • The database may not be in normalized form.
  • Database structures may not be uniform across systems.
  • Effort duplication might be happening for data entry and reporting.
  • Software Maintenance may be a major concern.
  • No online approvals.

Proposed System

To Overcome the above-mentioned problems, an attempt is made to develop a Web-based product Stores & Inventory Management Project which is centralized, fully integrated having/ all the required functionalities of the existing system. Product Stores & Inventory Management Project will have FIVE major modules, Master, User Management, Procurement and Store Inventory, Payments

General Features 

  • A centralized, fully integrated System that can integrate all required functionalities of existing systems.
  • Should be able to handle any number of Projects without having any additional instances.
  • Organizational Changes should not impact the system.
  • Optimization in business process Automation.
  • Leverage the advantage of new technologies like Java, Spring, Hibernate, and Oracle RDBMS 11g.
  • Multiple users would access this application software with proper Authentication.
  • The proposed system should work both on LAN and WAN (TBD Internet), is a web-based application, and is easy to configure. This system would be developed in a user-friendly way.
  • Business Rule and Workflow for optimizing resources and reduction in Data entry redundancy.
  • Online approval can be done based on their roles and their responsibility.

Functionality Features 

  • Reports(Item/BOM/System/sub System/Article wise summary, Lifted Items, Shortage Lists, Expired items list, and Final Built-in Report), Various reports to be generated throughout the Procurement, Inventory  and other stages such as Proposal, Sanctions, Demands, Enquiry, Inventory, IR and Voucher Gate Passes 

Transaction logs 

  • Transaction log shall keep track of data items added, changed, or deleted.

For records that are added, the data items logged shall be:

  • User ID of the user who activated the functions.
  • Function name
  • Date/Time of the action
  • Data items added

For records that are modified, the data items logged shall be:

  • User ID of the user who activated the change
  • Function name
  • Data items after and before the change of action

For records that are deleted, the data items logged shall be:

  • User ID of the user who activated the function
  • Function name
  • Date/time of the action
  • The add/change/delete functions which shall be logged in the transaction log shall be a different functional requirement given in this document.

Access Control 

  • A valid user ID and password should be entered in order to access the Product Stores & Inventory Management application. Only the project administrator can create or disable user accounts.
  • A timeout to log out feature would be set for non-active sessions or sessions idle beyond a certain time period. Proper session management for the application would be set so those non-active sessions would be automatically logged out.

System Overview

The purpose of this document is to present a detailed description of the Web Publishing System of the “Product Stores & Inventory Management Project” for ANSP (Advanced Naval Systems Program). 

System Architecture

  1. Layered Approach

Product Stores & Inventory Management Project application would be developed in a layered approach. This would enable the team to work on different components independently and also for faster development. It increases flexibility, maintainability, and scalability. It helps in configuring different levels of security.  It also helps in testing components independently.

  • The user interface layer is which all end users would view. All UI components are created and integrated with the business layer.
  • In the business/ service layer, business objects help us in defining entities. Using these business objects, business logic is developed and attached to services. These services are exposed through an application programming interface (API).
  • The data access layer would connect to the database by using hibernate. Hibernate is a high-performance object/ relational persistence and query service. It not only takes care of the mapping from java classes to database tables and from java data types to SQL data types but also provides data query and retrieval facilities.
  • The repository includes a database and file system. The file system would include all the attachments uploaded through the application.
  • Audit log, security & external application integration would include auditing, and tracking of all actions and activities done by users. All integrations like SMS, email, and any hardware integrations are done in this layer.
  1. Detailed Application Layer Architecture

This Inventory Management application would be developed in three-tier architecture i.e.  Client, application and data tier. In the client tier, all end users can access by using a web browser and interact with the Product Stores & Inventory Management Project. UI components would include JSP, CSS, java scripts, and JSON. In the application tier, the application design would be included with presentation, business logic, and data access layers. As discussed earlier, these layers would help applications for faster accessibility and faster development. Architectural styles would include REST i.e. representational state transfer and architectural pattern would be MVC (Model View Controller). In the data tier, services would get the data from the Oracle database and present it in the presentation layer so that the end user can view and take necessary actions.

Functional Modules

The Inventory Management Project contains the following Main Modules

  • Stores & Inventory Management

Store inventory management is a module that enables the maintenance of accurate inventory of its products. The following are the modules.

  • Issue of items
  • FIM Issue using Gatepass

Store Inventory Module:

The Store Inventory would deal with functions like receiving items into inventory and issuing items from the inventory to the requested user based on approval. The system should generate vouchers as per the store’s format for both issues and receiving. Procurement and Store Inventory uses well-designed Web Forms for specific actions required by the users.

Operating Environment

This product will be developed mainly using open source technologies like apache, Java, Spring, Hibernate, Ext-JS, and Windows Operating System for developing this product.

Server Operating System

Ubuntu Linux or any other flavor of Linux

Language / Tools

Java, J2EE, Hibernate, ExtJS

Client O/s

Windows 7 and Above

Database

Oracle 11g

Application Server

Jboss/Apache Tomcat

Web Server

Apache2

Browser Support

Chrome, Mozilla Firefox 10+, Internet Explorer 9.0 and above

Server Hardware requirements:

Processor

Intel Xeon Processor 2.1 GHz

Memory (RAM)

16 GB or higher

Storage Capacity (HDD)

Minimum 500 GB

Port Speed:

10 Mbps Public & Private Networks

System Features & Requirements

Capability Requirements

This subsection provides a high-level overview of the major capabilities of the Project.

Users Capabilities

The System will provide the following capabilities to users:

  • The Product Stores & Inventory Management Project will enable all authorized users to:
  • Provision to Raise Material Gate Pass

External Interface Requirements

User Interfaces

The user would then enter the required data for processing and press the Save or Submit button, after which the processing would be done and the user would be returned to the main page.

The user would then be able to use the different functionalities of the Product Stores & Inventory Management Project by clicking on various links that are provided on each page.

There would also be a Logoff button which would help the user to end his session with the application and he will be transferred back to the login screen.

Functional Requirement

Login

Description & Priority

This feature will be used to LOG IN to the application (only permitted users can use the PMS). It is done in order to prevent any misuse of PMS

Login users:

User, HOD, PGD, PD, Admin, PJB, PMB (Approval Members), and Office users/Clerks can log in with their assigned User names and password.

Stimulus / Response Sequence

When the user gives the correct username and password combination, he/she is transferred to the main screen or the PMS main page.

Functional Requirements

Purpose

To check the credibility of a user and to prevent any misuse of the product.

Inputs

The input will be a username, password combination, and project associated with the program. 

A user can have multiple roles and a role can have multiple features. The change password feature should be with admin only; if the user wants to have a change password feature user has to enter a security question that is provided by the user at the time of user registration.

Output

The user will be transferred to the PMS main page on successful validation and will be alerted if the validation is unsuccessful.

Validations:

Login Credentials.

  • After login user access only assigned project-specific and assigned role-specific data. Here users can be assigned multiple roles and multiple projects.
  • There will be one default project and default role configured.

PMS Login Use Case
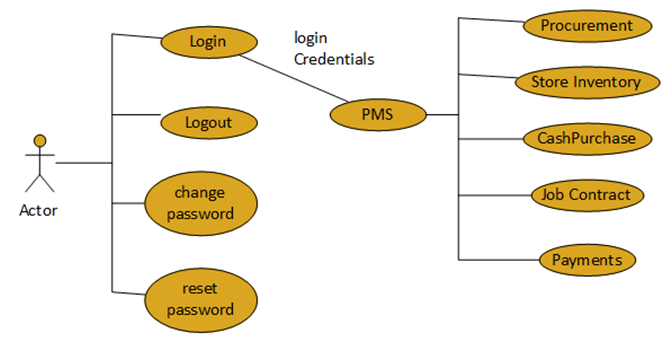
PMS Login Use Case

MATERIAL GATE PASS

Free issue material is the item that is issued to the respective supplier in order to develop/manufacture the required item.

FIM has been categorized into two types.

  • Returnable
  • Non-Returnable

Generation of returnable and non-returnable gate passes.

  • Before gate pass generation user has to raise the gate pass requisition in a specified format with an auto-generated gate pass requisition number.
  • If the type of gate pass is returnable then PDC (Proposed Date of Completion) has to be mentioned (Mandatory).
  • If the gate pass purpose is FIM then QA/QC approval is required.
  • After the gate pass requisition is approved the generation of the gate pass is done by the admin.
  • The below Screen is for requisition for gate passes. To generate a gate pass, the admin has to select the gate pass requisition number on the gate pass generation page and get the gate pass requisition details with some entry fields like packed by & date, supervised by, SOB Number, and date.
  • After taking the concerned officer’s approval gate pass with items went to the security office for the check, if approved out of control number.

Gate Pass System

  • For the issue of an item/ BOM for an outside organization or supplier then the issue has been done by raising gate pass requisition.
  • Gate Pass requisition of two types 1) returnable and 2) non-returnable.
  • After gate pass requisition approval takes place and approval has been done the store admin raises the gate pass with item information.
  • Sends the item with gate pass to the security to out that item.
  • For gate passes also concerned officer’s approvals are mandatory

Gate pass requisition

Returnable:

In the case of items issued on returnable gate passes, the cost of FIM will not be added to items received in the supply order.

  • Requisition gate pass raised by user &approved by project director
  • Gate pass raised by store member/ issued by store member which required authorized officer’s approval.
    • Issue of returnable gate pass max period allowable is 11 months (In PDC, it has to be mentioned).
    • The system has to prompt/alert two weeks before the expiry of the above period in returnable gate pass.
  • FIM BG (bank guarantee) by vendor needs to do for a specific time and date.

Provision for a check box indicating the required FIM BG amount is available in the preform

Non-Returnable

Non-returnable gate pass would be generated for the following:

  • Transfer to other work centers (other labs/inventory) on a permanent basis

– FIM BG (bank guarantee) by vendor needs to do for a specific time and date.

– External issue voucher prepared by the stores with a gate pass

– Inclusion of FIM cost lot-wise/Total cost of supply item when delivery takes place.

– External issue voucher with a gate pass both need to approve

  • Requisition gate pass raised by user & project director
  • Gate pass raised by store admin which required authorized officer’s approval.
  • External issue vouchers are prepared for all items irrespective of their destiny.

– Deduction from stores will be done after approval of external vouchers from respective users and authorities and receipt of Voucher (Acknowledgement) details from another unit.

– FIM gate pass going to labs conversion issue voucher prepared for items flight hardware.

– Nonflight items FIM to other labs external voucher, transfer voucher, and gate pass issued

– Certified received voucher (CRV) from the other inventory once received, the external voucher is prepared.

Note: All items go through returnable/non-returnable gate passes only.

In case a vendor brings an item for entry into the project, a pass is prepared by MMG and sent to Security online to allow the firm inside.

In order to deny permission for entry to those items that were sent on returnable gate passes, it is suggested that a format/ screen be provided for the user to request for the issue of pass by MMG. In that format, the User has to state whether the items being brought inside by the vendor have gone out on returnable gate pass or are being supplied on S.O He has to give reference to S.O or returnable gate pass.

Where a gate pass is prepared whether returnable or Non-returnable, periodically the control no and date issued by Security is to be entered against the gate pass. In case of returnable gate pass corresponding control no and dates are also to be recorded.

Gate pass generation

  • After gate pass requisition approvals, store admin generates gate pass to out the items which are issued to outside organizations/ suppliers as requested item/ BOM (FIM) wise.
  • By taking concerned authority approvals stores admin sends the same to security to out the item/ BOM.

Generation of returnable and non-returnable gate passes.

  • Before gate pass generation user has to raise gate pass requisition in a specified format.
  • If the type of gate pass is returnable then PDC (Proposed Date of Completion) has to be mentioned (Mandatory).
  • If the gate pass purpose is FIM then QA/QC approval is required.
  • After the gate pass requisition is approved the generation of the gate pass is done by store members.
  • The below Screen is for requisition for gate passes. To generate a gate pass, the admin has to select the gate pass requisition number on the gate pass generation page and get the gate pass requisition details with some entry fields like packed by & date, supervised by, SOB Number, and date.
  • After taking the concerned officer’s approval gate pass with items went to the security office for the check, if approved out of control number.

Gate Pass Requisition Screen for Returnable/ Non-Returnable: 
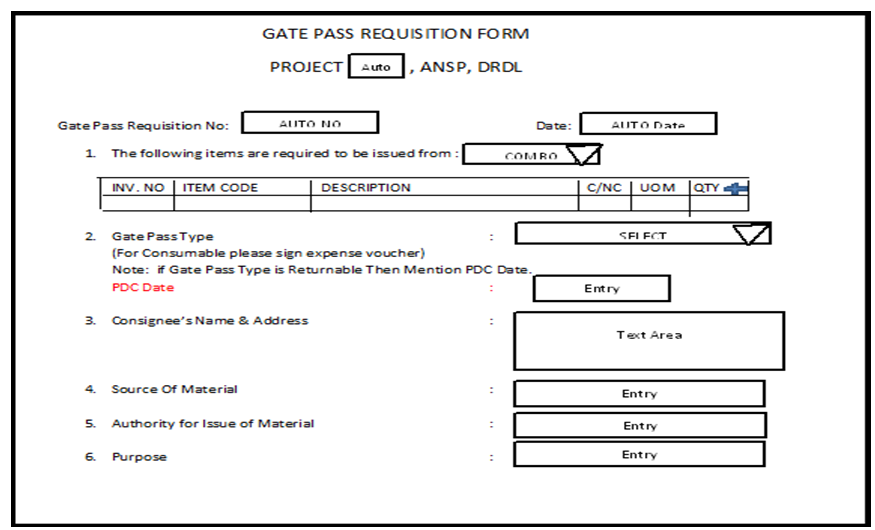
Gate Pass Requisition User Interface

TBL_GATEPAS_REQUISTITION

TBL_GATEPASS_ITEMS

IT Banking Portal Student Java Project Using Eclipse

EXECUTIVE SUMMARY OF THE PROJECT

Synopsis 

The mini-project made by us is basically a demonstration of the banking systems around the world on a very basic scale, in which we have created a GUI (Graphic User Interface) using the eclipse platform of JAVA and using the file management systems in JAVA. Basically, we have provided an interface to add, delete and view the different many accountants of a particular branch of a bank and also to add, delete and view the different bank holders and also store their account numbers, contact numbers, and salaries in the file, just to use whenever required. We have used the file management system in JAVA to store the details of all the accountants and the account holders.

Introduction 

The application that is the essence of the project works by defining various classes that even have further subclasses so as to modularize the final code. The code is written in a neat fashion with appropriate documentation. It provides a smooth, unfaltering user experience so as to facilitate its use among all age groups.

The use of exception handling in Java is implemented so as to prevent the user from getting stuck in a process and understanding the use of the application in a more suitable manner. It eases the reading and understanding of naive runtime errors generated. The use of the multithreading concept in Java lets us use multiple threads at a single time and also lets us do multiple tasks simultaneously which is required in the banking system.

Problem Statement 

The motivation behind the project was the lack of a simple well-written application to access and modify the details of the bank accountants of a particular branch and the bank account holders at the same time. It gave us enough motivation to make a GUI-based application to solve the same. In a world like this, can a whole lot of the population afford to waste the time looking for the details in the hard-copied registers and looking for all the accountants and the account holders when they can be easily maintained as a simple application?

Objective 

The main objective of the project makes the user to access the details of all the bank accountant’s bank account holders. It also gives the accountant the authority to delete, and modify the details of the account holders but the reverse is not possible

because that’s the hierarchy in a banking system works in that way. The aim is to give the accountant entire power virtually on the application. With our application, we have achieved just that. The application could have been designed in many different ways, but we have produced a solution of application that minimizes time complexity as well as space complexity by using Encapsulation, Polymorphism, Inheritance, and data abstraction. Along with these, Interfaces and various access modifiers have been implemented so as to maintain privacy and definition of access in different blocks Of code. The use of exception handling lets the user know exactly what went wrong.

METHOD

The application works by reading all the accountants and the account holders from a different file, which can be updated by the proprietor of the application, and also the same power is given to the admin of the bank. The file has the information stored in a particular format, which is decoded by the string reader functions in the code. Each time we enter or want output from the file we have to read this string reader function which is an in-built function of java and can be directly used just by importing the required files.

If there exists an object for the particular accountant or the account holder already, then that object is accessed, instead of creating a new one. If an object that is not available in the file is to be accessed then that object needs to be created and then accessed hence access to that object is not allowed and hence access is denied. We have to make sure that the object we want to access is present in the file system otherwise we have to create an object. The usage of various JFrames also enables us to increase our scope and work beyond the limitations of java by using the GUI effectively to give users an attractive interface to work with and get the work done.

SYSTEM REQUIREMENTS:-

  • Eclipse platform for JAVA GUI (Graphic User Interface)
  • JDK(Java Development Kit)
  • Windows Operating System

WORKS DONE:- (SCREENSHOT PF OUTPUT AND EXPLANATION)

  1. Main Page:–

This is the main frame that will be displayed as soon as our project gets executed. This is also the first page and the directive page as it directs us either to the admin section or to the accountant section. It consists of two buttons ADMIN LOGIN AND ACCOUNTANT LOGIN.

  1. Admin login page:–

This is the page that gets displayed as soon as the user clicks on the admin login button.

It consists of 2 labels namely enter a name, enter a password, one button, one text field, and one password field to get the password. To hide the password we have here used the echo Code property of the password field to encrypt it.

  1. Login Failed:–

This page gets displayed as soon as the user gets the name and the password on the frame admin login form but the dialog box with the message “Sorry, Username or Password Error” only when either the password or the name entered is incorrect.

4. Admin login Section:–

This frame gets displayed when the user enters the correct name and password. It has 4 different buttons which will direct to the things written on them. Only the ADMIN can enter the details of the Accountant and no one else. It consists of the addition, viewing, and removal of the accountant.

5. Add Accountant Page:–

This frame appears when the Accountant login button has been selected and the name and password entered are correct. This frame consists of the heading Add Accountant and it consists of 6 labels and 6 text fields and 2 buttons. This

6. Accountant Added Successfully:–

This frame appears when an accountant is added successfully.

This frame comes under the admin section. It consists of a dialog box that is used to make a JOptionPane.showMessageDialog() function.

  1. Database of all accountants:–

This is the database frame of all accountants under the institution. This contains various information about the accountants.

  1. Deleting an accountant:–

This frame comes under the admin section.

This frame does the job of deleting an accountant.

This is in the control of the admin whether to delete or not.

  1. Record Deleted Successfully:–

This frame comes when the record is deleted.

This frame confirms that the record is deleted successfully.

  1. Accountant Login Form:–

This frame can be chosen from the main frame of the project.

In this framed name and password of an accountant has to be given and if it is correct then the accountant section frame pops up.

  1. Accountant Section:–

This frame comes under the accountant’s control.

In this Frame, the accountant can add and view users.

  1. Add Account section:–

This frame appears when the button to add an account is hit in the Accountant section.

This frame saves the user’s various details in the database.

  1. Account Added Successfully:–

This frame confirms that the user is added successfully. This frame comes under the accountant section.

  1. Database of users:–

This is the database of users.

This comes under the accountant view section.

FUTURE WORKS:-

  • Since the project was made on a very basic level the obvious future work for the project would be to inculcate into it more complexities of the real-life kind of banking system. Since the project we made was only for the students of the branch IT in its future work we can inculcate more branches
  • Another future work that might sound interesting is to provide a server to it and make it using a database like MySQL(My Structured Query Language) which is a database used often with Java to store the details and the contents into it. It will be relatively easier for both the user as well as the programmer to use MySQL instead of the file management system, this is because in the file management system, we have to distinctly code to read in a string or anything else but when using MySQL we can directly use the add, delete and modify inbuilt functions of the MySQL database system and connect it to the Java program through server and then take in the command from the user in java and then pass on the same command to MySQL. Java and MySQL can be connected to each other through database connectivity which basically connects them through

RESULT AND DISCUSSION:-

The main result of the project is that we are now able to create a banking interface within a branch and between the accountants and the bank account holders. It can also be used to display the details of the users/bank account holders if we want to know something about them as and when we require it.

The usage of JFrame also enables a good graphical user interface making the banking system look more attractive and hence more appealing to the user. Since we have used many components on the JFrame like the text fields, password fields, radio buttons, and other buttons. All the components within them contain a lot of properties that can further be used to make it more attractive and more user friendly and also more encrypted in a way hence ensuring the data encryption in the Java program.

CONCLUSION:-

This was our project ever involving the connectivity of a language with the file management systems. This surely taught us a lot of things like how to store the details and how to look for the details in the backup database and how to create a database and how to back up our data regularly. Through this project, we ended up making an IT portal that has important significance and is very essential to us all. Through this project, we have gathered more knowledge about java, eclipse, and file systems in java. We also got to know a bit more about databases and how we use them.

This project also taught us how to work in a team and taught us various leadership skills and how to coordinate in a team and get the work done.