Our Audio Classification project illustrates a straightforward audio classification model supported by deep learning. we tend to address the matter of classifying the sort of sound-supported short audio signals and their generated spectrograms, from classifying dog’s audio to cat’s audio throughout model training. So as to satisfy this challenge, we tend to use a model-supported Convolutional Neural Network (CNN). The audio was processed with Mel-frequency Cepstral Coefficients (MFCC) into what is unremarkably called Mel spectrograms, and hence, was reworked into a picture. Our final CNN model achieved 89% accuracy on the testing dataset.
Project Overview :
The input to our model, in this project, is cats and associated dogs recording audio go in WAV kind. It lies below the supervised machine learning class. Thus, a dataset is also present as well as a target class. Hence, the intention here is to classify if the given input wav file is that of a cat or dog. Each of the dog and cat sounds is incredibly distinguished like in their pitch and frequency level since completely different| sounds have different sample rates. By default, Librosa mixes all audio to mono and resamples them to 22050 cycles/second at load time. For music and audio analysis, Librosa is associated ASCII text file python package. The info and the sampling rate are provided by Librosa. Audio or sound is in its raw kind, and the data provided should be pre-processed to extract significant and meaningful features so we implemented an algorithm i.e., MFCC (Mel Frequency Cepstral Coefficients) rule. Then, when audio extraction is done, the information is fed and the dataset is split into training and test set. So, after the preprocessing, a Convolutional Neural Network model is designed using tensor flow. For every code and model building, Keras API was used to implement Google colab.
Motivation
Machine learning can be used in image processing, understanding speech, and musical instruments, speech-to-text, environmental sound classification, and many more. And as for our project, we implemented a class of speech processing i.e, audio classification. Converting sound waves into audio and spectrograms which is a visual representation of frequencies with the help of function provided by machine learning.
There are many techniques to classify images as many different in-built neural networks under CNN are already there, especially if it is related to images. And it’s straightforward to extract options from pictures as a result of pictures already being available in the shape of numbers, because the formation of a picture may be an assortment of pixels, and pixels area units within the sort of numbers. When we have data as text, we use the sequential encoder and decoder-based techniques to find features. But if it is to sound recognition or audio it is more difficult compared to text because it is based on frequency and time. Therefore a proper model is to be made to extract the frequency and pitch of that audio so as to make it easier to later recognize it.
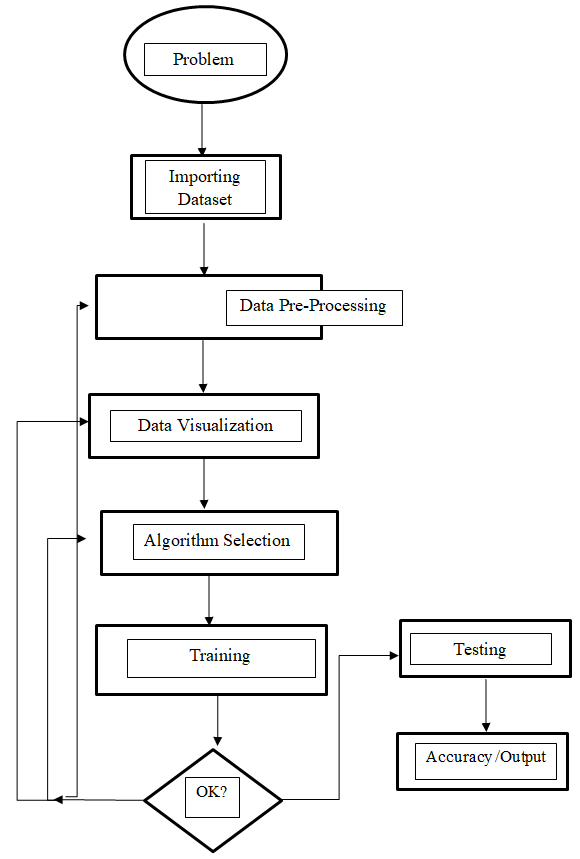
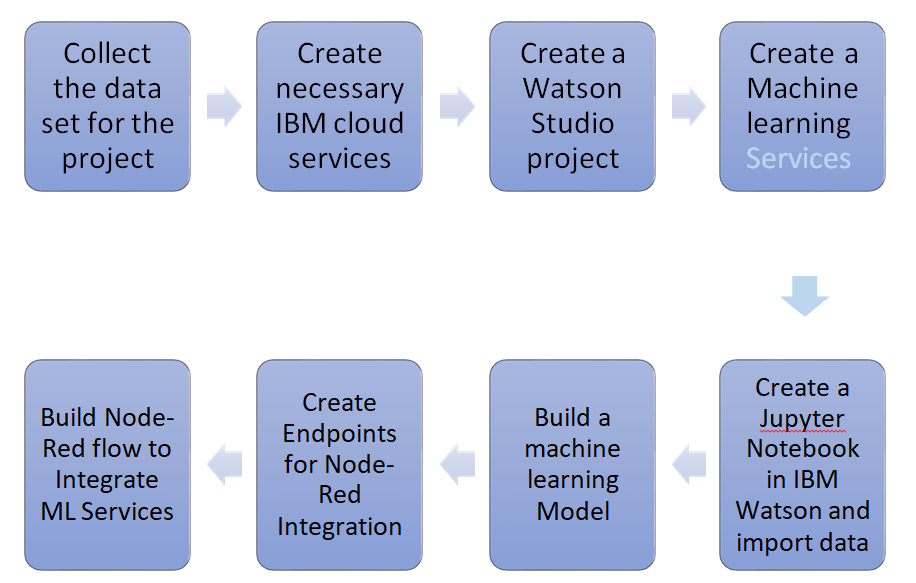
Flow Chart:

Preliminaries and Background
Related work
Machine learning: Image classification of cats and dogs – Before a decade, in computer notion, many problems had been saturating in accordance with their precision. However, the accuracy of those troubles significantly stepped forward with the boom of deep gaining knowledge of strategies. The majority of the problems that arise from image class is that it is defined as predicting the distinct categories a photo can belong to. Hence, for the supplied enter/ photograph detection with the aim of accomplishing high precision, a state-of-the-art approach is incorporated, i.e., a convolutional neural network turned into the build for the photo category mission of puppies and cats. A dataset become given from Kaggle comprising a total of 25000 pix of each dog and cat.
Machine learning: Audio classification of different bird species – Here, the methodology and results of using deep learning to assist in the classification of birds by their sounds are presented. As birds indicate the health of an ecosystem, hence this topic is of high importance. Random Forest Classification and custom-made six CNN models from the literature were performed on a dataset of ten birds that were composed of xeno-canto.org. The highest accuracy was achieved at around 65% by the Random Forest and at about 58% for the CNN model.
conclusion and future work
In this report, we first briefly explained the overview of this project and showed some referred project work already established. Then, we precisely illustrated our task, including the learning task and the performance task. After that, we explained the approach we are heading toward in order to classify the datasets. The approach/model we used is a neural network which is an implementation of the deep network which is a trainable model by which we were able to classify the dog’s and cat’s audio. The highest accuracy we got was 89.6%.
- In the future, we will try to implement the different high-level models in order to achieve much higher
- We’ll build a system that can directly intake a live raw