Book Reading Event System MVC App Using ASP.Net SQL & Bootstrap

This Book Reading Event App is a combination of tools and processes that manage book-reading events across India. A book reading event where book lovers come together for a community reading of their favorite book. One or more readers read the book loudly and optionally people even play roles from the book.

INTRODUCTION

A book reading event app is an online web application that is a single-point entry for all book lovers across India. Any registered and verified user who wants to keep a book reading event can create an event, invite people they know by specifying their email ids, or can keep the event open for all. The invited people need not be registered users. Due to some problem, if someone is not able to create an event, s/he can ask some other registered user to keep an event on their behalf of her/him. The registered user can check for the public events happening by just browsing into to portal and for private events, one can check the invited list of events by logging into the portal as well as by checking their invitation mail. Admin can see all the events (whether it is public or private) and all the registered users. As per the requirement, the admin can Edit as well as Delete any future public or private event details.

OBJECTIVE

The objective of this Book Reading Event System Project was to manage all the book reading events properties created by one user and send an invitation to the guests by entering their email ids or by keeping an event public. Managing these resources may itself be sufficient enough to give any user a big jump in terms of efficiency. The objective was to build a web application for people that makes use of it to manage their hectic schedule and make the best use of it in a smooth and efficient manner.

FUNCTIONALITY

The project will manage the intellectual property by creating a database of all the users and events, helping users to create an event, edit the event details, delete an event, add comment(s) on the event, invite the guest(s) for the event and to see any book reading event details happening around. Admin simultaneously verifies details of events as well as users. Admin can also edit and delete the event whenever required. Book Reading Event App has two types of users: Registered users, and Admin users.

Registered users are the normal user of the application who has the following rights:

  • View Past and Upcoming Public events
  • Log in to the system using “Email id” and “Password”
  • Create an Event and send the invites by specifying email ids
  • Edit the events created by him/her
  • View the events invitation list along with the details
  • View the list of events created by him/her
  • Add Comments to the Event

Admin Users have all rights throughout the application as follows:

  • View Past and Upcoming Public events
  • Log in to the system using “Email id” and “Password”
  • Create an Event and send the invites by specifying email ids
  • Edit any upcoming event’s detail
  • View the events invitation list along with the details
  • View the list of events created by him/her
  • Add Comments to the Event
  • View list of all the users
  • View a list of all the events

METHODOLOGY AND APPROACH

The following technologies were used for building this project:

  • Frontend – Hypertext Markup Language (HTML) CSS (Cascading Style Sheets), JavaScript, Bootstrap
  • Backend – ASP.NET (Active Server Page) Model View Controller (MVC)
  • Database – Structured Query Language (SQL) Server
  • Framework – Entity framework is used to connect to the database which helps in object-relational mapping

This project is built in an MVC pattern where M is the model which determines the classes, V is a view that determines views shown to the user and C stands for the controller which is used to handle the request. This project follows three layered architecture. The first layer is the presentation layer which includes views, and the second layer is the business layer which includes the services which work as a mediator between the presentation and data access layer. And the third layer is the data access layer which directly interacts with the SQL server database using entity framework and code first approach.

OBSERVATIONS

Graphical User Interface (GUI) – The website contains many links and tabs for various requirements like Create Event, Edit Event, View Invitations, etc. The users of the application consist of users from India. It will lay stress on each

page’s layout and the features to be depicted on that page.
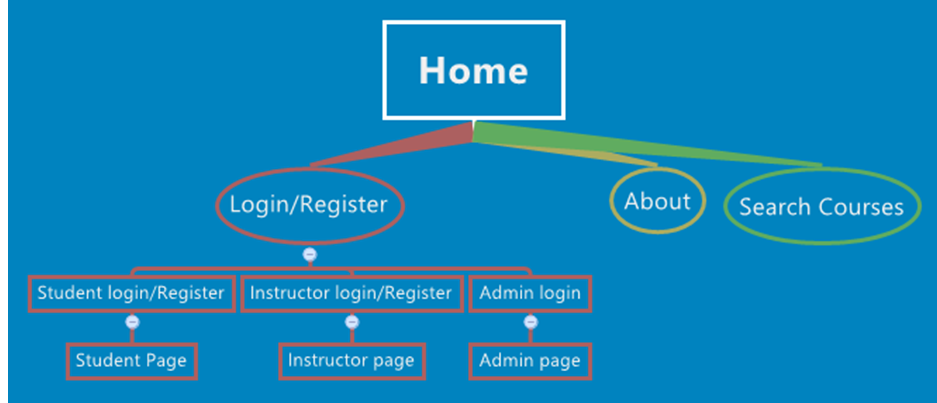
HOME PAGE:

This is the first landing page. Any user can see the Public Book Reading Events without logging into the system by using the Past Events and Upcoming Events links. The past Events link redirects to the Past Public Events and the Upcoming Events link redirects to the Upcoming Public Events along with their details.

PAST EVENTS:

This page is landing by clicking on Past Events on the home page. Any user can land on this page without logging into the system. But one cannot add comments without logging into the system. Users can see the list of Past Public Events along with the details of each event. The working of Upcoming Events on the home page is the same.

A registered user or admin can log in using their credentials.
Depending on the type of user, s/he will have access to various functionalities of the application. In case the email id and password typed by the user do not match any record in the database, a login failure message will be displayed. If not registered already, a user can sign up by clicking on “Signup”.

USER SIGN UP

A user can register using their credentials. After successful registration user will be redirected to the login page. In case of failing the validation requirements of email id or password, a failure message will be displayed. If registered already, a user can log in by clicking on “Login”.

HOME PAGE AFTER LOGIN:

This is the landing page after the user logs in to the system. PAST EVENTS redirect to the page containing the list of past events which either the user invited, or was a public event. UPCOMING EVENTS redirects to the page containing the list of upcoming events to which either the user is invited, or it is a public event.

Navigation bar: Contains the button for CREATE EVENT, MY EVENTS, INVITATIONS, HELP, USER DETAIL and
LOGOUT functionalities.

Only user with Administrator rights has some additional button for some additional functionalities available in the navigation bar are ALL USERS and ALL EVENTS button.

CREATE EVENT:

Users can create a new event. The user just needs to enter some necessary details like Title, Date, Location, Time, Type of event, and some other optional details like Description, and Other Details. Users can invite guests to the event by entering their email ids separated by a comma. Users must provide the creator id for whom they are creating the event. If the user wants to create an event for himself/herself only, then he/she can check the creator id by clicking on DEAR – XXXXX. If the user is creating an event for someone else, then the admin will verify the details with whose creator id has been entered. If the BACK TO LIST button is clicked, the user will be redirected to the HOME PAGE.

MY EVENTS:

Users can see the complete list of events created using their own creator id. From here user can Edit/Delete his/her any upcoming event by clicking on the Edit/Delete button. Users can also create events by the button provided just under the tile MY EVENTS.

COMMENT. And can also see the comments posted by others in the COMMENTS section. The comments in the COMMENTS section are shown anonymously sorted by date and time.

EDIT EVENT:

Users can edit the details of any upcoming events from the list of events provided on the MY EVENTS page. Users can edit any of the details provided in create event form except the creator id. The layout of the page is exactly the same as CREATE EVENT page. Users can return to the MY EVENTS page using the BACK button.

INVITATIONS:

Users can see the complete list of events to he/she is invited. The list of events being shown is sorted by the date and time of the event. As this page proved to be much helpful to users in order to plan their future activities. By clicking on the DETAILS button, the user will be redirected to the EVENT DETAILS page. On the EVENT DETAILS page, users will find some additional information regarding the events such as the type of event(public/private), the number of invitees invited, and the creator of the event.

EVENT DETAILS:

Users can see all the available information regarding the event he/she invited to by clicking on the Details button available on the INVITATIONS page. Here one can find some additional information such as the type of event(public/private), the number of invitees invited, and the creator of the event. Users can also add comments for this particular event by clicking on ADD

USER DETAILS:

Users can check his/her own details by clicking on the DEAR – XXXXX button. One needs to check their user id for creating their event, so here they can find it out. Here the button name is extracted from the email id by which the user has login into the system. As it is clearly visible from the image, if someone logged into the system with [email protected] then the name before @ is shown after the Dear – button like “Dear – XXXX”. The name visible in the button is the extracted from user’s email id leaving the part from @ symbol.

ALL USERS – ADMIN ONLY:

Only users with administrator rights can access this page. This page can be accessed by clicking on the button ALL USERS available in the navigation bar. On this page, the admin user can see the whole list of users who may or may not be an admin. Admin can see each user’s name, id, and email id.

ALL EVENTS – ADMIN ONLY:

Only users with administrator rights can access this page. This page can be accessed by clicking on the button ALL EVENTS available in the navigation bar. On this page, the admin user can see the complete list of events. The list contains both public as well private events. The list contains both past and upcoming events. The events in the list are sorted by date and time. Admin can use create event functionality here also by clicking on CREATE NEW EVENT button.

Admin can see details like Title, Date, Location, Start Time, Type of Event, Duration, Description, Other Details, No. of Invitees invited, and Creator id of all the events. For some specific requirements, the admin can see the details for a particular event by clicking on the DETAILS button available in that event’s particular row which will be redirected to the EVENT DETAILS PAGE as shown before. Admin can not only edit the events created by him/her but also edit events created by other users/admins. Admin can edit any upcoming event by clicking on the EDIT button for that particular event which will redirect to the EDIT EVENT page. Admin can also edit the creator id for the event.

After being done with the usage of the portal, the user/admin can log out from the system by clicking on the LOGOUT button available in the navigation bar. After clicking on the LOGOUT button, the user will be redirected to the HOME PAGE. Users can again use the system any number of times by logging into the system using the same credentials used for the first time.

CONCLUSION

This Book Reading Event system is a user-friendly software that can be used in any locality for any user to arrange the event and to send an invite to guests just by entering their email ids. Due to some problem, if someone might not be able to create an event and send an invite or somebody might not have email ids available for all the guests, in this case, the book reading event app provides functionality to a user to create an event on behalf of someone else and it will be verified by an admin before sending an invitation to the guests and posting that event on the portal.

Allowing all the users to have access to such web-based application software can help anyone who wants to keep an event busy with the preparation of the event can easily send invitations to the guests and save his/her time. Further, this software can be developed to add more functionalities in the future, like setting a reminder for the events and notifying the user time by time, and setting a flag for the events one is interested in. This project can be further extended to keep any event (i.e., House-Party, Get to Gather) and not just only for book reading. The sheer possibility of scaling this application is immense and will definitely go to be proven the most useful software in the future times.

Full Stack Project on Restaurant Selection based on Reviews and Ratings

This Website ultimately relies on its users to post reviews, which can be rather subjective and not entirely accurate. Moreover, negative and inflammatory reviews tend to attract significantly more attention than positive reviews. For example, if a restaurant gets 10 positive reviews and just 1 negative review, most people will often scroll down to the negative review and read what it says. This means that even a single bad review can put a business in a bad light. This can pollute their online presence and potentially cause some loss in revenue.

Brief about the Project:

So, the project is titled Review-based Restaurant Selection, where this website will deal with the top-rated and best-reviewed Restaurants present in Mathura.

So, with the help of this website, potential customers weed out their choices of restaurants in Mathura.

Objective

“Review based Restaurant Selection” is the way of giving/providing information related to the best-rated Restaurant in Mathura, because Online review sites have transformed the way we do business and the way your customers make decisions.

 Modules used in the project: 

Detailed Description of Pages

Home Page The home screen consists of a screen where one can browse through the page for getting information about the usefulness of the web page

Home Page

Top 6 Restaurant Page: The screen consists of a screen where one can browse through the top 6 best-Rated Restaurants present in Mathura.

Write Your Review: The user can also Write a Review of any stuff for any Restaurant Present in Mathura Because public opinion matters

Products Page

Review of the Day: – Here on the Screen some Review Added by the user will be shown.

Review of the Day Page

Requirement-: 

Hardware:

  • Personal computer (any configuration)

Software:

  • Brackets source code editor

Technologies used:

  • Full Stack Technology –
  • HTML
  • CSS
  • Bootstrap

Web Page Details

  1. Home Page
  2. About Us
  3. Top 6 Restaurants present in Mathura
  4. Write a Review
  5. People Reviewed

Future Aspects

  1. We can add a query box
  2. We can add the review of the newly opened Restaurant

We can add an SMS tool so that information about the Restaurant can be provided using SMS.

Travel and Tourism Analysis Data of Hotels using Big Data Hadoop

Name/Title of the Project

  • Travel and tourism analysis data of hotels using the Hadoop environment system.
  • Tourist Analysis Using Big Data (Tourist Place Recommendations Dataset)
  • Tourism Behaviour Analysis Using Hadoop (Big Data Analysis)

Problem Statement

Throughout the years the tourism industry was dependent on intermediaries, who enabled the interaction between the suppliers and the customers. The internet age changed the complexity of tourism distribution, enabling the entry of new virtual intermediaries characterized by a strong competitive advantage over other players in the sector.

Recommender systems are categorized into

1. Content-based system: With this, item recommendation is analyzed then it retrieves the information and filters this for research. For example, if the tourist goes to hill stations more often, then the database contains “hill station” as a recommendation

2. Collaborative filtering systems: They rely on similar factors of users or items. Preferences of different users for the same item are recommended by the system.

There are many challenges in designing and executing a Personalized Tourist Travel Package Recommendation System.

1. Usually Travel packages are location-based so they are pertained to space or time to reach the destination. For example, the package contains locations that are geographically near and also vary season-wise.
2. The older recommendation method is dependent upon rating and the travel data may not consist of this sort of rating.

Introduction/Feasibility Study

According to the World Travel & Tourism Council, in 2008 travel and tourism were equivalent to 9.9% of the total world GDP. The tourism industry is growing despite all the risks faced in recent years: terrorism, health fears related to avian flu, and high oil prices. The World Tourism Organization (WTO) reports that in 2006 international tourism arrivals reached its record of 842 million: a 4.5% growth compared with the previous year (http://www.unwto.org). This number even exceeded previous long-term forecasts. For the following years, the WTO predicts constant growth, reaching 1.6 billion international arrivals in 2020. According to the WTO, in the last four years, the biggest tourism arrival growth occurred in the Middle East, followed by Africa and Asia, and finally Europe, while a sharp decline has been observed in the Americas. Europe, however, still accounts for the biggest market share of international arrivals. Tourism has thus a great influence on the world economy and it is important for the European market to maintain its leadership position. This can only happen if the industry will keep up with the newest technology innovations and will be able to quickly adopt them. Internet is especially relevant for the tourism industry due to its worldwide coverage, enabling direct worldwide interaction with tourists

Below are the modules required to develop this project and create an application user form:

1. Administrator authentication/module: This module is mainly based on admin.
2. User Registration: This module covers the details about the registration of users they can be registered by themselves by adding data like name, password, email id, and further details.
3. Package Modules: Users can view different tour packages available for tourists.
4. Testimonials module: This is the module where passengers can post feedback after the journey and they can share their experience.
5. Payment & Search Module:
a. Pay payment through PayPal.
b. Pay payment through draft, credit & debit cards, UPI, and net banking.
c. Search city-wise hotels, flights, packages, buses, rails, and events.
6. Routes module; This will display the route information of the source location and destination location. Users can also check the best routes for their destination. From this module user can also get information related to various routes connecting sources and destinations, For each route, information such as source, destination, fare, reservation details, pick-up points, etc. are provided.
7. Reservations module: This module is for passengers/customers where passengers can reserve their seats by making payments.

Hardware & Software Used

Software Used:

1. HADOOP environment system that acts as a tool for analysis & recommendations to tourists.
2. Technology: Java
3. Web Technology: HTML, Javascript, and CSS.
4. Database used: MySQL5.0

Hardware Used:

1. A portable PC or a working laptop.
2. A minimum RAM of 8GB or 32 GB hard disk drive.
3. Intel Core-i5 Processor, 8th Generation(minimum)

With this project, I am developing a tourism management system first by creating a user login and password form with the help of java language and some of the python frameworks which will be used for developing the code and then, giving recommendations on famous tourist places to visit in a particular area or throughout our country(India) based on user’s search history on the system. It will be a simple static web application type system with not that much of looking feel.

Bus Reservation System or Online Bus Ticket Booking Java Project

Purpose of the Project:

This project is meant to delineate the features of Online Bus Ticket Booking, so as to serve as a guide to the developers on one hand and a software validation document for the prospective client on the other. The Bus Reservation System is developed for Travellers to reserve seats online and to save them from hassles. It will allow the passengers to enjoy the booking of bus tickets from the present position through the internet. They will be provided with the bus routes along with some other facilities like booking the tickets based on their comfort level, the time of arrival and departure, and canceling the tickets. The administrator can handle various aspects like applying the offers, changing the facilities according to price, can monitor various other things. The Travel Agency can also use this application for managing their ticket booking service.

Scope of Project

This Bus Ticket Booking application can be used by any Travel Agent to issue tickets to customers. It also helps the customer to enquire about the availability of seats in a particular bus at a particular date from a particular location. It will also provide the facility to check the timings and schedule of the buses along with the ticket price.

Aim & Objective of the Project

  • Up To Date information is provided that is not possible manually.
  • The objective of my project is to make the Ticket Booking system of an Agency, simple, reliable, user-friendly, and corrective. Moreover less time-consuming as compared to manual work.
  • To Increase The Ticket Booking efficiency.

Features Provided to User

  • The User can enter the sources and destination to view the buses on the specific route.
  • The User can register himself and then re-login to book the tickets.
  • Can check the seats available?
  • Can see all the bus information
  • Can book no. of tickets after registration.
  • Can check the number of Seats already booked.
  • Can view the bus information like arrival time, destination time, etc.

Features provided to Customer

  • The Customer can Update his profile.
  • Can see his Booking.
  • Can change the password.
  • Can Book tickets.

Features Provided to Admin

  • Add the route.
  • Delete the route.
  • Remove the bus from the route.
  • Update the bus details.
  • Update the route details.
  • Add the bus to the specified route.
  • View the Total tickets booked, seats booked, etc.

Functional Requirements:

Activity Diagram for User:

Activity Diagram for Customer:

Activity Diagram of Admin:

Use Case Diagram:

ER Diagram:

List of Actors :

1. Administrator
2. Passengers

Description:

Registration: 

  • Registration if the customer wants to book the bus ticket then he/she must be registered.
  • Unregistered users will not be allowed to access the site.

Login:

  • The passenger who has registered can log in to the system by entering the valid user id and password.
  • If admin logins, they can add or remove bus, can change the price and the timings.
  • If users logins, they can book the ticket from their particular location to their desired destination.

Selection of Source and destination:

The passenger will be able to choose the source and destination.

Available Buses:

After the selection of the source, destination, and date the available buses for the specific route along with the time will be shown to the user.

Bus Route:

The Route to be followed by the bus while traveling from the source to the destination will be shown to the user.

Ticket Booking:

The passenger will be able to book the tickets as per their comfort of price, bus category, time, date, etc.

Logout:

After the payment of the ticket, the customer will be logged out.

Report Generation:

After all transactions, the system will generate the online ticket and will send one copy to the passenger’s Email- address and another one to the system database to maintain the records of the passengers along with the traveling details.

Technical Issues:

  • This Bus Ticket Booking system will work on client-Server architecture. It will require an internet server.
  • The Bus Ticket Booking system should support some commonly used browsers such as Chrome etc.

The customers may select the different options which will be open on another screen as

1. Login Page
2. Registration Form
3. Source and destination (state-wise)
4. Journey Date
5. Search Buses
6. select a pickup and drop location.
7. Offers
8. Route Directories
9. Payment Gateways

Design Constraints:

This Bus Ticket Booking system should be developed using Standard Web Page Development Tool, which conforms to GUI standards such as HTML, XML, JSON, etc.
The system should support various RDMS and Cloud Technologies.

Operational Scenario:

The passenger will log in and will enter the source, destination, and date. The system will show all the buses from that route reaching the entered destination along with the bus type and the seats available for booking along with the fair. The passenger will choose the bus seat according to their comfort and choice. The payment will be done and the online bus ticket will be generated and will be sent to the email address of the user. The user will also be provided with the ticket cancelation option.

Benefits of Online Ticket booking System

  • This system will help to maximize the number of Reservations.
  • Easy to Manage the calendar.
  • Easy to Manage all the records.
  • This System is fully functional and flexible.
  • Easy to use.
  • Saves a lot of time, money, and Labour.
  • This Application acts as an office that is open 24/7.

CONCLUSION

In the Online Bus Ticket Booking system, we have developed a secure, user-friendly Website where users,s or visitors, can view and search the buses for a specific route and can check seats available on the buses. Here we have maintained records of passenger details, seat availability, price per seat, bill generation, and other things, we have developed a computerized reservation system successfully.

Future Scope

  • This Bus Ticket Booking project can be enhanced further by adding the Agent Module to perform the agent-related functionalities, The generated ticket can be sent to the email id of the customer.
  • The website is flexible enough to be modified and implemented as per future requirements.
  • We have tried our best to present this website. Messages and Email alerts for various things can be sent to the Users so that they cannot miss anything.
  • The offers information for various festival seasons can be sent to the User. The payment-related things can be upgraded.

Download the Complete project on Online Bus Booking System Code.

Online Cafe and Salon Management System Angular Project

During the Internship, Students worked on various static websites which include websites of café and event management companies. My internship also includes work on the Angular project Salon management system. This management system includes my main contributions in the registration portal, login portal, password changing portal, membership and offer cards, and other registration and contacts forms. This summer internship provided me with team experience and helped me in developing my skills in Web development using HTML, CSS, and JavaScript. Students have worked with the development of the front end and design of a Company’s Website and Dashboard.

Overall, the Internship program helped me in different ways to grow my knowledge in my field and also gave me insight into how to work in a team with proper coordination and in a timely manner.

ACKNOWLEDGEMENT

Working on these Cafe and Salon Management System projects has given us a wide opportunity to think, implement and interact with various aspects of computer technologies as well as learn new skills. One of the most fruitful benefits of working on this project is that we got a proper experience of working as a team, working on our assigned tasks, supervising and correlating with others, and management of the entire team with their tasks and completing the whole project.

I would also like to express our sincere thanks to our HOD and Course Directors, because of them we got the opportunity of having this group project as a subject in our current semester, and as a result, provided us the seed of execution of such a wonderful idea into action.

Overview of Projects

  • The Salon is a salon management system that has functions like admin management, customer tracking, and product shopping from the web.
  • The Café is a static site that has been designed for the users to get acknowledgment about the café. It has functionalities like booking tables, ordering online food, and menu details.

Objective

  • The objective of the salon management system: The Salon is to keep track of its daily expenses, customer, manage staff, and Publicity of its salon.
  • Static website Cafe management system which is designed also has the main objective of reaching more and more people through the help of the internet and making their marketing more strategic in the market.

Tools and Technologies

When the idea of making a web-based application came to our mind, the first thing that was required to be done was to gather information about the things that were required to be learned by us in order to make this project come to life. Hence after some brainstorming and group discussions, we followed the following figure and according to that learned the things in order.

After conducting this brainstorming and learning the process the tools and technologies that we had to use were as follows:

For Salon:

  • Angular
  • NodeJS
  • Stackoverflow (to learn about our software requirements)
  • GitHub (to learn about our topic)

For Static Website (The Cafe): 

  • Html
  • CSS
  • JavaScript
  • Bootstrap

IDE’s:

  • Visual Studio Code

Roles and Responsibility

  • Contributed to the making of a few modules for the Salon which includes modules like registering customers, forgetting passwords, and reset
  • Also contributed to live project

Implementation Environment:

 The backbone and the main aspect of the software side of the project were to run the HTML code, perform the JavaScript and make the site more user-friendly by adding CSS. So the implementation was carried out in such a way that the correlation of different files would be done easily. Hence, the use of an IDE was a must. Initially, we thought of using IntelliJ IDEA but the idea was dropped later on and we began working with the visual studio code 2020.

Sometimes to organize we even had to use some text editors like sublime text, atom, etc. Implementation of the code was done altogether after we researched and sorted the image data that we obtained. The basic approach that we used was the partial compilation method and went on integrating the small amount of the code into larger ones, module by module.

CONCLUSION

 In the end, we would just like to briefly explain how this project helped us to excel at our own best level and made us learn a lot of new things, technologies, and team management. And also implement all of the skills that we previously acquired or learned later on as a part of the completion of the project. Moreover, this project helped us to learn about the real scenarios of working in a team for real tasks and to cope with deadlines, quality management, and each and every aspect of the project. This project gave us the motivation to think differently and express our own ideas to implement them. Also, it taught us how to deal with errors, quality-related, time-related, and other management-related problems.

Most importantly with the medium of this project, we learned Many new skills, ranging from soft skills to technical skills. Qualities related to management, problem-saving time saving, etc. were also learned by us. We tried to make an honest solution for people out there facing problems and learned how all the skills combined: with the help of a perfect team and proper management along with proper skills is the key to providing the solution to any possible problems out there. And we believe that we did a great job implementing all our knowledge, and are grateful to present this execution of one such idea.

Thanking all those who helped us in a big or a small way with this project. Every contribution that has been given is very valuable to us and is the true reason for this project to stand out as a pioneer-based preliminary project and success of this project. With that being notified we heartily present our project and welcome all suggestions or improvements with open hands.

Online Banking Website Project using HTML, CSS, and JavaScript

In this academic project, we are going to create an Online Banking Website using basic HTML, CSS, and JavaScript. We have planned and going to create as per the design given by the instructor. Which include:-

  • A home page that will provide all the necessary views. And it includes the link to the various linked pages (login/signup page, services, fixed deposit, e-services, account details, about us).
  • The top bars include the link to every single linked page.
  • We are going to provide services like Personal internet banking, Corporate banking, Merchant business, and Online tax.
  • Payment transfer: – International transfer, National transfer, Bill payment.
  • My Account page contains: – Account No. , Bank / Branch. IFSC Code.
  • ABOUT US page which shows the details of our contacts and our headquarters.2 Online Banking Websites

Concept:-

  • We have used the concept of HTML Programming like o Hyperlink projection.
  • Use of different tags to make it visually better like font, table, listing, hyperlink, styling, etc.

Use of:-

  • Combo Box
  • Search Box
  • Button
  • Text Field
  • Label
  • Fieldset
  • Legend

This project is basically an online banking website where one can create his/hers bank account, and use the same account for various banking services.
All designing and programming are done by us only.
All the members have their role in creating this website.

PROJECT DESCRIPTION

Project Name: Online Banking Website

Languages Used: HTML, CSS, JavaScript

Software Used: Visual Studio Code

Browser Used:  Google Chrome

Description:

This project is not a pure website that works on the internet. This project is just a template of a bank website, which can be used with the backend to create a perfectly working website. This website is work fine with JavaScript, CSS (Cascading Style Sheet), and HTML (Hyper Text Markup Language), with some simple concepts to make it a Responsive Web Page.

PROJECT CONTENT

This website is consist of various HTML pages, which are linked to each other with links (either by link or anchor tag).

Following are the HTML file names involved in the project:

  1. html (Home Page)
  2. html (Login Page)
  3. html (Sign Up Page)
  4. html (Personal Internet Banking)
  5. html (Corporate Banking)
  6. html (Merchant Business)
  7. html (Online Tax)
  8. html ( International Money Transfer
  9. html (National Money Transfer)
  10. html (Bill Payment)
  11. html (Fixed Deposit)
  12. html (E-Services)
  13. html (My Account)
  14. html (About Us)

Following are the CSS files name involved in this project: (Here, we used a simple convention in the naming of the files: “<html_file_name>CSS.css”

  1. css (Home Page)
  2. css (Login Page)
  3. css (Sign Up Page)
  4. css (Personal Internet Banking)
  5. css (Corporate Banking)
  6. css (Merchant Business)
  7. css (Online Tax)
  8. css ( International Money Transfer
  9. css (National Money Transfer)
  10. css (Bill Payment)
  11. css (About Us)
  12. css (My Account)
  13. css (Fixed Deposit)
  14. css (E-Services)

Following are the JavaScript file names involved in this project:

  1. js (Login Page)
  2. js (Sign Up Page)
  3. js (Personal Internet Banking)
  4. js (Fixed Deposit)
  5. js (Bill Payment)

CONCEPTS USED

As above mentioned, this template website is made up of HTML, CSS, and JavaScript.

The concept used in HTML:

  1. Using the link to add an external CSS file to it.
  2. Using the “src” attribute with the “script” tag we link external JavaScript.
  3. Using the “div” tag to separate various parts of the webpage to give functionality and style separately.
  4. Using “h1” tags to give a heading.
  5. Using “img” tag to give images on the webpage.
  6. Using anchor (“a”) tags to link multiple HTML files to each other.
  7. Using “id” and “class” attributes with different tags to give them style and functionality accordingly.
  8. Using the “form” tag to use the form for the login and sign-up page.
  9. Using the “method” attribute’s value as “POST” to give the form data securely.
  10. Using “input” tags to make an input field for the users. (With its different types.)
  11. Using “onload”, “onclick”, “onblur”, “onchange” with its value to call the functions which are in the respective JavaScript files on loading the webpage, on clicking a button, on losing focus, and changing the state respectively.
  12. Using “label” tags to create labels for the input fields.
  13. Using “select” tags to create a drop-down menu or combo box in the form.
  14. Using “option” tags inside the “select” tag to give options in the drop-down menu.
  15. Using “button” tags to create a button for submitting and resetting the form.

The concept used in CSS:

  1. Using “#” and “.” to access elements with their id and class values respectively.
  2. Using some pseudo-classes to make a somewhat interactive web page. (Without using JS.)
  3. Using media queries to make the page responsive for some specific display ratios.
  4. Using “@import” for importing another CSS file to a specific file.

The concept used in JavaScript:

(In this project, JavaScript is used mainly for form validation and for interactive buttons.)

  1. Using Regular Expression (RegEx) for creating a pattern for email and password validations as they have a specific pattern in them.
  2. Using “window.location.replace()” to go to a specific location on calling it.
  3. And using other pre-defined functions to create our user-defined functions.

CONTRIBUTION BY TEAM MEMBERS:

  • The idea of the project and its structure of it.
  • Creating all JavaScript files, to make our web pages interactive.
  • Final touch-up to the project.
  • Creating all CSS files, to make our web pages beautiful.
  • Creating all HTML files, to add content into it.

PROJECT IMPLEMENTATION:

Here are some images of our project.

  • home.html
  • acc.html
  • login.html
  • signUp.html
  • billPay.html 

CONCLUSION

This online banking website project is completed in two scripting languages i.e. HTML and CSS, and JavaScript.

There is a total of 14 .html pages which are linked together to create a full website template for online banking.

In this project, all three developers work equally, with the same amount of effort.

REFERENCES

1. w3school.org
2. geeksofgeeks.com
3. developer.mozilla.com

Download the complete project on code, report of Online Banking Website Project using HTML, CSS, and JavaScript

Library Management System Using PHP, JavaScript, HTML, CSS and MySQL

Introduction

The Library Management System is an application to manage various tasks such as check out and check in of books, adding the borrowers, and fine management of the books.

Functions:

1. Search Books based on keywords.
2. Select the book and checkout if available.
3. Check in the book.
4. Pay fines for books checked in after the due date.
5. Add borrowers.

Architecture

To implement the system, various schemas were built which are described below:

1. Book
The book table contains the ISBN, title, and availability of the book. Here, ISBN acts as the primary key of the table.
2. Book Authors
The Book_Authors table contains the Author_id and ISBN number of the book written by the author. Here, Author_id and ISBN act as the primary key.
3. Authors
The Authors table contains the Author_id and name of the author. Here, Author_id is the primary key.
4. Borrower
The Borrower table contains the card_id, SSN, Name, Address, and phone number of the Borrower. Here, card_id is the primary key.
5. Book Loans
The Book_Loans table contains the Loan_id, ISBN, Card_Id, Date_out, Due_date, and Date_in of the book loans. Here, Loan_id is the primary key.
6. Fines
The Fines table contains the Loan_id and Fine_Amount of the book loans. Here, Loan_id is the primary key.

The application is built on MVC (Model View Control) Architecture.

Libraries and Software Used

Software Used: Wamp(Apache, MySQL, PHP)
Database: MySQL
Language: PHP, JavaScript, HTML, CSS, SQL
Libraries: Bootstrap

User Manual

There are 4 navigation links on the index/home page. The following are the functionalities of each tab:

1. Search Books

The user can search books from the database by typing the keywords into the search box provided and clicking the search button. If the keyword matches the records in the database, the result is displayed in tabular format. On clicking the row of the table, the user can proceed to checkout if the book is available by providing the card id.

2. Check in Books

First, the user needs to search for the record by providing the keyword in the search box and clicking the search button. After the results are fetched, on selecting the required row, the user can check in the book.

3. Pay Fines

On clicking the refresh button, the user can see the total summed fines of the borrower based on their card id. On clicking the required row, the user can pay the fines.

4. Add Borrower

By filling out the form and clicking on submit button, the user can add a borrower to the database.

Download Library Management System Project Using PHP, JavaScript, HTML, CSS, and MySQL.

Food for Life PHP Minor Project Synopsis

Introduction

”FOOD FOR LIFE” is a food relief web project to serve food for the needy. Nowadays, One-third of the food produced is being wasted and about 9 percent of the people in this world go to bed on an empty stomach. In this Minor Project, various party palaces or hotels have to give information about their unused food on our website and we or other organisations have to collect the food and distribute the food to the needy.

Technologies to be used

 This Food for Life project will be a Web application to be developed in PHP having below technologies:

  • PHP
  • HTML
  • MYSQL
  • JavaScript

Technical feasibility

The technical needs of the Food for Life system may include:

Front-end and back-end selection

When we decided to develop the Food for Life project we went through an extensive study to determine the most suitable platform that suits the needs of the organization as well as helps in the development of the PHP & MySQL project.

Front-end selection:

    1. Scalability and extensibility
    2. Flexibility
    3. Robustness
    4. Platform independent
    5. Easy to debug and maintain

Back-end Selection:

1. Multiple user support.
2. Efficient data handling.
3. Provide inherent features for security.
4. Efficient data retrieval and maintenance.
5. Easy to install.
6. Various drivers must be available.
7. Easy to implant with the Front-end.

Objectives 

The main objectives of this Food for Life project are:

  • The main objective of our academic minor project is to reduce food wastage as many of us throw unused food in dustbins
  • The objective of this is to help the organization that serves food to the hungry people

Conclusion 

This ”Food For Life” project is to feed hungry people with the help of our system. Organizations such as hotels or restaurants have to publish the details of their food on our Food for Life website.

Order Management System for Steel Fabrication Factory Java Project

The web-based “Steel fabrication Order management system” project is an attempt to simulate the basic concepts of order management systems. The system enables the customer to do the things such as view all available products, and products by category-wise distribution. The user can place the order, the delivery agent will get the order details and it will be delivered to the customer at their residence. Users can request customized products with their own requirements and budget.

The Order Management System provides a facility that enables users to view details about products without logging in. But if the user wants to place the order, then it is required to log in first. Users can view all available products with detailed descriptions, reviews, and ratings. Users can choose a particular product. The system checks for the availability of the quantity of the product. If the product is available then the system allows the customer to select the product and place an order. To order a product the system asks the customer to enter his details such as first name, last name, city, street, landmark, state, pin, phone number, etc.

Scope 

  1. Order Management System for Steel Fabrication Factory is a web-based application that allows the admin to handle all the activities online quickly.
  2. So, the aim of the project is to provide products to customers. The customer can choose the products from the category and place the order. Users can request customized products to their own requirements and budget. Staff then can contact the user with the details provided by the user at the login time
  3. Staff will arrange the products as per the order and make them available for collection.
  4. Once the order is ready, the delivery agent will collect the products and they will be delivered to the customer at their residence

SYSTEM ANALYSIS AND DESIGN

System analysis is the performance management and documentation of activities late to the life cycle phase of any software namely:

  1. The Study Phase
  1. The Design Phase
  1. The Development Phase
  1. The Implementation Phase
  1. The Testing Phase

Software analysis starts with preliminary analysis and later switches to a detailed one. During the preliminary analysis, the Analyst took a quick look at what is needed and whether the cost benefits. Detailed analysis studies in depth all the cornered factor, which build and strengthens the software.

ER Diagram:

PROJECT FEATURES

Admin module

Admin is the main role in the overall system. Admin can log in into the system using credential where admin credential was already stored in the database.

After successful login into the admin dashboard, there are various operations that the admin can do mentioned below –

  1. View customer: Admin is able to view the list of customers who are already registered into the system. Customer data is stored in a database so the admin can fetch those data to view the list of customers
  2. Add remove staff: Admin can add staff by giving a particular role also admin is able to delete it from the system
  3. View feedback: Admin can view feedback which is given by customers on products after purchasing

Manager module

Like the admin, the manager can log in to the system with the credentials stored in the database. The manager carries out the most of operations on the owner’s side. The manager can perform the following functionalities mentioned below:

  • Manage products: The manager can add products into the system with all the necessary details. As the products are managed category-wise, the manager can add distinct categories first and then products under that specific category. Managers can also update products by changing the price of products or the available quantity of product
  • Manage delivery: The manager is able to see all the orders. After placing an order by the user, the manager assigns that order to the particular delivery That order is visible to that delivery agent’s dashboard with details.
  • View feedback: The manager can view feedback and ratings given by customers on products after purchasing. The manager can review and analyze the feedback
  • View order customization: The manager can review the customized orders that users have requested, and contact that specific user from the contact details given at the login time

User module

User can login into the system, or even without login users can see product lists, detailed descriptions of products, reviews, and ratings of products. Even without a login user can check all available products. But to place an order user needs to log in first to the system.

Registration and creation of user profile

The system shall require a user to register, in order to carry out the process to place an order. For registration it will ask the user for the following information first name, last name, city, street, landmark, state, pin, phone number, email, and password. The system will automatically generate the user’s profile.

Making Order

After registration user’s credential is saved in databases and using the credential user can log in to the system. For place an order user must do login first otherwise the system will not allow the user to place an order.

After login into the system successfully now the user is able to place an order. The first user needs to search for the available product or the user can search for a product by category, one more option is available the user can select a product and customize it according to their need.

If a user wants to place an order of multiple products, then the first user selects one item and moves it to the cart using the ‘add to cart button, after adding it to the cart now user can go for another product and the user can add multiple products to add.

After adding products to the cart, the cart dashboard will show all the products, product quantity, and total price. Now users can place orders by selecting a payment method.

View Order History: The system shall allow a user to view all information about his previous orders. In history, the system shows the previous product, delivery status, etc.

Delivery Agent

Account Delivery agent is another important role in this system. The main role of the delivery agent is to deliver the product to the mentioned address and update the status of delivery. The delivery agent has functionalities mentioned below:

  1. Receive order: The delivery agent received the order and does a job of delivering the product on time
  2. Track order: The tracking status of the product during delivery is updated by the delivery agent. Tracking status like ‘product arrives, ‘on the way, ‘delivered’, etc. Users get to see this status on his/her side
  3. Verify payment: The delivery agent needs to verify the payment details like whether payment is already done or needs to be collected at the time of delivery
  4. Update order status: After delivering the order successfully, the delivery agent needs to update the status as ‘delivered’.

Software Required for Development

Module 1: Database Design – MySQL-for database

Module 2: Front End – HTML, CSS, JavaScript, React js.

Module 3: Back End – Eclipse IDE(Any IDE), Spring tool suite, Tomcat

Download The Complete Project code, report, and PPT of the Order Management System for Steel Fabrication Factory Java & MySQL Project.

Online Learning Management System PHP Project

Objectives of the Project:-

The general objective of this Online Learning Management System project is to provide various courses to students as well as others who are interested in learning online. The use of the internet has increased and so the courses are available to be learned online. By providing this option, it would be easy for the users to learn by sitting in a comfortable place and learning based on the time they have.

The courses will be added, deleted, etc. by the admin. This project consists of the front end and back end sides. The front end side of the website is developed for the general public who are interested to know about us and to find out the courses provided by the management system. The back end is for the users who have created their accounts and admin utilities.

Scope of the Project:-

For this project, to store all the data various tables and attributes are required. As the main idea of this project is to provide courses for the students to enroll in and learn, it will also allow the instructors to teach courses. Thus the scope of this project is limited to the following tables: COURSES, USER DETAILS, STUDENTXREF, and INSTRUCTORXREF.

User requirements:-

Following would be the basic user requirements-

  1. Users should be able to view the Home page, About Us, and login/Register page of the website.
  2. Users should be able to search for the courses in which they are interested.
  3. Users will be asked to enter the user type as Student, or Instructor while creating the account.
  4. Users who have been marked as Students will be allowed to enroll in the available courses and will be displayed the courses in which they are already enrolled.
  5. Users marked as Instructors will be able to teach the course which is not taught by anyone else. They will be able to see the courses which are taught.
  6. Admin type of user will be able to add or delete courses as well as delete instructors from the courses.

*Note – User can be general public without creating an account, student, instructor, and admin.

Business Rules:-

Below are some basic business rules-

  1. One student can enroll in many courses.
  2. Every single course can be taken by many students.
  3. One instructor can teach many courses.
  4. One course will be taught by only one instructor.
  5. Users can be students or instructors based on the details entered while creating an account.

Entities and their attributes:

In this proposal, there are basically 4 entities. The description for each is given below-

USERDETAILS Entity –.When a student or instructor wants to enroll/teach for any course, first of all, they will have to create an account on the website by using the login page. All the details entered while creating an account will be stored in this table. This table will consist of the attributes as User id, user last name, user first name, user type (it can be student or instructor), and password. The primary key of this table will be the user id. Once the user has created an account, they will be able to know about the courses.

COURSE Entity – The course table will store all the details related to the courses which are offered. This table will have the following attributes Course id, Course name, course department, course description, course start date, and course end date. Course id will be the primary key for this table. Based on the above attributes, students can decide which course they are interested in. The instructors will also be able to know about the courses which are already taught by some other instructors and the courses available for them to teach.

STUDENTXREF Entity- This table will act as a reference table between the COURSE and USER DETAILS tables. The attributes of this table are student id, course id, and user id. The primary key of this table will be the student id.

INSTRUCTORXREF entity – This table is also a reference table between COURSE and USER DETAILS tables. If the user type is instructor then the details for that user id will be stored in this table. The attributes of this table are instructor id, user id, and course id. Instructor id will be the primary key for this table. Here the course id will be unique as 1 course cannot be taught by multiple instructors.

Entity-Relationship Diagram:-

Fig 1: Entity relationship diagram for Online Learning Management System.

Website Description:-

The online learning management system is a system that provides students to learn about various courses online. Various pages have been created for the users like Home Page, About Us page, Login/Register Page, and Search courses page.

The sitemap for the online Learning management system is as:

The project consists of the Front end and back end. The front-end pages are described below:

Home Page:

This page is the main page of the project. This page gives a brief description of the management system and also posts the latest courses which are going to be added in the future. This page will be linked to all other pages. Whenever the user is interested in learning any course, then they need to create an account by clicking on the Login/Register button provided on the navigation bar.

Login/Register Page:

The login page lets the user enter their username and password to login to their account. There are three different links for students, instructors and admin in the login/register page. Students can click on the enroll/register for courses link in order to login into the account. Students who are already registered can put in their username and password to login to the account. In the case of new users, they can register for a new account by clicking Join us button. In order to sign up for an account a user needs to enter an email address, preferred username and password, and date of birth. The user has to make a selection of the account type either teacher or student from a drop-down menu. Then they can simply login into their account. 

The login page lets the user enter their username and password to login to their account. There are three different links for students, instructors and admin in the login/register page. Students can click on enroll/register for courses link in order to login into the account.

Students who are already registered can put their username and password to login to the account. In case of new users, they can register for a new account by clicking Join us button. In order to sign up for an account a user needs to enter an email address, preferred username and password and date of birth. The user has to make a selection of the account type either teacher or student from a drop down menu. Then they can simply login into their account. 

About Us Page:

This page describes the goal of developing this project. This will make clear to the users what the purpose of developing this website is and how they can use it. Contact information is also provided for the users so that if they have any doubts, they can send an email with the query. 

1.6.4 Search course Page:

When a user is interested in learning any course, before creating an account he can check whether the course in which he is interested is provided by the management system or not. This search option will help them to know about the courses and then they can decide whether to enroll in those courses or not. While using the search option, users are not required to create an account.

The back end part will come into the picture when the user has created an account. Users can be students or instructors. While creating an account, the user will be asked to select the User type from the drop-down option. The pages at the backend side are described below:

Student Page:

This page (student.php) will be displayed to the user whose user type is Student. It will display the courses which are available for a particular student to enroll. He can select multiple courses for enrolling. Checkboxes are provided in front of all courses and then finally enroll button is provided.

Once the student selects any course and clicks on Enroll button, he will be shown a thank you message for enrolling in those courses. Student.php will call enroll.php when an enroll button is clicked by the student. The back button is provided on enroll.php which will re-direct the student to student.php. The student will also be displayed the courses in which he has already enrolled on student.php. 

Instructor Page:

When a user selects the user type as an instructor, he will be directed to instructor.php page. On this page, he will be displayed with the courses which he is already teaching. The instructor will be able to teach courses that are not being taught by any other instructor. A checkbox option will be provided to the instructor to select courses and then he can click on each button. This button will direct the instructor to teach.php page where he will be displayed a thank you message.

Admin Page:

Admin page is designed for the administrator to add and delete courses in the system. In order to login as an admin the user needs to select the admin-Add/Delete courses link from the Login/Register page. Two options appears in the admin page 1.Add a course and 2.Remove a course. Add a course lets the admin add new courses in the system.

The details the admin needs to provide in order to add a course are course name, course department, course description, course start date, and course end date. The admin can simply press the Add Class button. A success message appears on the page after the submission of the details. In order to remove a class the admin can make a selection from the drop-down menu and press the Delete Class button. The success message appears afterward.

Functions provided by the website are:

  1. The following are the functions provided by the online learning management system:
  2. Browse the homepage, and about us page.
  3. Search courses without creating an account.
  4. Interested users can create an account.
  5. Students can enroll in courses.
  6. The instructor can teach courses that are not being taught by any other instructor.
  7. Admin can add/delete courses.

Usability considerations:

The online management learning system website has logical navigation. Users can easily navigate around the webpage. The home page gives the users information about the whole system. All the contents are written in simple language. It has a user-friendly interface and functions well with no broken links. All the links and sub-links are clearly represented. The procedures to log in to the account, register for courses, and add or remove the courses from the system are very clear.

The system lets the users know if their attempts of adding courses or removing courses were successful. When the users put wrong credentials while logging in, it lets users know their attempt has failed because of the wrong username or password. So, that user can put the correct information and log in to the account. The website has all the required functions based on user types. That makes the website informative and user-centered. 

FUTURE ENHANCEMENTS:

  1. Based on the entries in the database, graphs can be created to provide information about the number of students in each course.
  2. A class entity can be added to provide more information about courses like classrooms, class timings, etc.
  3. Change the template to make it more attractive and user-friendly.
  4. Passwords can be stored in an encrypted way to avoid giving away personal information.