College Placement Management System Java Full Stack Project

Developing a Placement Management System Java Full Stack Project site for recruiting eligible candidates who have already enrolled their names in the Placement Office in an engineering college and a completely interactive site for the students to enhance their technical and communication skills and to be easily placed in companies.

Modules involved in this Full Stack Project are below:

1. Creating GUI Interfaces for the Recruiter, Student, and Admin and handling the inner logic of those three actors of the system.

2. Generating Reports of Online marks, eligible students for writing online tests, selected students for an interview, and final selected students. Sending emails to selected students and uploading files.

3. Online Test module

4. Providing practice sets for students and outsiders who visit the website

5. Creating a  Discussion Forum for handling student queries and other information which helps students in preparing for placements.

6. Send an SMS to the final selected students.

Download the Complete Java Full Stack Project on Placement Management System Source Code.

Order Management System for Steel Fabrication Factory Java Project

The web-based “Steel fabrication Order management system” project is an attempt to simulate the basic concepts of order management systems. The system enables the customer to do the things such as view all available products, and products by category-wise distribution. The user can place the order, the delivery agent will get the order details and it will be delivered to the customer at their residence. Users can request customized products with their own requirements and budget.

The Order Management System provides a facility that enables users to view details about products without logging in. But if the user wants to place the order, then it is required to log in first. Users can view all available products with detailed descriptions, reviews, and ratings. Users can choose a particular product. The system checks for the availability of the quantity of the product. If the product is available then the system allows the customer to select the product and place an order. To order a product the system asks the customer to enter his details such as first name, last name, city, street, landmark, state, pin, phone number, etc.

Scope 

  1. Order Management System for Steel Fabrication Factory is a web-based application that allows the admin to handle all the activities online quickly.
  2. So, the aim of the project is to provide products to customers. The customer can choose the products from the category and place the order. Users can request customized products to their own requirements and budget. Staff then can contact the user with the details provided by the user at the login time
  3. Staff will arrange the products as per the order and make them available for collection.
  4. Once the order is ready, the delivery agent will collect the products and they will be delivered to the customer at their residence

SYSTEM ANALYSIS AND DESIGN

System analysis is the performance management and documentation of activities late to the life cycle phase of any software namely:

  1. The Study Phase
  1. The Design Phase
  1. The Development Phase
  1. The Implementation Phase
  1. The Testing Phase

Software analysis starts with preliminary analysis and later switches to a detailed one. During the preliminary analysis, the Analyst took a quick look at what is needed and whether the cost benefits. Detailed analysis studies in depth all the cornered factor, which build and strengthens the software.

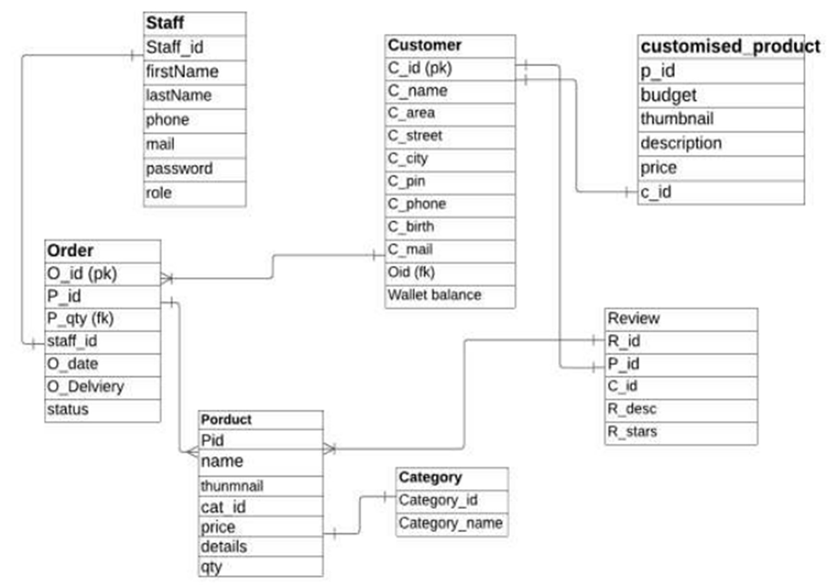
ER Diagram:

PROJECT FEATURES

Admin module

Admin is the main role in the overall system. Admin can log in into the system using credential where admin credential was already stored in the database.

After successful login into the admin dashboard, there are various operations that the admin can do mentioned below –

  1. View customer: Admin is able to view the list of customers who are already registered into the system. Customer data is stored in a database so the admin can fetch those data to view the list of customers
  2. Add remove staff: Admin can add staff by giving a particular role also admin is able to delete it from the system
  3. View feedback: Admin can view feedback which is given by customers on products after purchasing

Manager module

Like the admin, the manager can log in to the system with the credentials stored in the database. The manager carries out the most of operations on the owner’s side. The manager can perform the following functionalities mentioned below:

  • Manage products: The manager can add products into the system with all the necessary details. As the products are managed category-wise, the manager can add distinct categories first and then products under that specific category. Managers can also update products by changing the price of products or the available quantity of product
  • Manage delivery: The manager is able to see all the orders. After placing an order by the user, the manager assigns that order to the particular delivery That order is visible to that delivery agent’s dashboard with details.
  • View feedback: The manager can view feedback and ratings given by customers on products after purchasing. The manager can review and analyze the feedback
  • View order customization: The manager can review the customized orders that users have requested, and contact that specific user from the contact details given at the login time

User module

User can login into the system, or even without login users can see product lists, detailed descriptions of products, reviews, and ratings of products. Even without a login user can check all available products. But to place an order user needs to log in first to the system.

Registration and creation of user profile

The system shall require a user to register, in order to carry out the process to place an order. For registration it will ask the user for the following information first name, last name, city, street, landmark, state, pin, phone number, email, and password. The system will automatically generate the user’s profile.

Making Order

After registration user’s credential is saved in databases and using the credential user can log in to the system. For place an order user must do login first otherwise the system will not allow the user to place an order.

After login into the system successfully now the user is able to place an order. The first user needs to search for the available product or the user can search for a product by category, one more option is available the user can select a product and customize it according to their need.

If a user wants to place an order of multiple products, then the first user selects one item and moves it to the cart using the ‘add to cart button, after adding it to the cart now user can go for another product and the user can add multiple products to add.

After adding products to the cart, the cart dashboard will show all the products, product quantity, and total price. Now users can place orders by selecting a payment method.

View Order History: The system shall allow a user to view all information about his previous orders. In history, the system shows the previous product, delivery status, etc.

Delivery Agent

Account Delivery agent is another important role in this system. The main role of the delivery agent is to deliver the product to the mentioned address and update the status of delivery. The delivery agent has functionalities mentioned below:

  1. Receive order: The delivery agent received the order and does a job of delivering the product on time
  2. Track order: The tracking status of the product during delivery is updated by the delivery agent. Tracking status like ‘product arrives, ‘on the way, ‘delivered’, etc. Users get to see this status on his/her side
  3. Verify payment: The delivery agent needs to verify the payment details like whether payment is already done or needs to be collected at the time of delivery
  4. Update order status: After delivering the order successfully, the delivery agent needs to update the status as ‘delivered’.

Software Required for Development

Module 1: Database Design – MySQL-for database

Module 2: Front End – HTML, CSS, JavaScript, React js.

Module 3: Back End – Eclipse IDE(Any IDE), Spring tool suite, Tomcat

Download The Complete Project code, report, and PPT of the Order Management System for Steel Fabrication Factory Java & MySQL Project.

E-Commerce Order Management System Project using JAVA Swing

We have made a project on Order Management using Java AWT. Abstract Window Toolkit (AWT) is a set of application program interfaces ( API s) used by Java programmers to create graphical user interfaces ( GUI ) objects, such as buttons, scroll bars, and windows.  We have made our project by creating a store “E-Commerce Store”.

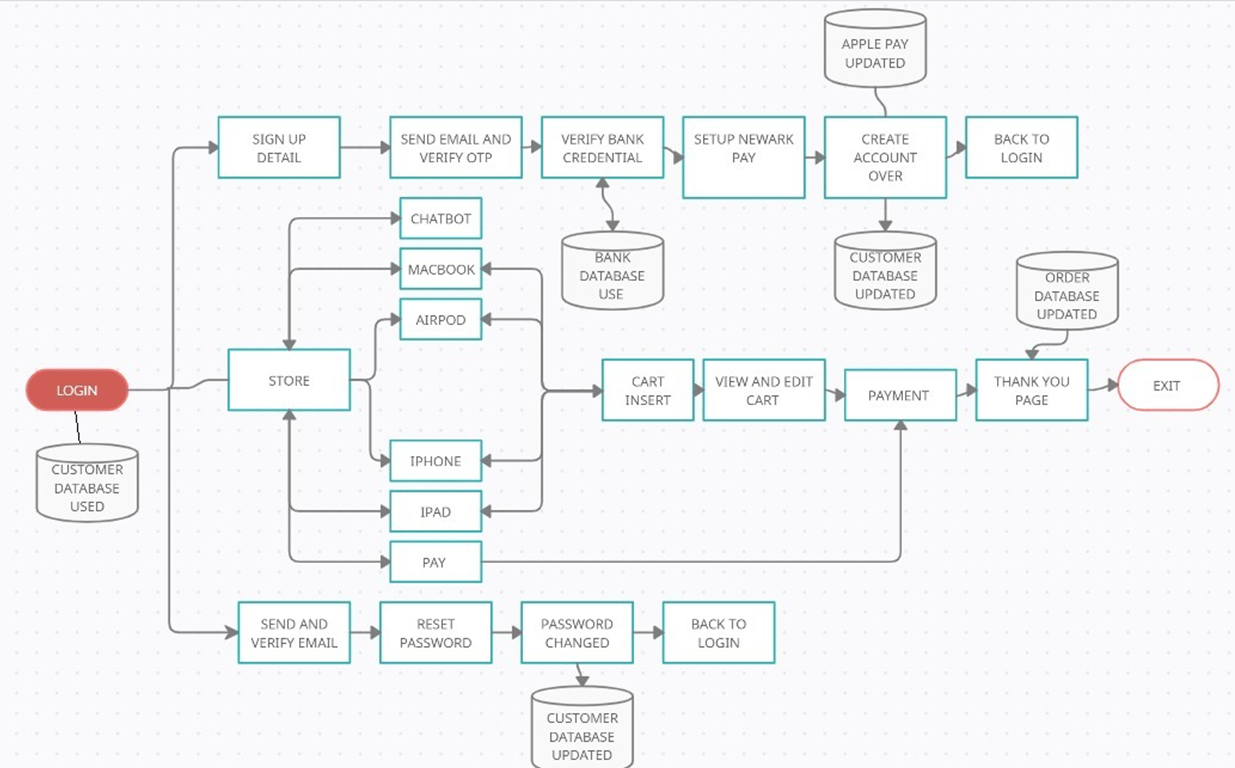
In our project we have to build a user interface where there is a login page where the user will be required to enter their email-id and password, after inserting, their details will be checked via JDBC with the information in the database if their information is incorrect an error message will be displayed, if the user does not have an account there is a button below which is create an account and after clicking that button the user will be taken to a different window where the user will be asked to input additional information and will be required to verify his email-id where the user will receive a onetime password (OTP), after entering that OTP the user will be required to set a password and other related information after successfully creating the account the user will receive a successful message.

After that, the user will be taken to the payment setup page where they have to enter a couple more information like Newark Id, Newark Pin, and Newark Password. Also, on the login page, if the user fails to remember their password, they can click on forget password and will be taken to another window where they will be required to enter their email-id and will receive an OTP after that they can change their password which in turn will be reflected in the database also.

After successful login the user will be taken to the store where there are some items to buy accompanied by a chat box and cart, the former takes you to the chat box where you can talk to our store and can directly go to the specific item purchase page as well you can also report a complaint regarding a specific item.

Talking about Cart, on that page you can see the items you have purchased and also delete the items that you have purchased but wish to keep no longer. For every item, there are specific specifications that you have to choose like memory, model color, etc., and below that there are three buttons cart, done and clear clicking on done will confirm your order and clear will clear the existing choices you have made there is also a button at the bottom which is back to store and it does what it reads.

On the cart page, once you have confirmed your order and wish to make no changes you can select on proceed to pay and after that, you will be taken to a new page where you can make your payment. To make a payment you will have to enter your Newark Id, Pin, and Password and then if you still wish to go back to the cart you can go before paying the amount. After paying the total amount of the items you purchased, the same amount will be deducted from the database as well and in case you have insufficient funds an error message will be displayed

The E-commerce system has massively replaced physical shopping, especially for electronic goods. Therefore, we have created our mini project to stimulate the initial aspects of an e-commerce engine starting with the user creating an account and ending with checkout and payment.

AIM

The first thing that comes to your mind when you think of an order management system is Amazon. Therefore, we decided to model our project on a mini version of Amazon, trying to incorporate some of its features including registration, purchasing items, placing orders, payment, etc.

Literature Review

To place an order on Amazon we need to create an account or if we have an account we just need to sign in.
We navigate to the product we want to buy.
We can then add the product to the cart.
We check the cart and remove the product that we don’t want.
We can then check out and proceed to pay.
We have to specify user details.
We also have Amazon Pay from Amazon their in-house UPI for quicker payment.

PROBLEM STATEMENT

To create a secure small-scale and affordable online store for small vendors for managing inventory and orders as an order management system.

BLOCK DIAGRAM

FEATURES

Account Handling:

Our program is able to create an account for both accessing the account and generating a house payment account, log in into an account by verifying necessary credentials like passwords and forgot passwords.
Our primary verification is done through email:
We use email for:
Verifying email during creating an account by sending an OTP through email.
Authenticate the user when there is forget password request for an account.

Cart system:

A simple easy-to-use GUI for users to select items to add to a shopping cart.
The user can even remove the item once they added it to the cart and simultaneous updating of the final price.

Chatbot:

A simple chatbot to respond to simple queries from the users.

Payment gateway:

We have created an in-house gateway where the user only needs to verify his bank credential once and then he can create an id and password that he can use during checkout making the process easier for the user every time he makes a purchase.

CONCLUSION & FUTURE SCOPE

We have successfully created an online shopping store that can be distributed to small vendors to employ for their use.

Our future endeavors include: Ordering more than 4 items of a particular product auto-updating inventory verifying phone number

We have successfully used the above features for the creation of the order management system using the code mentioned above using java. Our future endeavors in improving our project include connecting our payment gateway to a bank account id, verifying a phone number, and being able to order more than 4 numbers of a particular product.

Online Learning Management System PHP Project

Objectives of the Project:-

The general objective of this Online Learning Management System project is to provide various courses to students as well as others who are interested in learning online. The use of the internet has increased and so the courses are available to be learned online. By providing this option, it would be easy for the users to learn by sitting in a comfortable place and learning based on the time they have.

The courses will be added, deleted, etc. by the admin. This project consists of the front end and back end sides. The front end side of the website is developed for the general public who are interested to know about us and to find out the courses provided by the management system. The back end is for the users who have created their accounts and admin utilities.

Scope of the Project:-

For this project, to store all the data various tables and attributes are required. As the main idea of this project is to provide courses for the students to enroll in and learn, it will also allow the instructors to teach courses. Thus the scope of this project is limited to the following tables: COURSES, USER DETAILS, STUDENTXREF, and INSTRUCTORXREF.

User requirements:-

Following would be the basic user requirements-

  1. Users should be able to view the Home page, About Us, and login/Register page of the website.
  2. Users should be able to search for the courses in which they are interested.
  3. Users will be asked to enter the user type as Student, or Instructor while creating the account.
  4. Users who have been marked as Students will be allowed to enroll in the available courses and will be displayed the courses in which they are already enrolled.
  5. Users marked as Instructors will be able to teach the course which is not taught by anyone else. They will be able to see the courses which are taught.
  6. Admin type of user will be able to add or delete courses as well as delete instructors from the courses.

*Note – User can be general public without creating an account, student, instructor, and admin.

Business Rules:-

Below are some basic business rules-

  1. One student can enroll in many courses.
  2. Every single course can be taken by many students.
  3. One instructor can teach many courses.
  4. One course will be taught by only one instructor.
  5. Users can be students or instructors based on the details entered while creating an account.

Entities and their attributes:

In this proposal, there are basically 4 entities. The description for each is given below-

USERDETAILS Entity –.When a student or instructor wants to enroll/teach for any course, first of all, they will have to create an account on the website by using the login page. All the details entered while creating an account will be stored in this table. This table will consist of the attributes as User id, user last name, user first name, user type (it can be student or instructor), and password. The primary key of this table will be the user id. Once the user has created an account, they will be able to know about the courses.

COURSE Entity – The course table will store all the details related to the courses which are offered. This table will have the following attributes Course id, Course name, course department, course description, course start date, and course end date. Course id will be the primary key for this table. Based on the above attributes, students can decide which course they are interested in. The instructors will also be able to know about the courses which are already taught by some other instructors and the courses available for them to teach.

STUDENTXREF Entity- This table will act as a reference table between the COURSE and USER DETAILS tables. The attributes of this table are student id, course id, and user id. The primary key of this table will be the student id.

INSTRUCTORXREF entity – This table is also a reference table between COURSE and USER DETAILS tables. If the user type is instructor then the details for that user id will be stored in this table. The attributes of this table are instructor id, user id, and course id. Instructor id will be the primary key for this table. Here the course id will be unique as 1 course cannot be taught by multiple instructors.

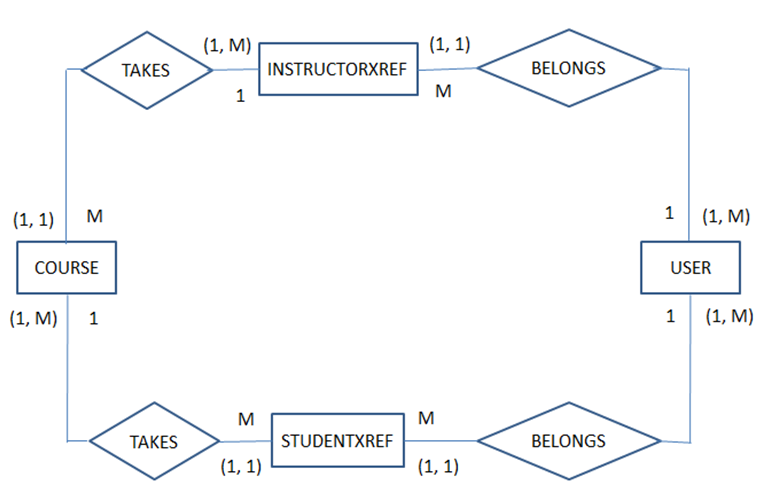
Entity-Relationship Diagram:-

Fig 1: Entity relationship diagram for Online Learning Management System.

Website Description:-

The online learning management system is a system that provides students to learn about various courses online. Various pages have been created for the users like Home Page, About Us page, Login/Register Page, and Search courses page.

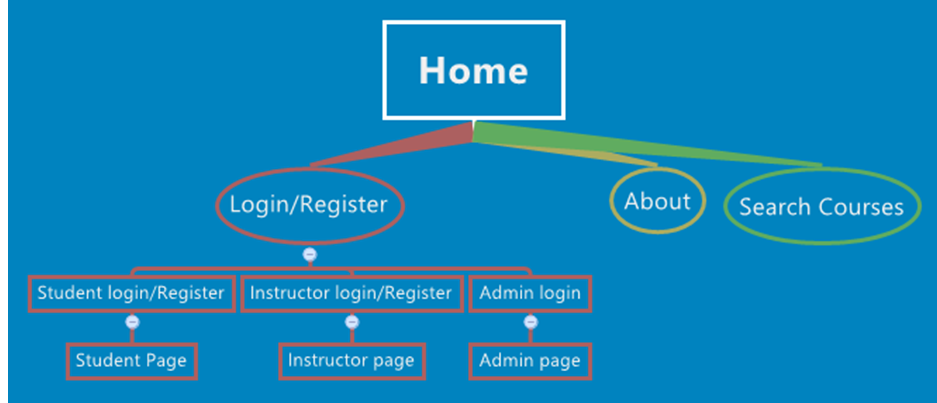
The sitemap for the online Learning management system is as:

The project consists of the Front end and back end. The front-end pages are described below:

Home Page:

This page is the main page of the project. This page gives a brief description of the management system and also posts the latest courses which are going to be added in the future. This page will be linked to all other pages. Whenever the user is interested in learning any course, then they need to create an account by clicking on the Login/Register button provided on the navigation bar.

Login/Register Page:

The login page lets the user enter their username and password to login to their account. There are three different links for students, instructors and admin in the login/register page. Students can click on the enroll/register for courses link in order to login into the account. Students who are already registered can put in their username and password to login to the account. In the case of new users, they can register for a new account by clicking Join us button. In order to sign up for an account a user needs to enter an email address, preferred username and password, and date of birth. The user has to make a selection of the account type either teacher or student from a drop-down menu. Then they can simply login into their account. 

The login page lets the user enter their username and password to login to their account. There are three different links for students, instructors and admin in the login/register page. Students can click on enroll/register for courses link in order to login into the account.

Students who are already registered can put their username and password to login to the account. In case of new users, they can register for a new account by clicking Join us button. In order to sign up for an account a user needs to enter an email address, preferred username and password and date of birth. The user has to make a selection of the account type either teacher or student from a drop down menu. Then they can simply login into their account. 

About Us Page:

This page describes the goal of developing this project. This will make clear to the users what the purpose of developing this website is and how they can use it. Contact information is also provided for the users so that if they have any doubts, they can send an email with the query. 

1.6.4 Search course Page:

When a user is interested in learning any course, before creating an account he can check whether the course in which he is interested is provided by the management system or not. This search option will help them to know about the courses and then they can decide whether to enroll in those courses or not. While using the search option, users are not required to create an account.

The back end part will come into the picture when the user has created an account. Users can be students or instructors. While creating an account, the user will be asked to select the User type from the drop-down option. The pages at the backend side are described below:

Student Page:

This page (student.php) will be displayed to the user whose user type is Student. It will display the courses which are available for a particular student to enroll. He can select multiple courses for enrolling. Checkboxes are provided in front of all courses and then finally enroll button is provided.

Once the student selects any course and clicks on Enroll button, he will be shown a thank you message for enrolling in those courses. Student.php will call enroll.php when an enroll button is clicked by the student. The back button is provided on enroll.php which will re-direct the student to student.php. The student will also be displayed the courses in which he has already enrolled on student.php. 

Instructor Page:

When a user selects the user type as an instructor, he will be directed to instructor.php page. On this page, he will be displayed with the courses which he is already teaching. The instructor will be able to teach courses that are not being taught by any other instructor. A checkbox option will be provided to the instructor to select courses and then he can click on each button. This button will direct the instructor to teach.php page where he will be displayed a thank you message.

Admin Page:

Admin page is designed for the administrator to add and delete courses in the system. In order to login as an admin the user needs to select the admin-Add/Delete courses link from the Login/Register page. Two options appears in the admin page 1.Add a course and 2.Remove a course. Add a course lets the admin add new courses in the system.

The details the admin needs to provide in order to add a course are course name, course department, course description, course start date, and course end date. The admin can simply press the Add Class button. A success message appears on the page after the submission of the details. In order to remove a class the admin can make a selection from the drop-down menu and press the Delete Class button. The success message appears afterward.

Functions provided by the website are:

  1. The following are the functions provided by the online learning management system:
  2. Browse the homepage, and about us page.
  3. Search courses without creating an account.
  4. Interested users can create an account.
  5. Students can enroll in courses.
  6. The instructor can teach courses that are not being taught by any other instructor.
  7. Admin can add/delete courses.

Usability considerations:

The online management learning system website has logical navigation. Users can easily navigate around the webpage. The home page gives the users information about the whole system. All the contents are written in simple language. It has a user-friendly interface and functions well with no broken links. All the links and sub-links are clearly represented. The procedures to log in to the account, register for courses, and add or remove the courses from the system are very clear.

The system lets the users know if their attempts of adding courses or removing courses were successful. When the users put wrong credentials while logging in, it lets users know their attempt has failed because of the wrong username or password. So, that user can put the correct information and log in to the account. The website has all the required functions based on user types. That makes the website informative and user-centered. 

FUTURE ENHANCEMENTS:

  1. Based on the entries in the database, graphs can be created to provide information about the number of students in each course.
  2. A class entity can be added to provide more information about courses like classrooms, class timings, etc.
  3. Change the template to make it more attractive and user-friendly.
  4. Passwords can be stored in an encrypted way to avoid giving away personal information.

Product Stores & Inventory Management Project

Existing System

Following are the S/W for Procurement Process and Managing the database for all the projects of Programme ANSP from Demand – SO – Payments – Stores Inventory.

Challenges: Following are the Challenges in using the above-mentioned Inventory Management S/W

  • Multiple Client–Server Applications for data capturing.
  • Systems are very old and hence they are not able to cope with the latest S/W and H/W.
  • No communication between the applications.
  • No linkage between the projects, every project has a separate schema and instance.
  • Few processes cannot be automated.
  • The database may not be in normalized form.
  • Database structures may not be uniform across systems.
  • Effort duplication might be happening for data entry and reporting.
  • Software Maintenance may be a major concern.
  • No online approvals.

Proposed System

To Overcome the above-mentioned problems, an attempt is made to develop a Web-based product Stores & Inventory Management Project which is centralized, fully integrated having/ all the required functionalities of the existing system. Product Stores & Inventory Management Project will have FIVE major modules, Master, User Management, Procurement and Store Inventory, Payments

General Features 

  • A centralized, fully integrated System that can integrate all required functionalities of existing systems.
  • Should be able to handle any number of Projects without having any additional instances.
  • Organizational Changes should not impact the system.
  • Optimization in business process Automation.
  • Leverage the advantage of new technologies like Java, Spring, Hibernate, and Oracle RDBMS 11g.
  • Multiple users would access this application software with proper Authentication.
  • The proposed system should work both on LAN and WAN (TBD Internet), is a web-based application, and is easy to configure. This system would be developed in a user-friendly way.
  • Business Rule and Workflow for optimizing resources and reduction in Data entry redundancy.
  • Online approval can be done based on their roles and their responsibility.

Functionality Features 

  • Reports(Item/BOM/System/sub System/Article wise summary, Lifted Items, Shortage Lists, Expired items list, and Final Built-in Report), Various reports to be generated throughout the Procurement, Inventory  and other stages such as Proposal, Sanctions, Demands, Enquiry, Inventory, IR and Voucher Gate Passes 

Transaction logs 

  • Transaction log shall keep track of data items added, changed, or deleted.

For records that are added, the data items logged shall be:

  • User ID of the user who activated the functions.
  • Function name
  • Date/Time of the action
  • Data items added

For records that are modified, the data items logged shall be:

  • User ID of the user who activated the change
  • Function name
  • Data items after and before the change of action

For records that are deleted, the data items logged shall be:

  • User ID of the user who activated the function
  • Function name
  • Date/time of the action
  • The add/change/delete functions which shall be logged in the transaction log shall be a different functional requirement given in this document.

Access Control 

  • A valid user ID and password should be entered in order to access the Product Stores & Inventory Management application. Only the project administrator can create or disable user accounts.
  • A timeout to log out feature would be set for non-active sessions or sessions idle beyond a certain time period. Proper session management for the application would be set so those non-active sessions would be automatically logged out.

System Overview

The purpose of this document is to present a detailed description of the Web Publishing System of the “Product Stores & Inventory Management Project” for ANSP (Advanced Naval Systems Program). 

System Architecture

  1. Layered Approach

Product Stores & Inventory Management Project application would be developed in a layered approach. This would enable the team to work on different components independently and also for faster development. It increases flexibility, maintainability, and scalability. It helps in configuring different levels of security.  It also helps in testing components independently.

  • The user interface layer is which all end users would view. All UI components are created and integrated with the business layer.
  • In the business/ service layer, business objects help us in defining entities. Using these business objects, business logic is developed and attached to services. These services are exposed through an application programming interface (API).
  • The data access layer would connect to the database by using hibernate. Hibernate is a high-performance object/ relational persistence and query service. It not only takes care of the mapping from java classes to database tables and from java data types to SQL data types but also provides data query and retrieval facilities.
  • The repository includes a database and file system. The file system would include all the attachments uploaded through the application.
  • Audit log, security & external application integration would include auditing, and tracking of all actions and activities done by users. All integrations like SMS, email, and any hardware integrations are done in this layer.
  1. Detailed Application Layer Architecture

This Inventory Management application would be developed in three-tier architecture i.e.  Client, application and data tier. In the client tier, all end users can access by using a web browser and interact with the Product Stores & Inventory Management Project. UI components would include JSP, CSS, java scripts, and JSON. In the application tier, the application design would be included with presentation, business logic, and data access layers. As discussed earlier, these layers would help applications for faster accessibility and faster development. Architectural styles would include REST i.e. representational state transfer and architectural pattern would be MVC (Model View Controller). In the data tier, services would get the data from the Oracle database and present it in the presentation layer so that the end user can view and take necessary actions.

Functional Modules

The Inventory Management Project contains the following Main Modules

  • Stores & Inventory Management

Store inventory management is a module that enables the maintenance of accurate inventory of its products. The following are the modules.

  • Issue of items
  • FIM Issue using Gatepass

Store Inventory Module:

The Store Inventory would deal with functions like receiving items into inventory and issuing items from the inventory to the requested user based on approval. The system should generate vouchers as per the store’s format for both issues and receiving. Procurement and Store Inventory uses well-designed Web Forms for specific actions required by the users.

Operating Environment

This product will be developed mainly using open source technologies like apache, Java, Spring, Hibernate, Ext-JS, and Windows Operating System for developing this product.

Server Operating System

Ubuntu Linux or any other flavor of Linux

Language / Tools

Java, J2EE, Hibernate, ExtJS

Client O/s

Windows 7 and Above

Database

Oracle 11g

Application Server

Jboss/Apache Tomcat

Web Server

Apache2

Browser Support

Chrome, Mozilla Firefox 10+, Internet Explorer 9.0 and above

Server Hardware requirements:

Processor

Intel Xeon Processor 2.1 GHz

Memory (RAM)

16 GB or higher

Storage Capacity (HDD)

Minimum 500 GB

Port Speed:

10 Mbps Public & Private Networks

System Features & Requirements

Capability Requirements

This subsection provides a high-level overview of the major capabilities of the Project.

Users Capabilities

The System will provide the following capabilities to users:

  • The Product Stores & Inventory Management Project will enable all authorized users to:
  • Provision to Raise Material Gate Pass

External Interface Requirements

User Interfaces

The user would then enter the required data for processing and press the Save or Submit button, after which the processing would be done and the user would be returned to the main page.

The user would then be able to use the different functionalities of the Product Stores & Inventory Management Project by clicking on various links that are provided on each page.

There would also be a Logoff button which would help the user to end his session with the application and he will be transferred back to the login screen.

Functional Requirement

Login

Description & Priority

This feature will be used to LOG IN to the application (only permitted users can use the PMS). It is done in order to prevent any misuse of PMS

Login users:

User, HOD, PGD, PD, Admin, PJB, PMB (Approval Members), and Office users/Clerks can log in with their assigned User names and password.

Stimulus / Response Sequence

When the user gives the correct username and password combination, he/she is transferred to the main screen or the PMS main page.

Functional Requirements

Purpose

To check the credibility of a user and to prevent any misuse of the product.

Inputs

The input will be a username, password combination, and project associated with the program. 

A user can have multiple roles and a role can have multiple features. The change password feature should be with admin only; if the user wants to have a change password feature user has to enter a security question that is provided by the user at the time of user registration.

Output

The user will be transferred to the PMS main page on successful validation and will be alerted if the validation is unsuccessful.

Validations:

Login Credentials.

  • After login user access only assigned project-specific and assigned role-specific data. Here users can be assigned multiple roles and multiple projects.
  • There will be one default project and default role configured.

PMS Login Use Case
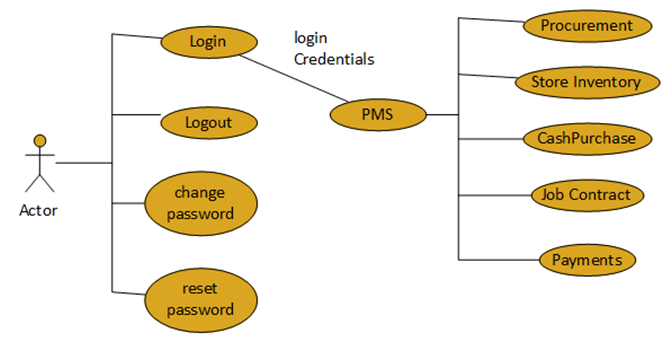
PMS Login Use Case

MATERIAL GATE PASS

Free issue material is the item that is issued to the respective supplier in order to develop/manufacture the required item.

FIM has been categorized into two types.

  • Returnable
  • Non-Returnable

Generation of returnable and non-returnable gate passes.

  • Before gate pass generation user has to raise the gate pass requisition in a specified format with an auto-generated gate pass requisition number.
  • If the type of gate pass is returnable then PDC (Proposed Date of Completion) has to be mentioned (Mandatory).
  • If the gate pass purpose is FIM then QA/QC approval is required.
  • After the gate pass requisition is approved the generation of the gate pass is done by the admin.
  • The below Screen is for requisition for gate passes. To generate a gate pass, the admin has to select the gate pass requisition number on the gate pass generation page and get the gate pass requisition details with some entry fields like packed by & date, supervised by, SOB Number, and date.
  • After taking the concerned officer’s approval gate pass with items went to the security office for the check, if approved out of control number.

Gate Pass System

  • For the issue of an item/ BOM for an outside organization or supplier then the issue has been done by raising gate pass requisition.
  • Gate Pass requisition of two types 1) returnable and 2) non-returnable.
  • After gate pass requisition approval takes place and approval has been done the store admin raises the gate pass with item information.
  • Sends the item with gate pass to the security to out that item.
  • For gate passes also concerned officer’s approvals are mandatory

Gate pass requisition

Returnable:

In the case of items issued on returnable gate passes, the cost of FIM will not be added to items received in the supply order.

  • Requisition gate pass raised by user &approved by project director
  • Gate pass raised by store member/ issued by store member which required authorized officer’s approval.
    • Issue of returnable gate pass max period allowable is 11 months (In PDC, it has to be mentioned).
    • The system has to prompt/alert two weeks before the expiry of the above period in returnable gate pass.
  • FIM BG (bank guarantee) by vendor needs to do for a specific time and date.

Provision for a check box indicating the required FIM BG amount is available in the preform

Non-Returnable

Non-returnable gate pass would be generated for the following:

  • Transfer to other work centers (other labs/inventory) on a permanent basis

– FIM BG (bank guarantee) by vendor needs to do for a specific time and date.

– External issue voucher prepared by the stores with a gate pass

– Inclusion of FIM cost lot-wise/Total cost of supply item when delivery takes place.

– External issue voucher with a gate pass both need to approve

  • Requisition gate pass raised by user & project director
  • Gate pass raised by store admin which required authorized officer’s approval.
  • External issue vouchers are prepared for all items irrespective of their destiny.

– Deduction from stores will be done after approval of external vouchers from respective users and authorities and receipt of Voucher (Acknowledgement) details from another unit.

– FIM gate pass going to labs conversion issue voucher prepared for items flight hardware.

– Nonflight items FIM to other labs external voucher, transfer voucher, and gate pass issued

– Certified received voucher (CRV) from the other inventory once received, the external voucher is prepared.

Note: All items go through returnable/non-returnable gate passes only.

In case a vendor brings an item for entry into the project, a pass is prepared by MMG and sent to Security online to allow the firm inside.

In order to deny permission for entry to those items that were sent on returnable gate passes, it is suggested that a format/ screen be provided for the user to request for the issue of pass by MMG. In that format, the User has to state whether the items being brought inside by the vendor have gone out on returnable gate pass or are being supplied on S.O He has to give reference to S.O or returnable gate pass.

Where a gate pass is prepared whether returnable or Non-returnable, periodically the control no and date issued by Security is to be entered against the gate pass. In case of returnable gate pass corresponding control no and dates are also to be recorded.

Gate pass generation

  • After gate pass requisition approvals, store admin generates gate pass to out the items which are issued to outside organizations/ suppliers as requested item/ BOM (FIM) wise.
  • By taking concerned authority approvals stores admin sends the same to security to out the item/ BOM.

Generation of returnable and non-returnable gate passes.

  • Before gate pass generation user has to raise gate pass requisition in a specified format.
  • If the type of gate pass is returnable then PDC (Proposed Date of Completion) has to be mentioned (Mandatory).
  • If the gate pass purpose is FIM then QA/QC approval is required.
  • After the gate pass requisition is approved the generation of the gate pass is done by store members.
  • The below Screen is for requisition for gate passes. To generate a gate pass, the admin has to select the gate pass requisition number on the gate pass generation page and get the gate pass requisition details with some entry fields like packed by & date, supervised by, SOB Number, and date.
  • After taking the concerned officer’s approval gate pass with items went to the security office for the check, if approved out of control number.

Gate Pass Requisition Screen for Returnable/ Non-Returnable: 
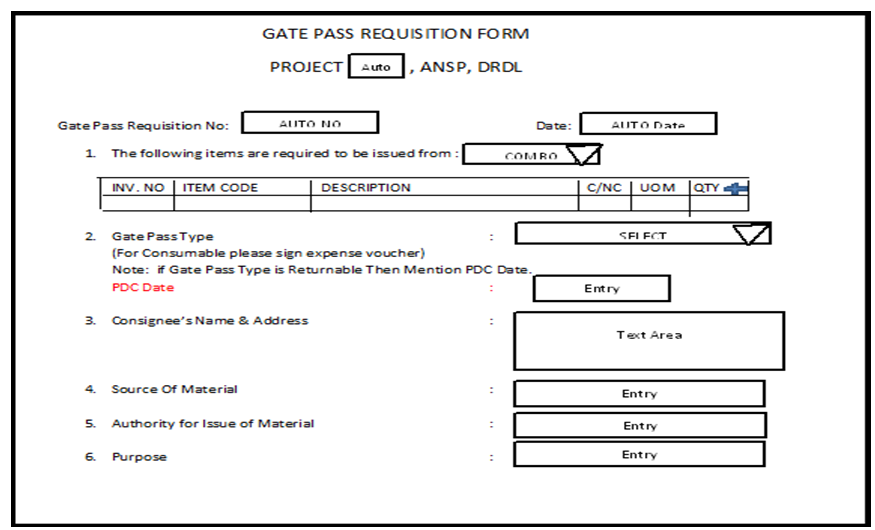
Gate Pass Requisition User Interface

TBL_GATEPAS_REQUISTITION

TBL_GATEPASS_ITEMS

IT Banking Portal Student Java Project Using Eclipse

EXECUTIVE SUMMARY OF THE PROJECT

Synopsis 

The mini-project made by us is basically a demonstration of the banking systems around the world on a very basic scale, in which we have created a GUI (Graphic User Interface) using the eclipse platform of JAVA and using the file management systems in JAVA. Basically, we have provided an interface to add, delete and view the different many accountants of a particular branch of a bank and also to add, delete and view the different bank holders and also store their account numbers, contact numbers, and salaries in the file, just to use whenever required. We have used the file management system in JAVA to store the details of all the accountants and the account holders.

Introduction 

The application that is the essence of the project works by defining various classes that even have further subclasses so as to modularize the final code. The code is written in a neat fashion with appropriate documentation. It provides a smooth, unfaltering user experience so as to facilitate its use among all age groups.

The use of exception handling in Java is implemented so as to prevent the user from getting stuck in a process and understanding the use of the application in a more suitable manner. It eases the reading and understanding of naive runtime errors generated. The use of the multithreading concept in Java lets us use multiple threads at a single time and also lets us do multiple tasks simultaneously which is required in the banking system.

Problem Statement 

The motivation behind the project was the lack of a simple well-written application to access and modify the details of the bank accountants of a particular branch and the bank account holders at the same time. It gave us enough motivation to make a GUI-based application to solve the same. In a world like this, can a whole lot of the population afford to waste the time looking for the details in the hard-copied registers and looking for all the accountants and the account holders when they can be easily maintained as a simple application?

Objective 

The main objective of the project makes the user to access the details of all the bank accountant’s bank account holders. It also gives the accountant the authority to delete, and modify the details of the account holders but the reverse is not possible

because that’s the hierarchy in a banking system works in that way. The aim is to give the accountant entire power virtually on the application. With our application, we have achieved just that. The application could have been designed in many different ways, but we have produced a solution of application that minimizes time complexity as well as space complexity by using Encapsulation, Polymorphism, Inheritance, and data abstraction. Along with these, Interfaces and various access modifiers have been implemented so as to maintain privacy and definition of access in different blocks Of code. The use of exception handling lets the user know exactly what went wrong.

METHOD

The application works by reading all the accountants and the account holders from a different file, which can be updated by the proprietor of the application, and also the same power is given to the admin of the bank. The file has the information stored in a particular format, which is decoded by the string reader functions in the code. Each time we enter or want output from the file we have to read this string reader function which is an in-built function of java and can be directly used just by importing the required files.

If there exists an object for the particular accountant or the account holder already, then that object is accessed, instead of creating a new one. If an object that is not available in the file is to be accessed then that object needs to be created and then accessed hence access to that object is not allowed and hence access is denied. We have to make sure that the object we want to access is present in the file system otherwise we have to create an object. The usage of various JFrames also enables us to increase our scope and work beyond the limitations of java by using the GUI effectively to give users an attractive interface to work with and get the work done.

SYSTEM REQUIREMENTS:-

  • Eclipse platform for JAVA GUI (Graphic User Interface)
  • JDK(Java Development Kit)
  • Windows Operating System

WORKS DONE:- (SCREENSHOT PF OUTPUT AND EXPLANATION)

  1. Main Page:–

This is the main frame that will be displayed as soon as our project gets executed. This is also the first page and the directive page as it directs us either to the admin section or to the accountant section. It consists of two buttons ADMIN LOGIN AND ACCOUNTANT LOGIN.

  1. Admin login page:–

This is the page that gets displayed as soon as the user clicks on the admin login button.

It consists of 2 labels namely enter a name, enter a password, one button, one text field, and one password field to get the password. To hide the password we have here used the echo Code property of the password field to encrypt it.

  1. Login Failed:–

This page gets displayed as soon as the user gets the name and the password on the frame admin login form but the dialog box with the message “Sorry, Username or Password Error” only when either the password or the name entered is incorrect.

4. Admin login Section:–

This frame gets displayed when the user enters the correct name and password. It has 4 different buttons which will direct to the things written on them. Only the ADMIN can enter the details of the Accountant and no one else. It consists of the addition, viewing, and removal of the accountant.

5. Add Accountant Page:–

This frame appears when the Accountant login button has been selected and the name and password entered are correct. This frame consists of the heading Add Accountant and it consists of 6 labels and 6 text fields and 2 buttons. This

6. Accountant Added Successfully:–

This frame appears when an accountant is added successfully.

This frame comes under the admin section. It consists of a dialog box that is used to make a JOptionPane.showMessageDialog() function.

  1. Database of all accountants:–

This is the database frame of all accountants under the institution. This contains various information about the accountants.

  1. Deleting an accountant:–

This frame comes under the admin section.

This frame does the job of deleting an accountant.

This is in the control of the admin whether to delete or not.

  1. Record Deleted Successfully:–

This frame comes when the record is deleted.

This frame confirms that the record is deleted successfully.

  1. Accountant Login Form:–

This frame can be chosen from the main frame of the project.

In this framed name and password of an accountant has to be given and if it is correct then the accountant section frame pops up.

  1. Accountant Section:–

This frame comes under the accountant’s control.

In this Frame, the accountant can add and view users.

  1. Add Account section:–

This frame appears when the button to add an account is hit in the Accountant section.

This frame saves the user’s various details in the database.

  1. Account Added Successfully:–

This frame confirms that the user is added successfully. This frame comes under the accountant section.

  1. Database of users:–

This is the database of users.

This comes under the accountant view section.

FUTURE WORKS:-

  • Since the project was made on a very basic level the obvious future work for the project would be to inculcate into it more complexities of the real-life kind of banking system. Since the project we made was only for the students of the branch IT in its future work we can inculcate more branches
  • Another future work that might sound interesting is to provide a server to it and make it using a database like MySQL(My Structured Query Language) which is a database used often with Java to store the details and the contents into it. It will be relatively easier for both the user as well as the programmer to use MySQL instead of the file management system, this is because in the file management system, we have to distinctly code to read in a string or anything else but when using MySQL we can directly use the add, delete and modify inbuilt functions of the MySQL database system and connect it to the Java program through server and then take in the command from the user in java and then pass on the same command to MySQL. Java and MySQL can be connected to each other through database connectivity which basically connects them through

RESULT AND DISCUSSION:-

The main result of the project is that we are now able to create a banking interface within a branch and between the accountants and the bank account holders. It can also be used to display the details of the users/bank account holders if we want to know something about them as and when we require it.

The usage of JFrame also enables a good graphical user interface making the banking system look more attractive and hence more appealing to the user. Since we have used many components on the JFrame like the text fields, password fields, radio buttons, and other buttons. All the components within them contain a lot of properties that can further be used to make it more attractive and more user friendly and also more encrypted in a way hence ensuring the data encryption in the Java program.

CONCLUSION:-

This was our project ever involving the connectivity of a language with the file management systems. This surely taught us a lot of things like how to store the details and how to look for the details in the backup database and how to create a database and how to back up our data regularly. Through this project, we ended up making an IT portal that has important significance and is very essential to us all. Through this project, we have gathered more knowledge about java, eclipse, and file systems in java. We also got to know a bit more about databases and how we use them.

This project also taught us how to work in a team and taught us various leadership skills and how to coordinate in a team and get the work done.

IoT based Attendance System Project Using Blockchain and JAVA MySQL

The success of this IoT-based Attendance System app will ensure that many more parents and organizations will be motivated to use this common platform. It becomes complicated when strength is more. With the increase in technology, attendance monitoring is designed with android or web-based applications. However, the intention of this design is to provide a Blockchain-based app that can be downloaded and used by the organization with no third-party control to meddle with the data.

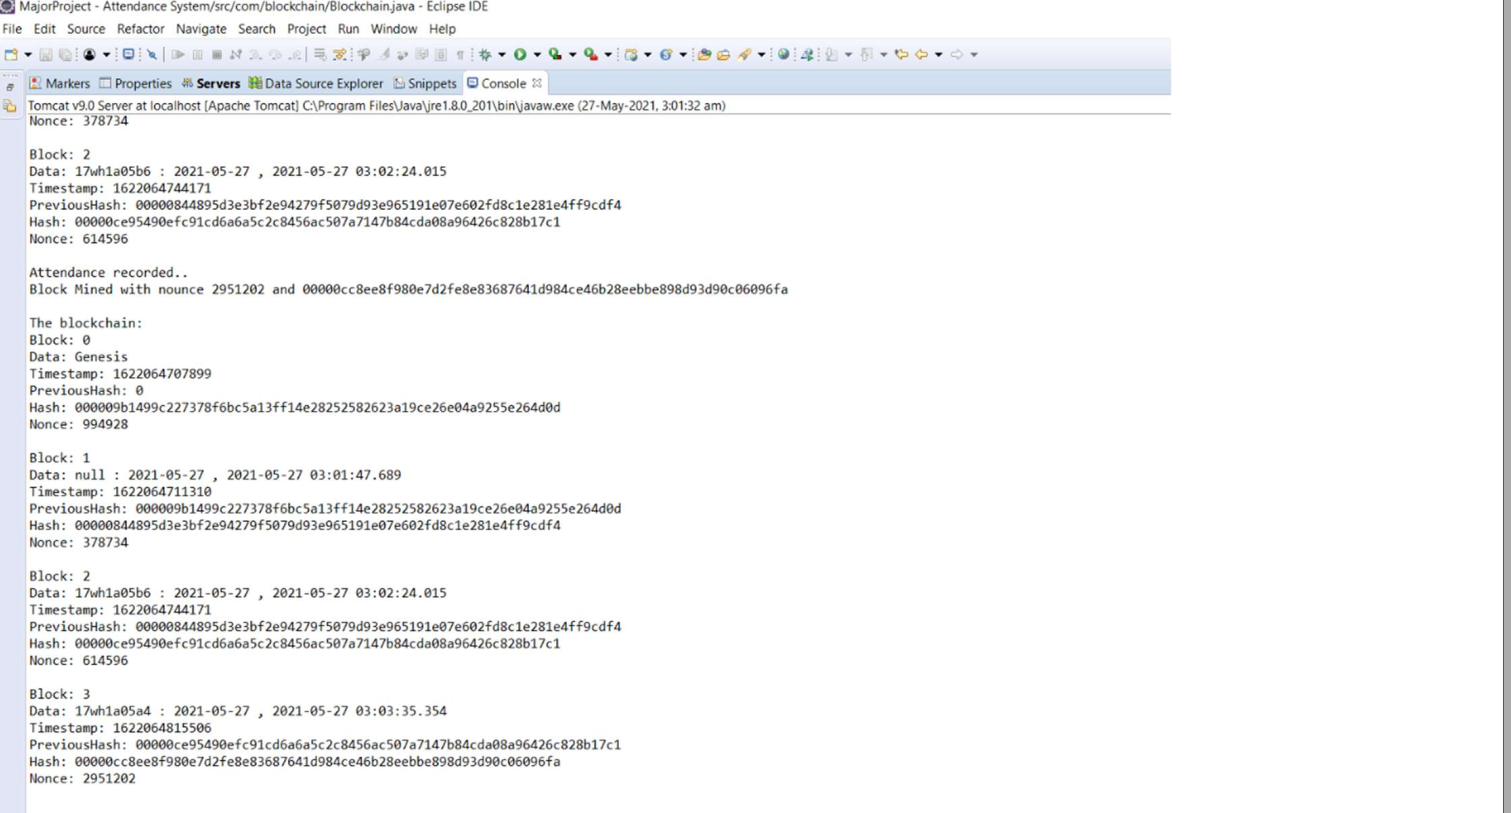
There is an update option to modify attendance when it’s needed. However, the modifications are recorded and tracked, just in case, it’s a fraudulent activity. Attendance is captured using IOT automatically and is entered into the blockchain which makes the data tamper-proof, secure and robust. The privacy of its users is preserved because the user ids are generated by a trusted third party. This data is available for the government for Scholarships and other related decision-making.

IOT-based Attendance System using Blockchain is an application that is made for students and faculty of a particular college to maintain students’ attendance which is captured through an IOT device(biometric) and then the attendance is stored in the Blockchain. Blockchain is used in this application to ensure safety and a tamper-free environment as the data cannot be manipulated and is used for government purposes.

Objectives

Generally, in many institutions attendance is monitored and marked using conventional systems like android or other similar web applications. Few conventional databases do not have features like checking whether any information has experienced unauthorized changes or not. In this system when the data is entered into the blockchain, no one is allowed to edit or delete the data.

This makes the application transparent and different from other web-based attendance systems as IoT is used to capture attendance through biometrics of the students in the class. Students’ poor attendance rate is one of the most challenging problems tackled by college management today. With the help of this application, student attendance rates can be improved which is also helpful for the government to take precise decisions regarding scholarship-like schemes for students with transparent data. Using blockchain and some encryption techniques, this application is made secure from any manipulations.

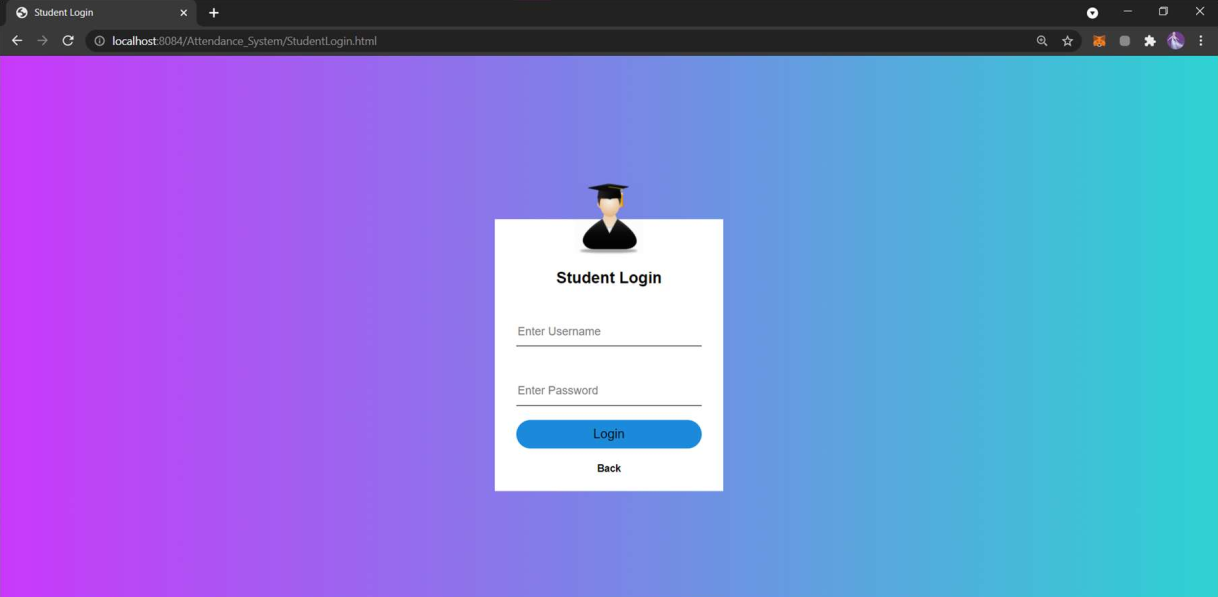
Student Login Page

Methodology

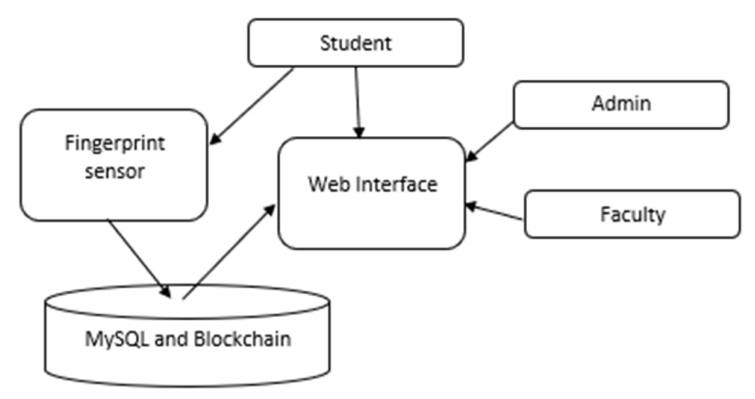
The fingerprint module will collect fingerprint data from multiple users and sends it over the internet to the website. The IoT-based Attendance System website is coded in HTML, and CSS, JSP has a MySQL database, and records of attendance are stored in Blockchain. By logging into the website, the student can view all their attendance records. The timestamp of students’ attendance is encrypted and stored in the blockchain.

CONCLUSION AND FUTURE SCOPE

This IoT-based Attendance System application helps to automize the attendance system and makes it easy to manage all the data. Encryption, decryption, and blockchain make the application very secure. The application has a very user-friendly UI and is made to keep UI and UX in consideration.

The future enhancement of this IoT based Attendance System application is

  • To use Ethereum to make the application up to date with the technologies
  • To generate automatic weekly and monthly reports

DATABASE TABLES SCREENSHOTS

Tables in the project.
Test case showing the home page after pasting the URL in the browser
Test case showing navbar functionalities working.
Test case showing login is done and navigated to the home page
Test case showing student registration is working.
Test case showing faculty registration
Test case showing faculty registration is working.
Test case showing attendance stored in blockchain

IoT based Attendance System Using Blockchain
Test case showing student’s attendance records.
Test case to get student report
Test case showing Student’s attendance report.
Test case showing download report is working
Test case showing all student details.
Test case showing all student’s attendance records.

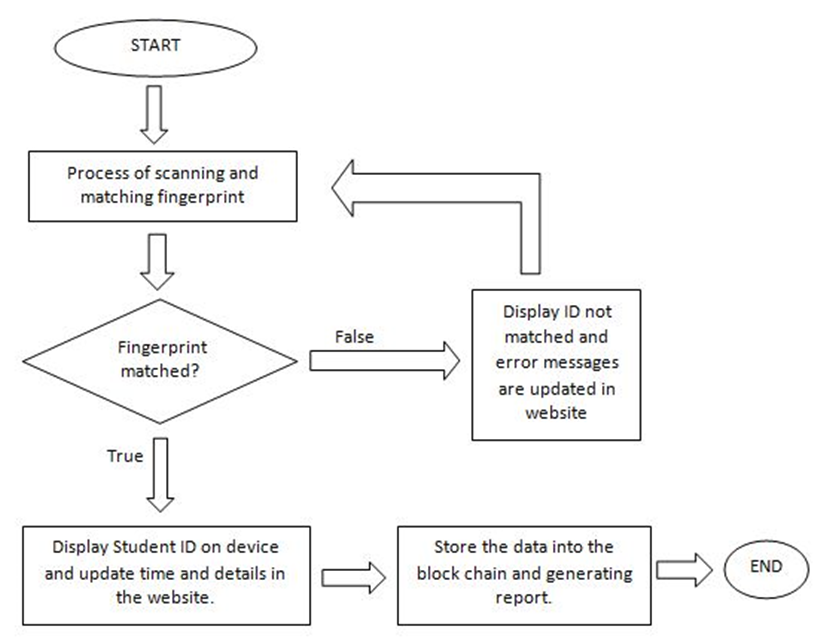
Flow Chart Diagram:

Flow Chart

Architecture Diagram

Architecture Diagram

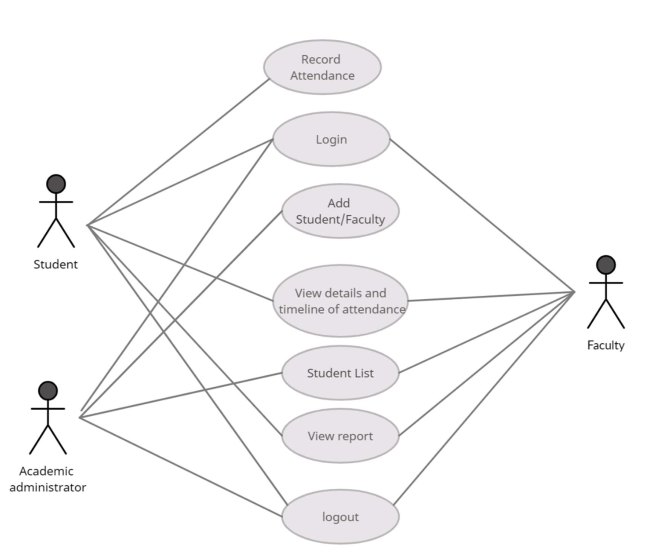
Usecase Diagram:

usecase diagram

Software Requirements

Programming Language: Java
Graphical User Interface: HTML, CSS with Bootstrap, JSP
Libraries: MYSQL connector jar file, Apache Tomcat jar file
Encryption Algorithm: SHA-256
API: JDBC
Framework: Java EE
Tool: Eclipse, MYSQL

Hardware Requirements:

IOT Fingerprint Scanner

Bus Ticket Reservation and Management System Project using Java and Swing

1. Introduction

1.1    Purpose

The purpose of this document is to describe the Software Requirement Specifications of a Bus Ticket Management System. It aims to lay down guidelines that have to be followed while developing the bus ticket management system. It also includes a description of the software and the IDEs used.

1.2    Intended Audience and Reading Suggestions

  • Section 2 of this document provides an overview of the domain that the proposed Bus Ticket Management System will support.
  • Section 3 includes screenshots of the actual developed Bus Ticket Management System.
  • Section 4 organizes the functional requirements for the major services provided by the Bus Ticket Management System.
  • Section 5 describes the nonfunctional requirements of the Bus Ticket Management System.

2.    Overall Description

2.1    Product Perspective

The Bus Ticket Management System that is to be developed is a new self-contained product that will contain information about a set of buses and passengers traveling on that particular bus. The perspective of the product is to replace the travel books used by travel agents and replace them with a well-maintained, reliable soft copy of the travel details.

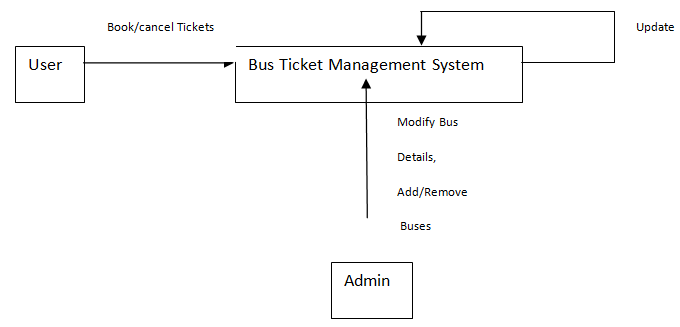
Figure 2.1: Logic Diagram of the Software

2.2    Product Functions

A software system needs to be developed to maintain a Bus-Ticket Management System.

The software includes functionalities for 

1. User

2. Administrator                           

The user can book/cancel tickets.

  • To Book a ticket He / She selects the SOURCE Station & DESTINATION Station (for a given Date), upon which a list of buses plying on the chosen route is displayed. The user selects a bus, which results in the displaying of the Seat Matrix of the bus showing the available seats and booked seats.

            The user selects a seat and enters details like

            1. Name

            2. Address

            3. Contact No. 

            4. E-Mail

            after which the ticket describing all the travel details is generated.

  • To cancel a ticket He / She enters the Bus Number, Seat Number, and Date of Journey.

The ticket is canceled and the canceled seat is shown to be available in the seat matrix.

The administrator of the Bus-Ticket-Management system has to verify his/her identity by entering the password, which will give him/her administrative privileges.

The administrator can 

  1. Modify routes of buses
  2. Alter schedules of buses
  3. Modify the Prices of the tickets
  4. Add or remove buses

The changes made by the administrator are updated and the user sees the latest updated information.   

2.3    User Classes and Characteristics

It identifies the various use classes that will use the system. The system will be used in a Travel agency. The administrators, front-desk staff, and passengers will be the main users.

Assumptions: They are responsible for checking seat availability and reserving it for the appropriate passengers.

2.4    Operating Environment

The Bus Ticket Management System is developed on the Netbeans IDE and compiled as a Java Project. The source code files are put together in an src folder and included under one package.

This can be run on Operating Systems which have the Java Development Kit along with the Java Run Time Environment installed on it. 

3. External Interface Requirements

3.1 User Interfaces

The Bus Ticket Management System will not be a web-based application.  As can be seen above, the main interface includes a Book ticket button which will resume only after the source and destination of the user are inserted with the date. It also includes a button for canceling tickets if the user changes their mind. The third button is for the Admin to log in, once pressed it will ask for their username and password and the system retrieves the admin menu.   

The Admin Menu Page contains 4 fields which are labeled as ‘Add a bus’, ‘Modify a bus’, ‘Book a Ticket’ and ‘Remove a bus’. The admin can enter values to these required fields by clicking on the respective button.

There shall be other pages that have functionality related to customer operations and admin tool operations. The example figures are added.

The bus list is a table containing the Company name along with the details of the bus:

  • Amenities: gives all extra features present in that particular bus
  • Route number: to differentiate between buses of the same company
  • Type: tells the user whether the bus is a sleeper/nonsleeper and if It has A/c.
  • Price: Amount to be paid
  • Date: date of departure
  • Start and End time: The time of departure and arrival

At the bottom, the user has to enter the route number and choose the seat position from the seat matrix given. Once finished choosing the user can use the confirm button.

The cancel page is also present to remove a reservation placed on a seat on any specific bus.

Enter the details of the bus: the date, the route number, and your seat number.

 3.2 Software Interfaces

Both the client and server computers do not need an internet browser to work online.

The Bus Ticket Management System is developed on the Netbeans IDE and compiled as a Java Project. The source code files are put together in an src folder and included under one package.

This can be run on Operating Systems which have the Java Development Kit along with the Java Run Time Environment installed on it.

3.3 Communications Interfaces

This software can only be used on a local computer and thus communication functions like e-mail, web browsers, and network servers are not included. Any changes made are reflected immediately and the user who uses the system next will see the latest updated information.

Use Case Diagram for the Bus Ticket Management

4. System Features

4.1 Functional Requirements

Book Ticket:

  • Check Availability: The passenger must be allowed to see all available options for a journey and see if a particular seat is available or not. He should be able to view all the buses plying on a given route on a specific day and be able to check seat availability on all the buses.
  • Book Ticket: Then if the ticket is available then the seat should be booked, by entering the passenger details like Name, Contact No., E-mail id, and Age.

Report Generation:

  • Bus List: The Bus Ticket Management System should contain files that contain the list of buses traveling on a particular route.
  • Passenger List: The Bus Ticket Management System should contain files that contain the list of passengers traveling on a particular bus.
  • Seat Availability: The Bus Reservation System should generate reports on seat availability.       
  • Passenger-related Information: Each passenger should have the following mandatory information: first name, last name, phone number, and Bus details.
  • Bus-related Information: Each bus should have the following information: bus number, no of seats, bus type: normal, AC, Sleeper, Source, and Destination.
  • Update Bus Information: The Bus Reservation System shall allow the Administrator to update any of the bus information like type, source, destination, and ticket price.  

The College Student App – A Solution to a Student common College Requirements

Problem Statement

A College Student App Android application needs to be developed that caters to the needs of students. The app should provide solutions to a student’s common requirements.

Timetable

Organize your daily college schedule with the help of the Timetable.
Create and customize according to your specific subjects for the semester.

Bunk Manager

Keeps you on track with the number of classes you have missed and warns you if you’re close to going below your attendance requirements for that course.

Expense Manager

Manage your expenses directly on your smartphone. The manager will be used by students to check the amount of money spent daily, weekly and monthly with the help of graphs.
The application also provides a widget for the expense manager to make it easier for the user to interact with it.

Memos

Quickly create, access, and organize notes. This proves extremely useful when you need to write things down on the go.

Reminder

It helps in reminding yourself of different important things which you don’t want to forget.
This feature has convenient messages which pop up on your notification bar as and when instructed.

The Study

Main Menu

The splash page on the left is the image that appears just as the android application is opened. It remains for 1.5s and is used to give time for the background applications to start running.

The College Student App main menu page is made to input details of the user, into the application. It appears only once when the application is first opened. These details are necessary for the Time Table and Bunk manager pages which are discussed later on.

The user has to input the following details into the text boxes

  • Classes per day (a maximum of 8)
  • Working days per week (either 5 or 6)
  • Total number of courses
  • The names of the course titles
  • Max number of classes in that course (max input of 60)
  • Required Attendance percentage

Menu screen

This is the initial page once the application is started and running. It serves as a menu for the user to choose the desired function. The menu screen of the college app consists of 5 buttons.

One button for each of the features present in the app:

  • Expense Manager
  • Timetable
  • Memos
  • Bunk Manager
  • Reminder

A single tap of any of the above icons will open the respective feature and take you to the next screen.

Reminder page

The College Student App Reminder application first starts off with a text box, which is used to give a title to your reminder. The user has to type in the message in this top space.
Next, the date and time of the event must be registered. The buttons when pressed open a drop-down panel that you can scroll through to find the correct date and time.
The date is in the DD/MM/YY format and the time is in the HH/MM format as shown above.
Finally, the bottom CREATE REMINDER button will finish the process.
The VIEW REMINDERS button stores all the previous reminders along with their date stamp for future reference.
The Reminder Message will pop up at the top of the screen in the notification bar at the specified time on the specified date. It also includes the ‘Big View’ Notification display.

Memo Page

Clicking on the memo icon will take you to the page above. This memo application is made to look like any ordinary piece of paper pinned down by a thumbtack. It’s an easy way to jot down any important points that you’ll need for further use.

The user can type in a title for the note on the top and continue with the details of the memo in the pop-up for the New Note.

Once saved, the user can create more and more memos by simply clicking on the green plus sign at the top of the screen. The minus sign on the left is used to remove a note that has already been created. It appears only after the first note is created and a pop-up gives you options to select the note you want to delete along with a Numpad.

Timetable Page

In the timetable feature, the user is meant to input the details once and then use the timetable for further use. The timetable page is made after initially asking the user whether they have a 5-day or 6-day college week. The number of classes in a day is also inputted along with the time intervals. After which the layout for the timetable is formed. Then one by one the classes are to be added. This is a one-time process.

After filling in all of the details, the user hits the confirm button to store the timetable. The timetable is saved and can be checked whenever necessary. It will be color-coded according to the subjects to simplify searching for the user. The edit button on the bottom of the screen allows the user to change the timetable if any adjustments are needed. The save button saves the changes made.

Bunk Manager page

The bunk manager opens up once the “Let’s Party” icon is tapped on. It opens up to an initial screen including all the subjects of the students. The student simply has to click on the subject which is currently taking place. Once the subject is selected, the next page that opens is the one that calculates your attendance percentage. If the user is attending the class, he taps on the Attended button. This draws a single tally mark under the attended column.

The same thing happens if the user is missing a class. In the bunk manager, the data is presented on the top of the screen. Also, the attendance percentage is automatically calculated as and when the classes are attended/bunked. This screen also includes an undo and reset button just in case you make a mistake or decide to attend class at the last moment. The last screenshot above shows the warning pop-up that opens up when the student’s attendance percentage goes lower than the minimum requirement.

Expense manager page

The expense manager page contains two buttons on the top. One dollar-eyed face for crediting money on the top left corner and another for debiting money on the top right.
First, it asks for the initial amount of money in your account which you have to punch in. After that, the user can update their expenses by filling in the pop-ups with the given number pads along with the reason for you spending their cash.

The application will keep track of your expenses and make sure that you don’t overspend. Another feature of this expense manager is the timely graphs showing the different ways you have spent your money.

There exist three columns:

  • A detailed expense for that specific day
  • Expenses with graphs per day
  • A monthly expense

Conclusion:

The College Student App is developed to be an innovative application and its main purpose is to get familiar with Android SDK and its development in general. The android OS has many advantages, as listed earlier, and this is why we picked this over others.

We primarily chose the Android platform as it is open-source and well documented, and the most commonly used mobile operating system among college students.

The advantage of declaring your User Interface in XML is that it enables you to better separate the presentation of your application from the code that controls its behavior. This feature of Android is used extensively in the development of our application.

Moving forward, we hope to push the user-specific data onto a server. We also plan to push notifications, tasks such as updating attendance records, wherein the user is notified after the class using the system time and date. Another functionality we would like to include is to sync expenses to a bank account thereby automatically updating the available balance when an amount is credited or debited. The application should be up on the Android play store soon once further testing and improvements have been made.

Citizens and the Municipal Authorities Connecting System Project

Abstract

Citizens & Municipal Officials Connecting System is a project that is designed to facilitate the citizens and the Municipal Authorities to simplify the process of complaint filing and management. It consists of a mobile application for the citizens as well as an ASP.NET web application for the Authorities. The citizens can file complaints through the app and the authorities will get those complaints and assign them to the appropriate officer.

The officer will then solve the complaint and notify the administrator through the system, the administrator will then change the status of the complaint. The user can track all of this through their mobile app from their dedicated section to view the complaint status.

This system is a significant improvement over the existing system of complaint filing and management, and hence we believe that our project can make a significant contribution to the modernization of the governance procedures.

INTRODUCTION

Citizens & Municipal Officials Connecting System is a tool designed to function as a platform for the citizens to communicate with the Municipal corporation authorities and replace the old method of writing letters and e-mails as they are a time-consuming mode of communicating with the authorities.

  • Background

In this age of rapid urban development and internet connectivity, the gap in communication between the residents of a city and the Municipal Corporation that runs the city should be reduced to a bare minimum.

Unfortunately, there hasn’t been much progress in that area or it has been very slow because this topic hasn’t been seen as a priority by the authorities even with all the technological advancements, due to which the citizens have suffered as they are yet to see a channel of communication that is as fast and as up-to-date as the technology of today.

  • Objectives

The objective of our project is to provide solutions to both – the citizens and the municipal corporation. We aim to provide the citizens with a platform, which they can use to communicate with the authorities.

Another objective of the project is to provide the municipal corporation with a tool – which they previously didn’t have – to manage all the complaints that they receive, freeing them from the responsibility of managing all the heaps of files that are present in their office.

The most important of all the objectives is to save the time of the Municipal authorities so that they can focus on multiple tasks in a single day and utilize their time more efficiently. Other secondary objectives include creating awareness among the masses about the digitization of the traditional paper-based administration – which is regarded as time-consuming – as we are moving toward the idea of a Digital India.

  • Purpose, Scope, and Applicability

The following are the purpose, scope, and applicability of the city reporting system that we are going to develop.

  • Purpose

The project has been undertaken by us to simplify the communication process between the authorities and the citizens by removing the unnecessary and time-consuming formalities that are in place right now and putting in its place a new system that uses an entirely new channel of communication – the Internet and the mobile phone.

Since the citizens can directly communicate with the authorities, it saves a lot of their time as they don’t have to follow a certain protocol anymore, the authorities will forward their query or complaint to the appropriate officer in charge and make the whole process hassle-free for them.

This way the authorities also don’t have to deal with all of the extra paperwork like forms and letters resulting from the old method of registering a complaint, all they have to do is to forward any complaint that they receive to the appropriate officer and that officer will take the necessary steps needed to solve that particular complaint.

  • Scope

The scope of our system ranges from the citizens that will use the system to report their grievances, to the Municipal authorities that will use the system to then manage those complaints and solve them.

This offers us multiple avenues where we can simplify the process of complaint filing and complaint management for both the parties involved respectively.

Citizens can have various problems, like waste disposal, water supply, sewage, drainage problems, waterlogging, etc., through the mobile application they can just simply click a picture and post a complaint, which will then be forwarded to the concerned officer. Thus we are building a single platform that can be used to resolve a wide range of issues about most of the departments in the Municipal Corporation.

Thus we can say that our project is not just one dimensional in terms of its scope we have tried to cover as many areas as we could, and we have also tried to make our project scalable so that we can build upon the existing architecture instead of building a new system entirely from scratch.

  • Applicability

The citizens here can file their complaints in a matter of a few clicks instead of making a personal visit to the local Municipal Corporation office due to which the transportation time and cost of the citizen are saved and the paperwork is also reduced making the whole operation an environment-friendly one.

The Mobile app can also help people with certain physical disabilities to file complaints without having to worry about traveling to the Municipality office and properly handling the paperwork or documentation and going from table to table, to find the right officer to submit their complaint since the app can do both the things for them so that they don’t have to take all the trouble by themselves.

Municipal officers that have been assigned a complaint through the system will need to provide a proof-of-work that they have solved that particular issue and not just click solved on the screen and think that their job is finished, in this way we are promoting accountability of the officers towards the citizen.

ER Diagram:

ER Diagram

SYSTEM ANALYSIS

Existing System

Till now most of the complaints are filed physically or via emails, which in the case of emails require multiple email IDs too, for the relevant authority of a particular department. This might take a lot of time and effort for finding the authority first, for a particular kind of complaint, and then find an email ID of the department.

Due to these multiple channels of communication, the authorities also find it difficult to track every complaint since the users might file their complaints through the medium of their choice, this leads to confusion among the authorities as there is no central system that manages all of the complaints in a single place

Proposed System

This system will not only save the time of the complaint filers but also allow them to track their complaint and their status at regular intervals of time. Once the complaint is solved, the user gets the update on their phone..

Requirement Analysis

  • Problem Definition

Nowadays it is important that if a user is using a mobile app, they have to be provided with accurate information/guidance and proper security of their data should be implemented, to create trustworthiness between the citizens and the government. Authentication and verification of users have also become mandatory now.

  • Issues

Some of the issues that the citizens face with the current system are as follows

  • Time Consumption: Travelling to the office of the Municipal Authorities and filing the complaint physically is a time-consuming process as it involves hopping from table to table.
  • Dealing with Paperwork: Another problem with the physical method is that involves dealing with a lot of paperwork. The citizens have to fill out various forms to file even a single complaint.
  • Lack of accountability: Municipal officers in the past have been accused of not being accountable to the citizens, through our project we are promoting accountability among the Municipality officers.
  • Requirements specification

Here we are going to develop a system that acts as a communication channel between the citizens of a locality and the Municipal Corporation of that locality the main objective is to provide a common interface between the citizens and the authorities so that they can communicate trustfully, at ease and without any inconvenience for both the parties involved.

Overview

  • The user can file a complaint by logging in to the app
  • The user will be requested to create and register an account by filling out all the details that are required
  • A complaint ID will be generated when the user files a complaint it will be unique for every complaint the user files
  • The user can track the status of all their filed complaints through a separate tab called ‘complaint status’.
  • The administrator will be able to delegate various complaints to an officer under him.
  • The officer can change the status of the complaint assigned to him once he has solved the complaint