Purpose of the Project:
This Project is a leave/outing pass automated system designed for Educational Universities. This system is an end-to-end module that enables a user (Student) to raise a request and an admin (Mentor) to approve/decline it. This is a robust system where Parent Verification, In-Out Time recording, and Data Security have been taken care of. This Project is built to be a secure, flexible, unique, transparent, and user-friendly environment that aims to digitize the whole process thus removing fake paper trails.
Feasibility Study:
The project has been undertaken after the feasibility study, which paves the way for deployment, and phase development.
Scope of the Project:
The scope of the Automated System is designed to run on the University server and to allow students to raise requests for their leave, trace the request status, and modify them. On the Mentor Dashboard, the software also allows the Mentor/ Mentor Coordinator to view requests, and approve/decline requests. Whereas on the Hostel Dashboard, the Warden/ Deputy Warden and Hostel Supervisors will be able to view and grant leave passes to the students.
This Automated System will provide ease to all the actors – students, mentors, hostel authorities, and security services in regard to leaving/outpassing sanctions and will ultimately eliminate the paperwork.
Overall Product Description:
Product Perspective:
It will provide a way in which existing paper-based work can be supplemented with the end-to-end robust leave management system. The system can be used independently of the platform and device, be it on a smartphone, tablet, or computer.
Product Functionality:
The server will be responsible for storing each request generated, generating one-time passwords, generating QR Codes E-Pass for authorized requests, receiving and authenticating requests, generating statistics at the needs of each audit, and maintaining and verifying security and user privacy. This server can also potentially contact all authorized students by email to give them username information, passwords, server address, OTP code, updates to the users from the Mentors/ Hostel Services, etc.
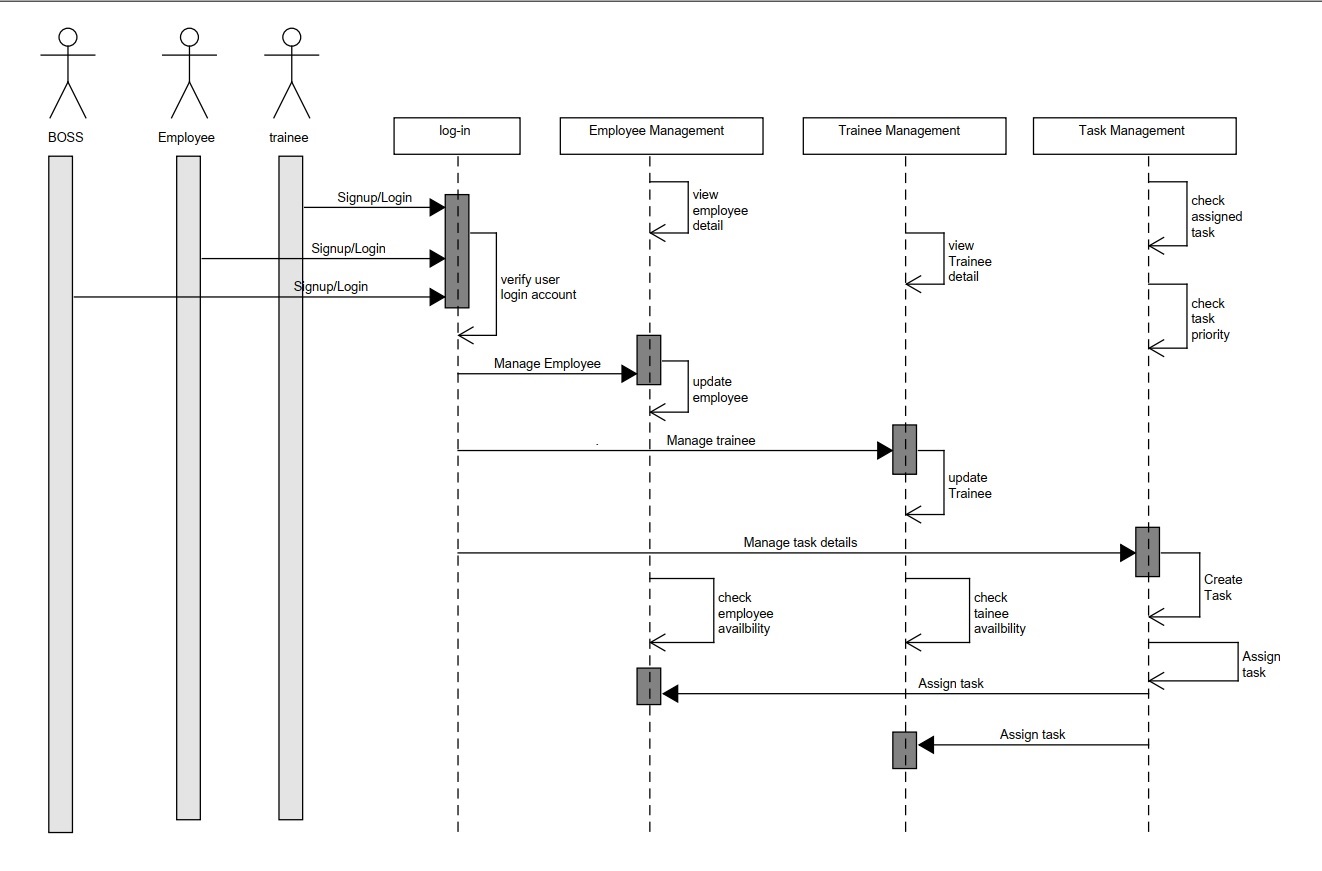
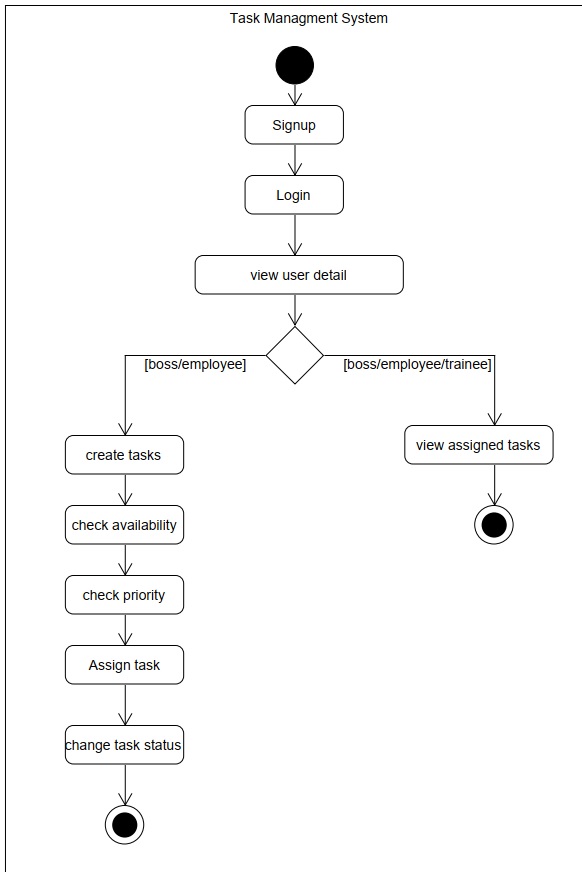
Process Flow – Student:
- depicts how the student raises the request and the activity which is continued after the review from the mentor.
- depicts how the Mentor/Warden/Supervisor approves/declines the requests.
- depicts how the Security guard can verify the leave request the student displays.
Upper Classes and Characteristics:
It is anticipated that three types of users will use the Licensed Software defined in this SRS.
- IT staff/ Software Development Cells are expected to deploy and configure the System using the defined system interfaces. This will include running the whole system and maintaining software after the handover and deployment of the project.
- The second type of user of the Hostel Warden/ Deputy Wardens / Hostel Supervisors and Managers is expected to understand and use correctly the software interfaces defined with the appropriate design documentation.
- Finally, it is expected that any student accorded with Hostel Services within the domain of Vellore Institute of Technology may access all of the leave request information such that the request is independently verifiable. This will include a web application presented using Hyper Text Markup Language (HTML) to allow a user to raise their request that has been registered under review including the previous requests history.
Working Environment:
The Automated System software is directly made as a web application, so the computer hosting must be capable of running HTML and should have internet. The system will be uploaded to the University server, in order to make it accessible for all the students, faculty mentors, and wardens.
Design and Implementation Constraints:
The Application provides an end-to-end leave management system that copes with malicious attacks provided certain constraints are met. Principally, all necessary steps should be taken to protect the System from unguarded attacks by using physical, network, storage, and user security protection. These safeguards should be penetration tested by the SDC to ensure viability.
User Documentation:
The users are the students or faculty/staff of the university who are authorized by SDC, they will be able to raise/ view/ approve/ disapprove requests on the server. The application client will be available free of charge, and any purchase of the server software will be authorized to distribute it to their users.
Assumptions and Dependencies:
This software in its initial phases of development depends on a few third-party commercial applications or any assumption. Student Development Team will take care of all the assumptions and dependencies. It will be the responsibility of SDC to purchase/ develop the dependency as per the University IT norms.
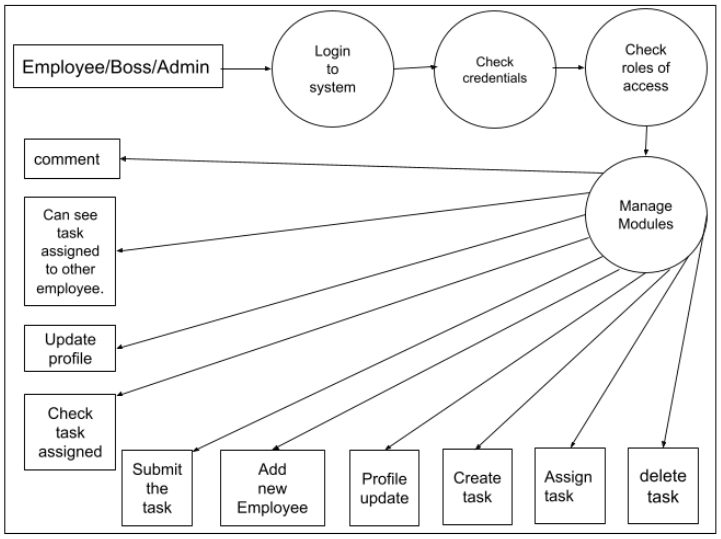
System Features:
Login:
This is used to login and maintain security by authenticating the users
1. Should accept the user name password
2. A case-insensitive comparison is done for a user name and a case-sensitive comparison is done for a password
3. If the correct user id and password are supplied then, Main Menu should be displayed
4. If an invalid user id or password is entered then the system should display the error message “Invalid ID or password” and should quit the application.
5. Username – Students – Registration Id Faculty – Employee Id Staff – Employee Id
6. VTop Login Credentials can be used in the further enhancements
Mentor’s Portal:
This feature allows mentors to work out the leave/vacation requests.
1. Can approve a request.
2. Can decline a request.
3. Can edit the request.
4. Can verify the request.
Warden’s Portal:
This feature allows the warden to authenticate the requests
1. Is able to view all requests for outpass.
2. Can reconsider requests
Hostel Supervisor’s Portal:
This feature allows supervisors to issue outpasses to the students
1. Can issue outpasses to students.
2. Can deny the issue of an outpass.
3. Can send a request for reconsideration to the warden.
Student Portal:
This feature will allow students to raise a request for an outing/extended outing/leave.
1. Can raise requests of respective categories.
2. Would receive a system-generated outpass
External Interface Requirement:
User Interfaces:
Login Interface – The login interface consists of the student username and password fields, Students can log in with the same VTop Credentials.
The login interface for the faculty and staff consists of the faculty/ staff employee id and password. Their credentials will also be the same as those of VTop.
Hardware Interfaces – Hardware requirements include a laptop or a desktop or a smartphone with proper connectivity to access the system. Other than above mentioned, no hardware is required.
Software Interfaces – The software is based on an application interface. The Application will interact with the University Server with regard to user verification and information retrieval.
|
Operating System |
Ubuntu |
|
Programming Language |
HTML, PHP, CSS, JavaScript |
|
IDE |
Visual Studio Code |
|
Database |
InnoDB |
|
Hosting Base |
Amazon Web Services |
Communication Interfaces – This software would be functional on an ethernet connection or a wireless connection.
Cost Calculation:
SOFTWARE COST ESTIMATION:
For any software project under development, it is indispensable to know how much it will cost to develop and how much development time will it take. The project scope must be established in advance and software metrics are used as a support from which evaluation is made. The project is broken into small PCs which are estimated individually. Several estimation procedures have been developed to monitor the project’s progress, so developers and product managers can assess whether the project is progressing according to the procedure and take corrective actions, if necessary.
STATIC, MULTIVARIABLE MODELS:
Static, multivariable models depend on several variables describing various aspects of the software development environment. In some models, several variables are needed to describe the software development process, and the selected equation combines these variables to give an estimate of time and cost.
WALSTON and FELIX developed the models at IBM to provide equations to give a relationship between lines of source code with effort and duration of development.
For our software project, the lines of code (LOC) sum up to 5223, which becomes 5.223 KLOC.
So, according to the WALSTON-FELIX model, we need to hire 24 engineers per month and require 7 and half months to develop our project.