Drowsiness Detection of a Cab Driver Python Project

  • In the present situation world, Accidents are part of life. On an average of 1214 road accidents in India only. One of the main reasons for road accidents is being drowsy during driving.
  • The application Drowsiness Detection of a Cab Driver helps the manager of the company get a notification that the driver is drowsy and an alarm rings in the car to alert the driver.

USAGE:

>    python detect_drowsiness.py –shape-predictor shape_predictor_68_face_landmarks.dat –alarm alarm.wav

Use the above command to run the application

This Drowsiness Detection of A Cab Driver application needs the following modules: –

MODULE NAME:  scipy

COMMAND USED FOR INSTALLING: conda install -c anaconda scipy

MODULE NAME: imutils

COMMAND USED FOR INSTALLING: conda install -c anaconda imutils

MODULE NAME: threading

COMMAND USED FOR INSTALLING: conda install -c anaconda threading

MODULE NAME: numpy

COMMAND USED FOR INSTALLING: conda install -c anaconda numpy

MODULE NAME: playsound

COMMAND USED FOR INSTALLING: conda install -c anaconda playsound

MODULE NAME: argparse

COMMAND USED FOR INSTALLING: conda install -c anaconda argparse

MODULE NAME: time

COMMAND USED FOR INSTALLING: conda install -c anaconda time

MODULE NAME: cv2

COMMAND USED FOR INSTALLING: conda install -c anaconda cv2

MODULE NAME: dlib

COMMAND USED FOR INSTALLING: It should be installed in the virtual environment the command is: conda install -c anaconda dlib

IN THE ABOVE-MENTIONED MODULES MOST OF THEM WILL BE GIVEN DEFAULT

TO CHECK THE MODULES THE COMMAND IS conda list

Download the complete project source code

Product Stores & Inventory Management Project

Existing System

Following are the S/W for Procurement Process and Managing the database for all the projects of Programme ANSP from Demand – SO – Payments – Stores Inventory.

Challenges: Following are the Challenges in using the above-mentioned Inventory Management S/W

  • Multiple Client–Server Applications for data capturing.
  • Systems are very old and hence they are not able to cope with the latest S/W and H/W.
  • No communication between the applications.
  • No linkage between the projects, every project has a separate schema and instance.
  • Few processes cannot be automated.
  • The database may not be in normalized form.
  • Database structures may not be uniform across systems.
  • Effort duplication might be happening for data entry and reporting.
  • Software Maintenance may be a major concern.
  • No online approvals.

Proposed System

To Overcome the above-mentioned problems, an attempt is made to develop a Web-based product Stores & Inventory Management Project which is centralized, fully integrated having/ all the required functionalities of the existing system. Product Stores & Inventory Management Project will have FIVE major modules, Master, User Management, Procurement and Store Inventory, Payments

General Features 

  • A centralized, fully integrated System that can integrate all required functionalities of existing systems.
  • Should be able to handle any number of Projects without having any additional instances.
  • Organizational Changes should not impact the system.
  • Optimization in business process Automation.
  • Leverage the advantage of new technologies like Java, Spring, Hibernate, and Oracle RDBMS 11g.
  • Multiple users would access this application software with proper Authentication.
  • The proposed system should work both on LAN and WAN (TBD Internet), is a web-based application, and is easy to configure. This system would be developed in a user-friendly way.
  • Business Rule and Workflow for optimizing resources and reduction in Data entry redundancy.
  • Online approval can be done based on their roles and their responsibility.

Functionality Features 

  • Reports(Item/BOM/System/sub System/Article wise summary, Lifted Items, Shortage Lists, Expired items list, and Final Built-in Report), Various reports to be generated throughout the Procurement, Inventory  and other stages such as Proposal, Sanctions, Demands, Enquiry, Inventory, IR and Voucher Gate Passes 

Transaction logs 

  • Transaction log shall keep track of data items added, changed, or deleted.

For records that are added, the data items logged shall be:

  • User ID of the user who activated the functions.
  • Function name
  • Date/Time of the action
  • Data items added

For records that are modified, the data items logged shall be:

  • User ID of the user who activated the change
  • Function name
  • Data items after and before the change of action

For records that are deleted, the data items logged shall be:

  • User ID of the user who activated the function
  • Function name
  • Date/time of the action
  • The add/change/delete functions which shall be logged in the transaction log shall be a different functional requirement given in this document.

Access Control 

  • A valid user ID and password should be entered in order to access the Product Stores & Inventory Management application. Only the project administrator can create or disable user accounts.
  • A timeout to log out feature would be set for non-active sessions or sessions idle beyond a certain time period. Proper session management for the application would be set so those non-active sessions would be automatically logged out.

System Overview

The purpose of this document is to present a detailed description of the Web Publishing System of the “Product Stores & Inventory Management Project” for ANSP (Advanced Naval Systems Program). 

System Architecture

  1. Layered Approach

Product Stores & Inventory Management Project application would be developed in a layered approach. This would enable the team to work on different components independently and also for faster development. It increases flexibility, maintainability, and scalability. It helps in configuring different levels of security.  It also helps in testing components independently.

  • The user interface layer is which all end users would view. All UI components are created and integrated with the business layer.
  • In the business/ service layer, business objects help us in defining entities. Using these business objects, business logic is developed and attached to services. These services are exposed through an application programming interface (API).
  • The data access layer would connect to the database by using hibernate. Hibernate is a high-performance object/ relational persistence and query service. It not only takes care of the mapping from java classes to database tables and from java data types to SQL data types but also provides data query and retrieval facilities.
  • The repository includes a database and file system. The file system would include all the attachments uploaded through the application.
  • Audit log, security & external application integration would include auditing, and tracking of all actions and activities done by users. All integrations like SMS, email, and any hardware integrations are done in this layer.
  1. Detailed Application Layer Architecture

This Inventory Management application would be developed in three-tier architecture i.e.  Client, application and data tier. In the client tier, all end users can access by using a web browser and interact with the Product Stores & Inventory Management Project. UI components would include JSP, CSS, java scripts, and JSON. In the application tier, the application design would be included with presentation, business logic, and data access layers. As discussed earlier, these layers would help applications for faster accessibility and faster development. Architectural styles would include REST i.e. representational state transfer and architectural pattern would be MVC (Model View Controller). In the data tier, services would get the data from the Oracle database and present it in the presentation layer so that the end user can view and take necessary actions.

Functional Modules

The Inventory Management Project contains the following Main Modules

  • Stores & Inventory Management

Store inventory management is a module that enables the maintenance of accurate inventory of its products. The following are the modules.

  • Issue of items
  • FIM Issue using Gatepass

Store Inventory Module:

The Store Inventory would deal with functions like receiving items into inventory and issuing items from the inventory to the requested user based on approval. The system should generate vouchers as per the store’s format for both issues and receiving. Procurement and Store Inventory uses well-designed Web Forms for specific actions required by the users.

Operating Environment

This product will be developed mainly using open source technologies like apache, Java, Spring, Hibernate, Ext-JS, and Windows Operating System for developing this product.

Server Operating System

Ubuntu Linux or any other flavor of Linux

Language / Tools

Java, J2EE, Hibernate, ExtJS

Client O/s

Windows 7 and Above

Database

Oracle 11g

Application Server

Jboss/Apache Tomcat

Web Server

Apache2

Browser Support

Chrome, Mozilla Firefox 10+, Internet Explorer 9.0 and above

Server Hardware requirements:

Processor

Intel Xeon Processor 2.1 GHz

Memory (RAM)

16 GB or higher

Storage Capacity (HDD)

Minimum 500 GB

Port Speed:

10 Mbps Public & Private Networks

System Features & Requirements

Capability Requirements

This subsection provides a high-level overview of the major capabilities of the Project.

Users Capabilities

The System will provide the following capabilities to users:

  • The Product Stores & Inventory Management Project will enable all authorized users to:
  • Provision to Raise Material Gate Pass

External Interface Requirements

User Interfaces

The user would then enter the required data for processing and press the Save or Submit button, after which the processing would be done and the user would be returned to the main page.

The user would then be able to use the different functionalities of the Product Stores & Inventory Management Project by clicking on various links that are provided on each page.

There would also be a Logoff button which would help the user to end his session with the application and he will be transferred back to the login screen.

Functional Requirement

Login

Description & Priority

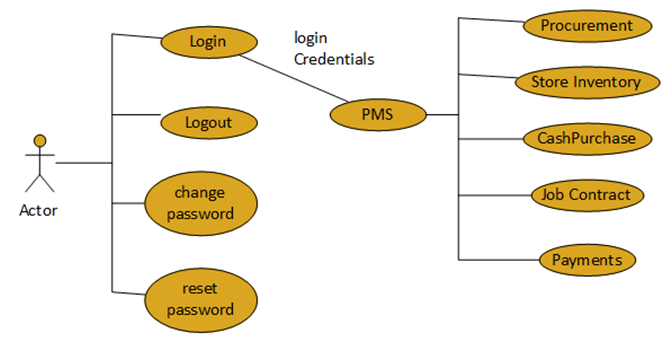
This feature will be used to LOG IN to the application (only permitted users can use the PMS). It is done in order to prevent any misuse of PMS

Login users:

User, HOD, PGD, PD, Admin, PJB, PMB (Approval Members), and Office users/Clerks can log in with their assigned User names and password.

Stimulus / Response Sequence

When the user gives the correct username and password combination, he/she is transferred to the main screen or the PMS main page.

Functional Requirements

Purpose

To check the credibility of a user and to prevent any misuse of the product.

Inputs

The input will be a username, password combination, and project associated with the program. 

A user can have multiple roles and a role can have multiple features. The change password feature should be with admin only; if the user wants to have a change password feature user has to enter a security question that is provided by the user at the time of user registration.

Output

The user will be transferred to the PMS main page on successful validation and will be alerted if the validation is unsuccessful.

Validations:

Login Credentials.

  • After login user access only assigned project-specific and assigned role-specific data. Here users can be assigned multiple roles and multiple projects.
  • There will be one default project and default role configured.

PMS Login Use Case

PMS Login Use Case

MATERIAL GATE PASS

Free issue material is the item that is issued to the respective supplier in order to develop/manufacture the required item.

FIM has been categorized into two types.

  • Returnable
  • Non-Returnable

Generation of returnable and non-returnable gate passes.

  • Before gate pass generation user has to raise the gate pass requisition in a specified format with an auto-generated gate pass requisition number.
  • If the type of gate pass is returnable then PDC (Proposed Date of Completion) has to be mentioned (Mandatory).
  • If the gate pass purpose is FIM then QA/QC approval is required.
  • After the gate pass requisition is approved the generation of the gate pass is done by the admin.
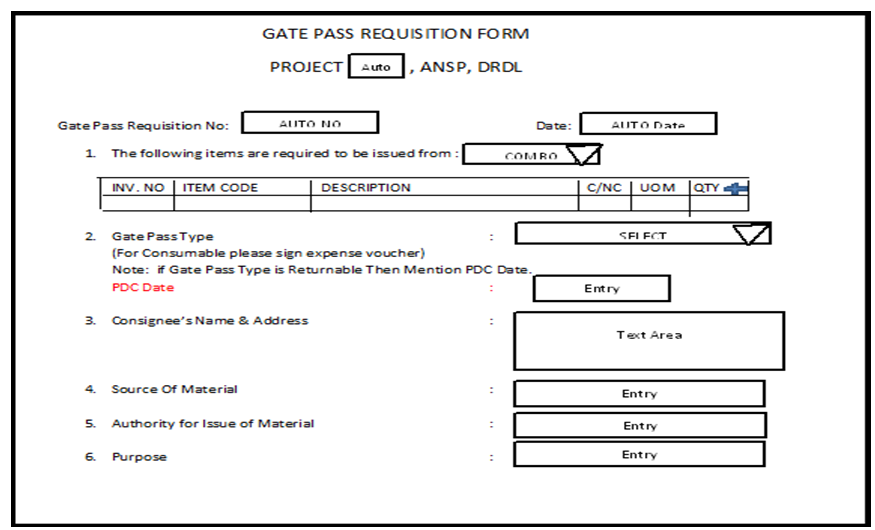
  • The below Screen is for requisition for gate passes. To generate a gate pass, the admin has to select the gate pass requisition number on the gate pass generation page and get the gate pass requisition details with some entry fields like packed by & date, supervised by, SOB Number, and date.
  • After taking the concerned officer’s approval gate pass with items went to the security office for the check, if approved out of control number.

Gate Pass System

  • For the issue of an item/ BOM for an outside organization or supplier then the issue has been done by raising gate pass requisition.
  • Gate Pass requisition of two types 1) returnable and 2) non-returnable.
  • After gate pass requisition approval takes place and approval has been done the store admin raises the gate pass with item information.
  • Sends the item with gate pass to the security to out that item.
  • For gate passes also concerned officer’s approvals are mandatory

Gate pass requisition

Returnable:

In the case of items issued on returnable gate passes, the cost of FIM will not be added to items received in the supply order.

  • Requisition gate pass raised by user &approved by project director
  • Gate pass raised by store member/ issued by store member which required authorized officer’s approval.
    • Issue of returnable gate pass max period allowable is 11 months (In PDC, it has to be mentioned).
    • The system has to prompt/alert two weeks before the expiry of the above period in returnable gate pass.
  • FIM BG (bank guarantee) by vendor needs to do for a specific time and date.

Provision for a check box indicating the required FIM BG amount is available in the preform

Non-Returnable

Non-returnable gate pass would be generated for the following:

  • Transfer to other work centers (other labs/inventory) on a permanent basis

– FIM BG (bank guarantee) by vendor needs to do for a specific time and date.

– External issue voucher prepared by the stores with a gate pass

– Inclusion of FIM cost lot-wise/Total cost of supply item when delivery takes place.

– External issue voucher with a gate pass both need to approve

  • Requisition gate pass raised by user & project director
  • Gate pass raised by store admin which required authorized officer’s approval.
  • External issue vouchers are prepared for all items irrespective of their destiny.

– Deduction from stores will be done after approval of external vouchers from respective users and authorities and receipt of Voucher (Acknowledgement) details from another unit.

– FIM gate pass going to labs conversion issue voucher prepared for items flight hardware.

– Nonflight items FIM to other labs external voucher, transfer voucher, and gate pass issued

– Certified received voucher (CRV) from the other inventory once received, the external voucher is prepared.

Note: All items go through returnable/non-returnable gate passes only.

In case a vendor brings an item for entry into the project, a pass is prepared by MMG and sent to Security online to allow the firm inside.

In order to deny permission for entry to those items that were sent on returnable gate passes, it is suggested that a format/ screen be provided for the user to request for the issue of pass by MMG. In that format, the User has to state whether the items being brought inside by the vendor have gone out on returnable gate pass or are being supplied on S.O He has to give reference to S.O or returnable gate pass.

Where a gate pass is prepared whether returnable or Non-returnable, periodically the control no and date issued by Security is to be entered against the gate pass. In case of returnable gate pass corresponding control no and dates are also to be recorded.

Gate pass generation

  • After gate pass requisition approvals, store admin generates gate pass to out the items which are issued to outside organizations/ suppliers as requested item/ BOM (FIM) wise.
  • By taking concerned authority approvals stores admin sends the same to security to out the item/ BOM.

Generation of returnable and non-returnable gate passes.

  • Before gate pass generation user has to raise gate pass requisition in a specified format.
  • If the type of gate pass is returnable then PDC (Proposed Date of Completion) has to be mentioned (Mandatory).
  • If the gate pass purpose is FIM then QA/QC approval is required.
  • After the gate pass requisition is approved the generation of the gate pass is done by store members.
  • The below Screen is for requisition for gate passes. To generate a gate pass, the admin has to select the gate pass requisition number on the gate pass generation page and get the gate pass requisition details with some entry fields like packed by & date, supervised by, SOB Number, and date.
  • After taking the concerned officer’s approval gate pass with items went to the security office for the check, if approved out of control number.

Gate Pass Requisition Screen for Returnable/ Non-Returnable: 

Gate Pass Requisition User Interface

TBL_GATEPAS_REQUISTITION

TBL_GATEPASS_ITEMS

IT Banking Portal Student Java Project Using Eclipse

EXECUTIVE SUMMARY OF THE PROJECT

Synopsis 

The mini-project made by us is basically a demonstration of the banking systems around the world on a very basic scale, in which we have created a GUI (Graphic User Interface) using the eclipse platform of JAVA and using the file management systems in JAVA. Basically, we have provided an interface to add, delete and view the different many accountants of a particular branch of a bank and also to add, delete and view the different bank holders and also store their account numbers, contact numbers, and salaries in the file, just to use whenever required. We have used the file management system in JAVA to store the details of all the accountants and the account holders.

Introduction 

The application that is the essence of the project works by defining various classes that even have further subclasses so as to modularize the final code. The code is written in a neat fashion with appropriate documentation. It provides a smooth, unfaltering user experience so as to facilitate its use among all age groups.

The use of exception handling in Java is implemented so as to prevent the user from getting stuck in a process and understanding the use of the application in a more suitable manner. It eases the reading and understanding of naive runtime errors generated. The use of the multithreading concept in Java lets us use multiple threads at a single time and also lets us do multiple tasks simultaneously which is required in the banking system.

Problem Statement 

The motivation behind the project was the lack of a simple well-written application to access and modify the details of the bank accountants of a particular branch and the bank account holders at the same time. It gave us enough motivation to make a GUI-based application to solve the same. In a world like this, can a whole lot of the population afford to waste the time looking for the details in the hard-copied registers and looking for all the accountants and the account holders when they can be easily maintained as a simple application?

Objective 

The main objective of the project makes the user to access the details of all the bank accountant’s bank account holders. It also gives the accountant the authority to delete, and modify the details of the account holders but the reverse is not possible

because that’s the hierarchy in a banking system works in that way. The aim is to give the accountant entire power virtually on the application. With our application, we have achieved just that. The application could have been designed in many different ways, but we have produced a solution of application that minimizes time complexity as well as space complexity by using Encapsulation, Polymorphism, Inheritance, and data abstraction. Along with these, Interfaces and various access modifiers have been implemented so as to maintain privacy and definition of access in different blocks Of code. The use of exception handling lets the user know exactly what went wrong.

METHOD

The application works by reading all the accountants and the account holders from a different file, which can be updated by the proprietor of the application, and also the same power is given to the admin of the bank. The file has the information stored in a particular format, which is decoded by the string reader functions in the code. Each time we enter or want output from the file we have to read this string reader function which is an in-built function of java and can be directly used just by importing the required files.

If there exists an object for the particular accountant or the account holder already, then that object is accessed, instead of creating a new one. If an object that is not available in the file is to be accessed then that object needs to be created and then accessed hence access to that object is not allowed and hence access is denied. We have to make sure that the object we want to access is present in the file system otherwise we have to create an object. The usage of various JFrames also enables us to increase our scope and work beyond the limitations of java by using the GUI effectively to give users an attractive interface to work with and get the work done.

SYSTEM REQUIREMENTS:-

  • Eclipse platform for JAVA GUI (Graphic User Interface)
  • JDK(Java Development Kit)
  • Windows Operating System

WORKS DONE:- (SCREENSHOT PF OUTPUT AND EXPLANATION)

  1. Main Page:–

This is the main frame that will be displayed as soon as our project gets executed. This is also the first page and the directive page as it directs us either to the admin section or to the accountant section. It consists of two buttons ADMIN LOGIN AND ACCOUNTANT LOGIN.

  1. Admin login page:–

This is the page that gets displayed as soon as the user clicks on the admin login button.

It consists of 2 labels namely enter a name, enter a password, one button, one text field, and one password field to get the password. To hide the password we have here used the echo Code property of the password field to encrypt it.

  1. Login Failed:–

This page gets displayed as soon as the user gets the name and the password on the frame admin login form but the dialog box with the message “Sorry, Username or Password Error” only when either the password or the name entered is incorrect.

4. Admin login Section:–

This frame gets displayed when the user enters the correct name and password. It has 4 different buttons which will direct to the things written on them. Only the ADMIN can enter the details of the Accountant and no one else. It consists of the addition, viewing, and removal of the accountant.

5. Add Accountant Page:–

This frame appears when the Accountant login button has been selected and the name and password entered are correct. This frame consists of the heading Add Accountant and it consists of 6 labels and 6 text fields and 2 buttons. This

6. Accountant Added Successfully:–

This frame appears when an accountant is added successfully.

This frame comes under the admin section. It consists of a dialog box that is used to make a JOptionPane.showMessageDialog() function.

  1. Database of all accountants:–

This is the database frame of all accountants under the institution. This contains various information about the accountants.

  1. Deleting an accountant:–

This frame comes under the admin section.

This frame does the job of deleting an accountant.

This is in the control of the admin whether to delete or not.

  1. Record Deleted Successfully:–

This frame comes when the record is deleted.

This frame confirms that the record is deleted successfully.

  1. Accountant Login Form:–

This frame can be chosen from the main frame of the project.

In this framed name and password of an accountant has to be given and if it is correct then the accountant section frame pops up.

  1. Accountant Section:–

This frame comes under the accountant’s control.

In this Frame, the accountant can add and view users.

  1. Add Account section:–

This frame appears when the button to add an account is hit in the Accountant section.

This frame saves the user’s various details in the database.

  1. Account Added Successfully:–

This frame confirms that the user is added successfully. This frame comes under the accountant section.

  1. Database of users:–

This is the database of users.

This comes under the accountant view section.

FUTURE WORKS:-

  • Since the project was made on a very basic level the obvious future work for the project would be to inculcate into it more complexities of the real-life kind of banking system. Since the project we made was only for the students of the branch IT in its future work we can inculcate more branches
  • Another future work that might sound interesting is to provide a server to it and make it using a database like MySQL(My Structured Query Language) which is a database used often with Java to store the details and the contents into it. It will be relatively easier for both the user as well as the programmer to use MySQL instead of the file management system, this is because in the file management system, we have to distinctly code to read in a string or anything else but when using MySQL we can directly use the add, delete and modify inbuilt functions of the MySQL database system and connect it to the Java program through server and then take in the command from the user in java and then pass on the same command to MySQL. Java and MySQL can be connected to each other through database connectivity which basically connects them through

RESULT AND DISCUSSION:-

The main result of the project is that we are now able to create a banking interface within a branch and between the accountants and the bank account holders. It can also be used to display the details of the users/bank account holders if we want to know something about them as and when we require it.

The usage of JFrame also enables a good graphical user interface making the banking system look more attractive and hence more appealing to the user. Since we have used many components on the JFrame like the text fields, password fields, radio buttons, and other buttons. All the components within them contain a lot of properties that can further be used to make it more attractive and more user friendly and also more encrypted in a way hence ensuring the data encryption in the Java program.

CONCLUSION:-

This was our project ever involving the connectivity of a language with the file management systems. This surely taught us a lot of things like how to store the details and how to look for the details in the backup database and how to create a database and how to back up our data regularly. Through this project, we ended up making an IT portal that has important significance and is very essential to us all. Through this project, we have gathered more knowledge about java, eclipse, and file systems in java. We also got to know a bit more about databases and how we use them.

This project also taught us how to work in a team and taught us various leadership skills and how to coordinate in a team and get the work done.

Power BI Management Insights Dashboard Assignment

Management Insights Dashboard Assignment

 The leaders of a company want to develop Comparing Dashboards for the management of the organization. These dashboards will provide a transparent and dynamic representation of the organization’s most important metrics, such as Revenue, Costs, and Profits, which can then be used for additional analysis or decision-making.

Data Model:

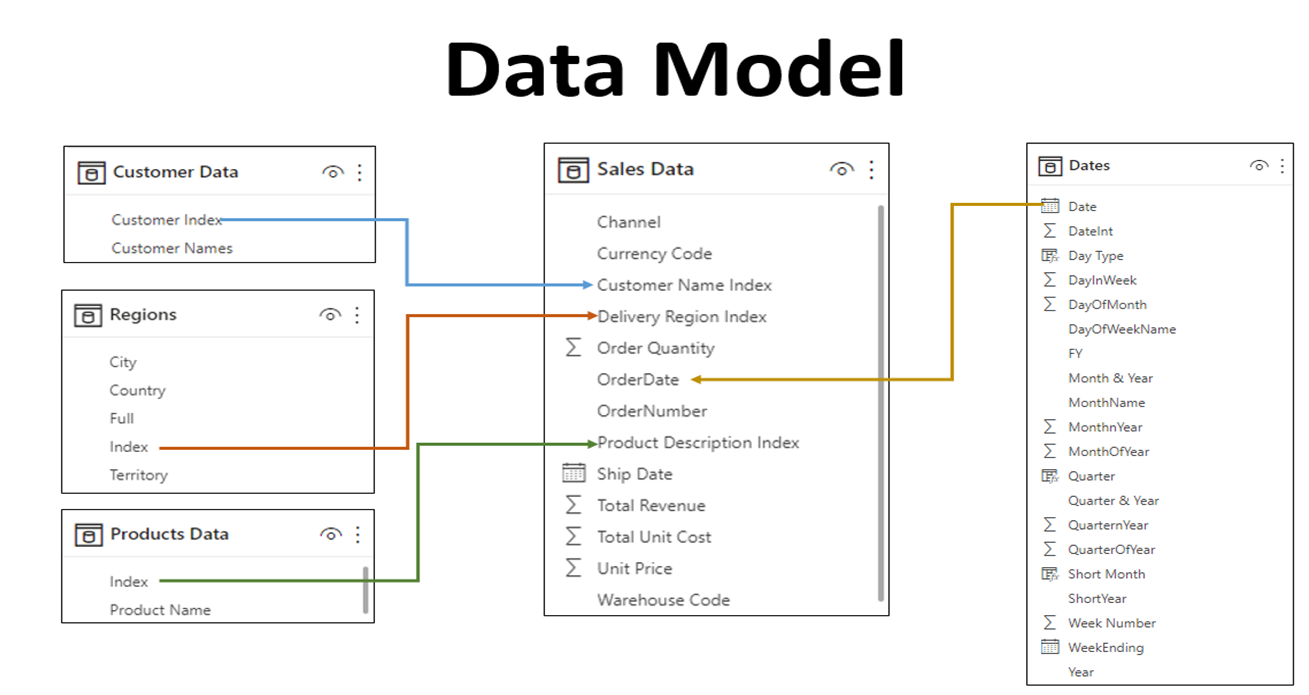
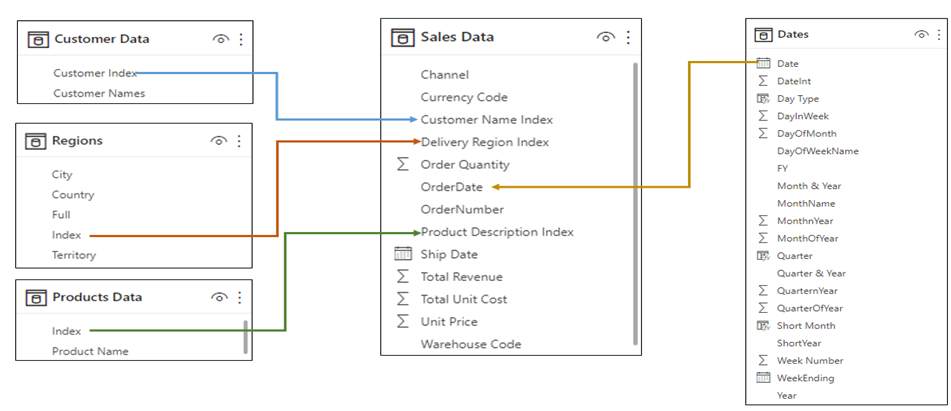
The management team at the company supplies the information in the excel file titled “Management_Insights_DataModel.xlsx” and the corresponding data diagram can be viewed below. This Excel spreadsheet includes separate sheets for “Sales Data”, “Customer Data”, “Products Data”, and “Regions” data.

Both the “Sales Data” table and the “Customer Data” table can be connected via the “Customer Name Index” column and the “Customer Index” column, respectively.

Both the “Sales Data” table and the “Products Data” table can be connected via the “Product Description Index” column and the “Index” column, respectively.

Both the “Sales Data” table and the “Regions” table can be connected via the “Product Description Index” column and the “Index” column, respectively.

Both the “Sales Data” table and the “Dates” table can be connected via the “OrderDate” column and the “Date” column, respectively.

Business Requirement:

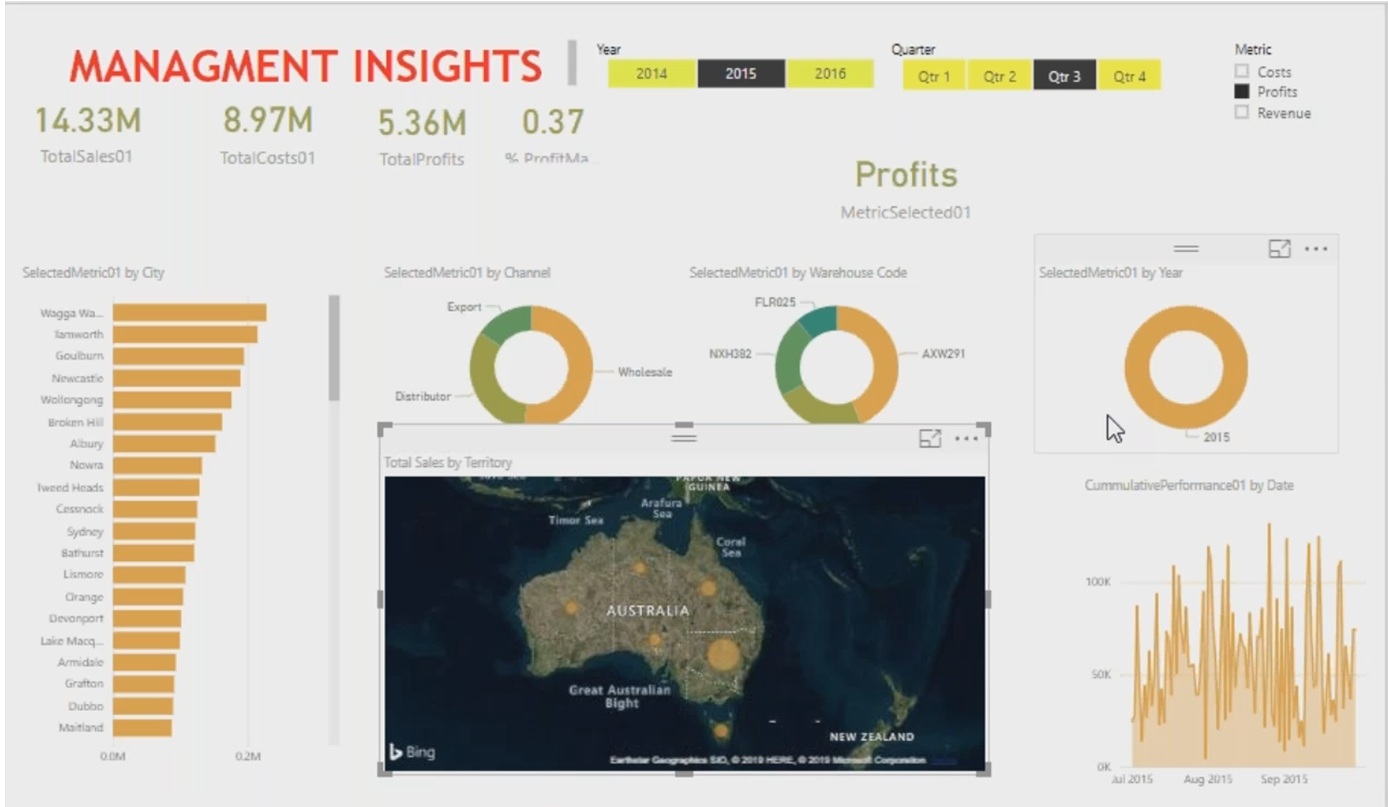
The executives of a company have requested that we develop an interactive and lively dashboard similar to the one seen below.

When the Year / Quarter of the selected Key Metric is clicked, the relevant data visualization should load up in order to facilitate improved decision-making.

Example Report:


Functional Requirements:

 Data Gathering / Requirement:

Prepare a report using a variety of visuals in order to display management insights on a single page as effectively as possible. Feel free to use your imagination to create the most accurate representation of the facts you have.

  1. Sales Data
  2. Customer Data
  3. Product Data
  4. Regions
  5. Dates

Task 1.1

Create a mechanism that will load all of the tables from the “Management_Insights_DataModel.xlsx” into a respective table.

 Task 1.2

In order to give the data segregation, you should first create a new table called “Metric Selection” and then fill in the information that is listed below.

Table Name: Metric Selection

Metric

Metric Index

Revenue

1

Costs

2

Profits

3

 2. Data Modeling:

Task 2.1

Establish the relationships between all of the tables that were uploaded from Excel as defined in the data model.

  1. DAX Calculations & Visualizations :

 Task 3.1

 Total Sales: Calculate a new measure in the “Sales Data” table, by summing the “Total Revenue” column and displaying it on the Power BI Visual “Card” on the Report.

Total Cost: Calculate a new measure in the “Sales Data” table, by multiplying the “Order Quantity” with “Total Unit Cost” and displaying it on the Power BI Visual “Card” on the Report.

Total Profits: Calculate a new measure in the “Sales Data” table, by using the previously created measures Total Revenue – Total Cost and display it on the Power BI Visual “Card” on the Report.

Profit Margin%: Calculate a new measure in the “Sales Data” table, by using the previously created measures that “Total Profit” % “Total Sales” and display it on the Power BI Visual “Card” on the Report.

Task 3.2

Create a new Power BI Visual Slicer – “Year” on the report using the Year column from “Dates” Tables to select year information. Connect all of the previously constructed “Total Sales,” “Total Cost,” and “Total Profits,” as well as the “Profit Margin%,” to this “Year” selection. Changing the criteria in the selection of this Metric Values, the corresponding information should be displayed.

Power BI Visual Slicer – “Year”, should show the buttons for the user to selection

Button background color should be changed on Click of a button

Task 3.3

Create a new Power BI Visual Slicer – “Quarter” on the report using the Quarter column from “Dates” Tables to select Quarter information. Connect all of the previously constructed “Total Sales,” “Total Cost,” and “Total Profits,” as well as the “Profit Margin%,” to this “Year” selection. Changing the criteria in the selection of this Metric Values, the corresponding information should be displayed.

Power BI Visual Slicer – “Quarter”, should show the buttons for the user to selection

Button background color should be changed on Click of a button

Task 3.5

 Create a new Measure “MetricSelection” on the “Metric Selection” table. The “Metric Selection” table should be displayed on the Power BI Visual “Slicer” “Metric” on the report.

Power BI Visual Slicer – “Metric”, should show the check box for the user to select

Task 3.6

Create a new Power BI Visual “Clustered Bar Chart” on the report using city-wise data from sales data tables and connect this with “Metric”, “Year” & “Quarter” report components. Changing the criteria in the selection of this Metric/Year/Quarter the corresponding information should be displayed.

X-Axis – City

Y Axis – Selected Metric

Task 3.7

Create a new Power BI Visual “Donut Chart” on the report using “Channel” wise data from sales data tables and connect this with “Metric”, “Year” & “Quarter” report components. Changing the criteria in the selection of this Metric/Year/Quarter the corresponding information should be displayed.

Legend – Channel

Value – Selected Metric

Task 3.8

Create new Power BI Visual “Donut Chart” on the report using “Warehouse Code” wise data from sales data tables and connect this with “Metric”, “Year” & “Quarter” report components. Changing the criteria in the selection of this Metric/Year/Quarter the corresponding information should be displayed.

Legend – Warehouse Code

Value – Selected Metric

Task 3.8

Create a new Power BI Visual “Donut Chart” on the report using “Date” Column data from Dates data tables and connect this with “Metric”, “Year” & “Quarter” report components. Changing the criteria in the selection of this Metric/Year/Quarter the corresponding information should be displayed.

Legend – Date

Value – Selected Metric

Task 3.9

Create a new Measure “CumulativePerformance” on Selected Metric (previously calculated) on sales Data tables and display the results in Power BI Visual “Area Chart”

X Axis – Date

Y Axis – CumulativePerformance

Task 3.10

Create a new Power BI Visual “MAP” on the report with data from the “Territory” column of the Regions tables, and then connect this to the “Sales Data” table in order to present the sales broken down by territory when the user selects an area on the MAP. 

Employee Task Management System Web Project using PHP and MYSQL

Problem Description

We need to make a system in which mentors can assign tasks to the employee and other mentors can monitor the availability of employees and on that basis, they can assign him/her new task. As well as employees can see all the assigned tasks with priorities. The app should be able to: Store data on new Employees/Trainees and new Task Assignments Employees can see the availability of other employees, trainees, and interns but trainees will not be able to see other availability. Employees can assign tasks with details like task name, task description, assigner, priority, and expected hours for completion to other employees’ or trainees’ ToDo lists considering the maximum limit of a total of eight hours for an employee before assigning any task.

Target Audience

This is a very common problem in companies where an employee already working on an assigned task and another mentor or boss going to assign him a new task, S/He might not know the employee’s availability and the priority of the task on which the employee already working. In that scenario, there will be lots of communication going around to assign the task, due to which task going to be delayed. To resolve these issues and make employee availability transparent, we need to make a system in which mentors can assign tasks to the employee and other mentors can monitor the availability of employees and on that basis, they can assign him/her new task.

As part of the curriculum of B.tech and to gain practical knowledge in the field and Python programming and web development we have made this project. We have boosted our skills through it.

In this Project, we have worked on VS Code and GitHub. Git Bash, Mysql, Software xamp, CSS, and HTML.

Employee Task Management System is created in PHP and MYSQL. It deals with the rundown of workers in an organization or an association. It likewise contains the training went by every Employee. Representative is the foundation of an organization so the Employee Management System is an extremely useful framework for an association or organization.

It also contains training attended by each employee. The employee is the backbone of a company so the Employee Management System is a very helpful system for an organization or company. This system also manages the company employee details like their attendance, their performance, salary details, and leave details.

This section compresses the assessment of the writing important to the Employee Management System. It looks at hypotheses, ideas, methodologies, strategies, and systems important to the venture.
Comparative existing advances identifying with the improvement of the Employee Management Systems are talked about.

In this Project, we have worked on VS Code and GitHub. Git Bash, Mysql, Software xampp, CSS, and HTML. Employee Management System is created in PHP and MYSQL. It deals with the rundown of workers in an organization or an association. It likewise contains the training went by every Employee.

Representative is the foundation of an organization so the Employee Management System is an extremely useful framework for an association or organization. It also contains training attended by each employee. The employee is the backbone of a company so the Employee Management System is a very helpful system for an organization or company. This system also manages the company employee details like their attendance, their performance, salary details, and leave details.

Design Diagrams:

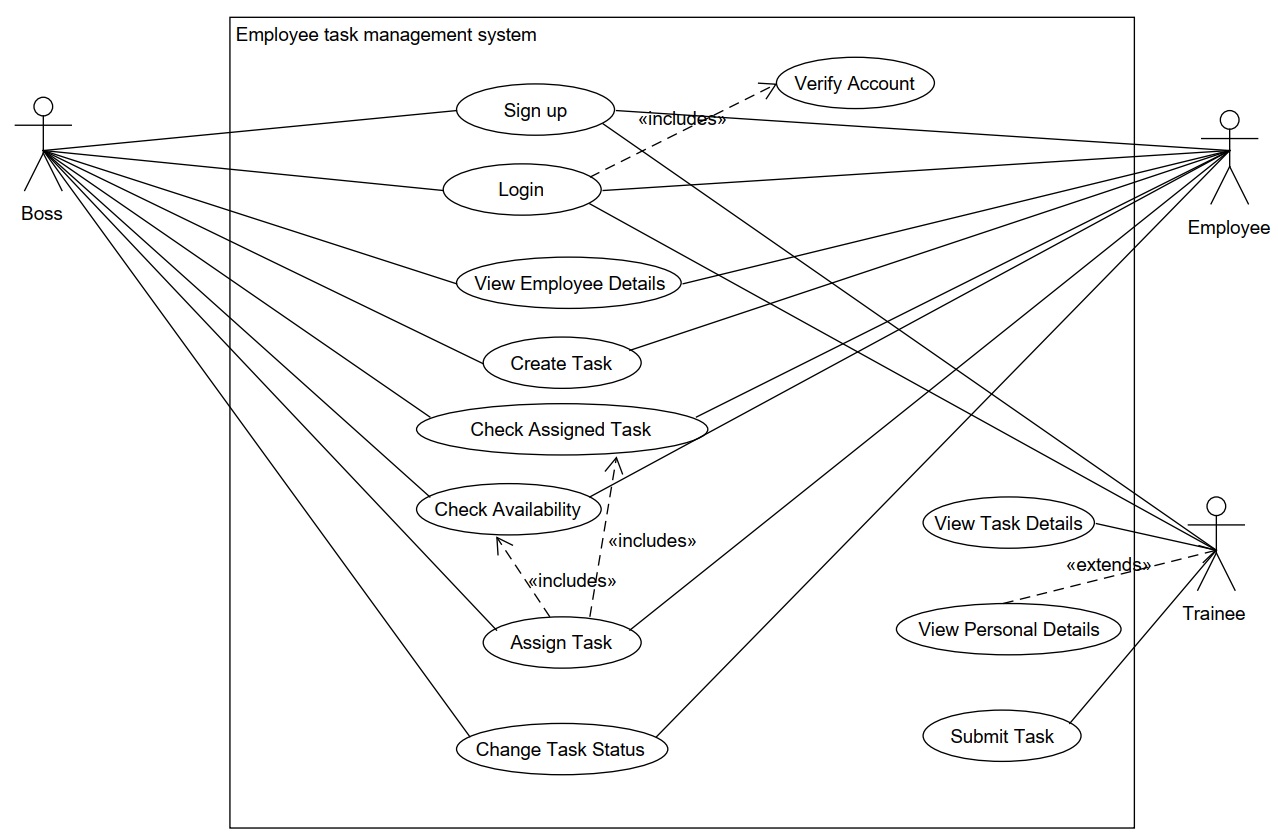
Use Case Diagram:

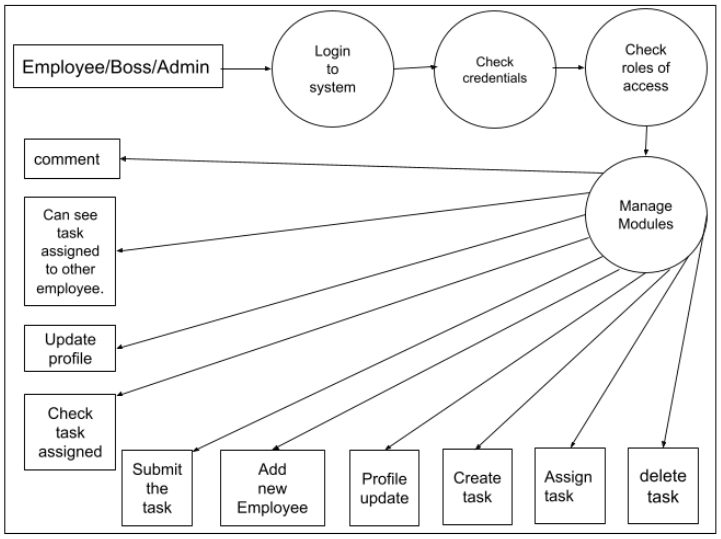
Data Flow Diagram:

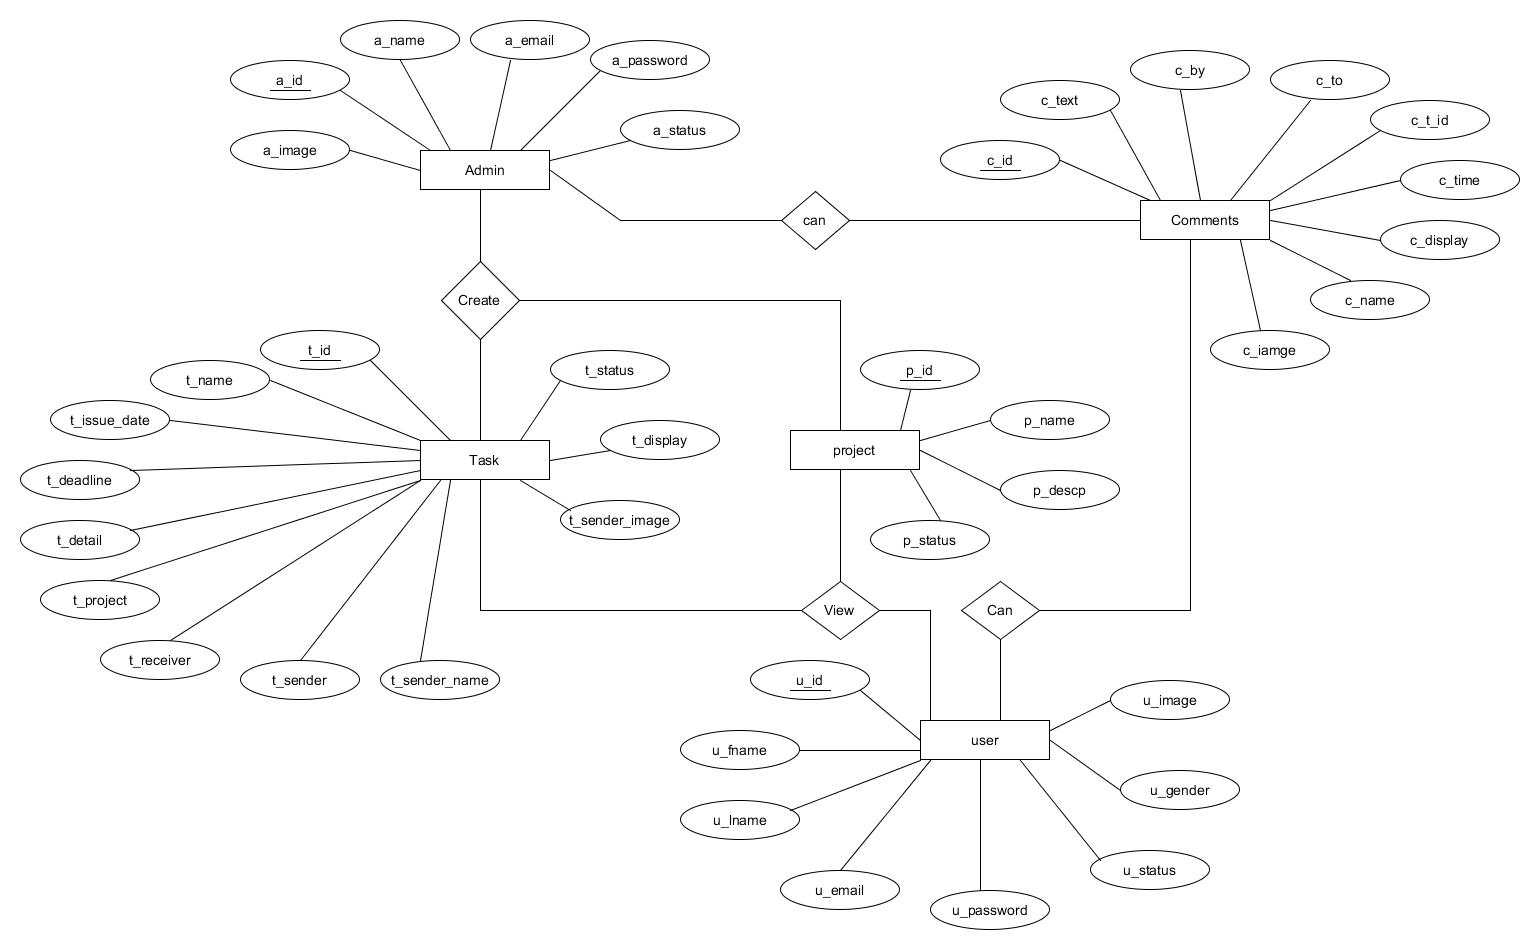
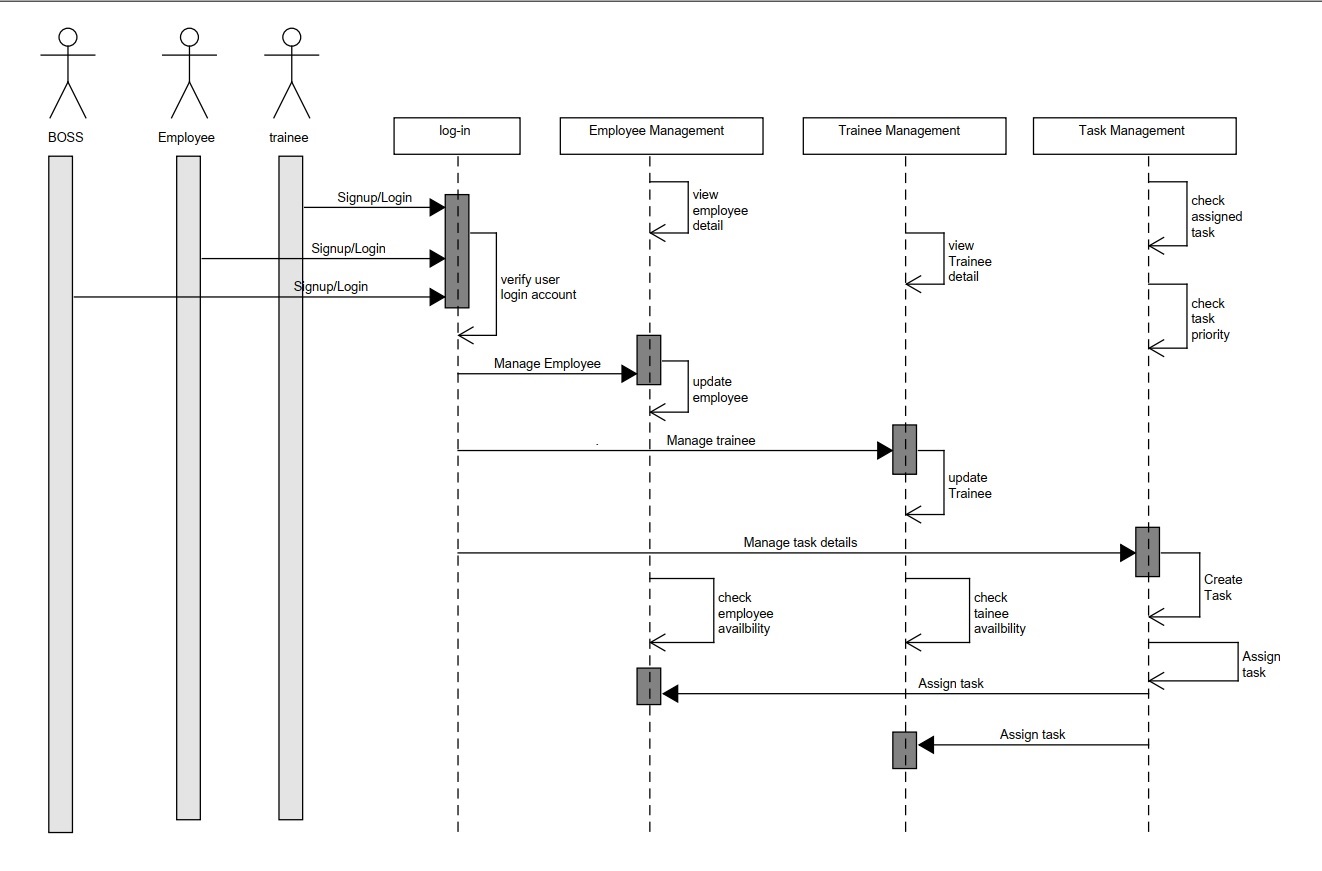
ER Diagram: Sequence Diagram:

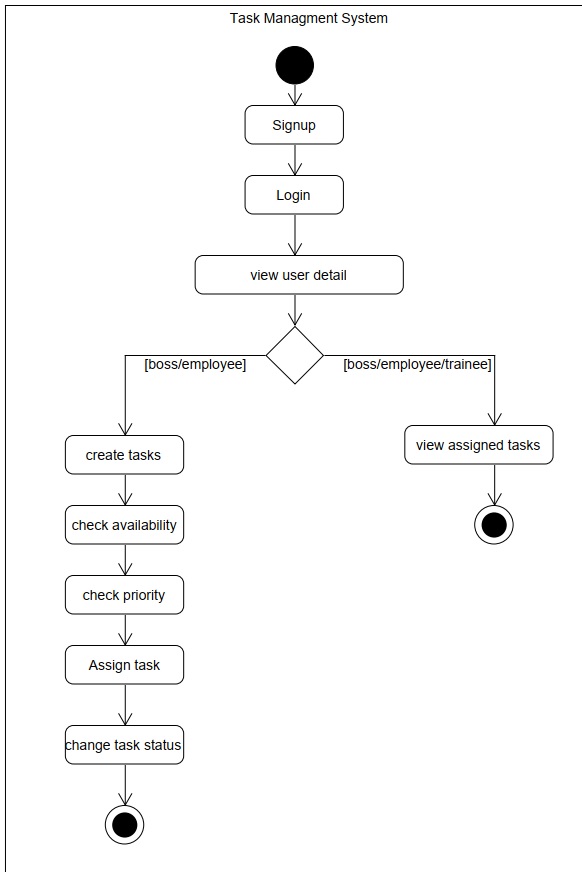
Activity Diagram:

Functional Requirements

REQ-1: Authentication 

  1. Login- The user can log in to the system with his/her username and
  2. Logout- The user can log out from the
  3. Login failure- If the user does not exist in the database or the user has not yet been authorized by the

REQ-2:Authorization 

  1. User role check- After logging in, the user role will be checked from the database and the user interface will be displayed according to their role.

REQ-3: Employee Management 

  1. Display- Users with defined roles can display the content of the database. To be more specific, an employee can only view his/her personal Boss and can not only see his/her personal information but also employee’s information who are under his/her department or school.
  2. Edit- A user with an employee role can edit his/her specific personal

information. Boss can only edit employees’ personal information that is under his/her coverage except for user role type. The Boss can check employee availability.

REQ-4:Trainee Management 

  1. Training – The Boss and employee shall create training tasks and assign them to other Bosses and employees and employees and trainees respectively that are required to attend the training as well. Boss and Employee can also check the availability of the trainee.

REQ-5: Task Management 

  1. Tasks – Boss and Employee can check assigned tasks, they can check task priority. they can also create the task and assign the task.

1. Sign Up
2. Login Up
3. View Employee Details
4. Create Task
5. Priority
6. Availability
7. Assign Task
8. Task Status
9. Task Done
10. Task Details
11. Personal Details
12. Submit Task

System Features

Module Description

Sign Up: Bosses, employees, and trainees will sign up using their credentials.

stimulus: boss/employee/trainee will sign up through the signup button.

response: dialogue box for “thank you for signing up” appears.

Log in: Boss, employee or trainee will log in to the system using their unique ID.

stimulus: boss/employee/trainee will log in through the login button.

response: for boss/employee/trainee different pages will appear respectively.

View employee details: contains employees’ details.

stimulus: click on the button to View employee details.

response: Details appear (only boss and employee can view details)

Create Task: boss can create tasks for employees or another boss. Employees can create tasks for trainees or other employees. trainee can not create tasks.

stimulus: click create task button.

response: the task will be created

Priority: Check the assigned task priority.(boss/employee/trainee)

stimulus: click on check assigned task priority.

response : shows priority(High,Medium,Low).

Availability: check availability of boss/employee/trainee for assigning the task.

stimulus: click on the check availability button.

response: shows availability.

Assign Task: After creating the task the creator will assign the task to the boss/employee/trainee.

stimulus: click on the button to assign a task.

response: Task will be assigned

Task Status: change the task status whether it is completed/submitted/in progress.

stimulus: click on the button to change task status.

response: changes will be done according to your status when you choose options from it.

The task is done: The feature indicates the task is done. Only bosses and employees can access this feature.

stimulus: click on the task done button.

response: status will be updated once the task is done.

Task Details: will get trainees through the details of the task assigned.

stimulus: click on the View Task Details button

response: details appeared

Personal Details: will display personal details of the trainee to her /him.

stimulus: click on the View personal details button.

response: personal view appears to him/her.

Submit Task: The feature is for trainees only, to submit the task.

stimulus: click on submit task button

response: the task will be submitted.

Future Scope

1) AI is applied in almost every industry and may become a standard in the near future. 

2) Data visualization represents the data in a visual and understandable manner: graphs, diagrams, maps, etc.

Conclusion

This is a customized task management tool that enables your enterprise to manage all tasks efficiently in this troubled time & even in the post-COVID age. Our robust task management app help organizations face challenges related to project management & gain a higher Return Of Investment over the period while meeting deadlines and utilizing resources effectively.

Download the Complete Employee Task Management System Project code, Report, PPt, and Design Documents

Restaurant Database Management System Project using C# & MS Access

Title: Restaurant Database Management System.

Topic Research and Executive Summary:

The Restaurant database Management System is an Enterprise Database project which has a few advantages where restaurants can improve customer relationships; Restaurant owners can know when the customers arrive most of the time which can enhance productivity. By using a Restaurant database Management System owners can have effective use of Human Resources. Due to this database system, we can manage time we can reduce human efficiency and errors, and get accurate information.

Statement of Work

Project Description:

This database system is developed in such a way that restaurant can get accurate details of both offline and online ordering through mobile or web application so customer gets a notification if the order is ready for pickup and customer can track the order if he/she orders online for home delivery.

Due to this database management system, we can reduce the complexity between restaurant management and customers.

Project Challenge:

  1. Collecting the information from the Restaurant owner visa by reading articles or interviewing the store manager of the company.
  2. Learning C# to create an application to connect with Microsoft access. C# is a programming language that is simple, and modern. The language and its implementations provide strong support to software engineering principles. C# is familiar to C and C++
  1. Microsoft Access is a database management system from Microsoft that combines the relational Microsoft jet database engine with a Graphical user interface and software tools.
  1. Must learn to design a logical relational database                                                              
  1. Create ER diagram

Project Description and Milestones:

Stage1: Analysis: The main objective of the database is to manage the details of the staff of the restaurant, the customer who visits the restaurant to order and take away behavior that the customers who order online, and manage the delivery system where the restaurant can assign delivery boys to deliver the food the customer.

Stage2: logical design: The Database consists of 5 data tables which are

Restaurants in different locations.

The store manager who takes care of the restaurant manages the staff and the daily supplies like food items

The staff are of different types such as cashier, waiter, receptionist, cleaner

Customers who order online, who visit the store and have dine-in, and others who take away

Delivery guy who takes the orders and delivers the food to the customer

Stage3: physical design:

The Restaurant is located in different locations so it has a restaurant id and restaurant address.

The manager data table has the manager id, manager name, manager age and management experience, and manager address.

The Staff has staff id, staff age, staff assigned work, staff address, and staff experience.

Data table for a delivery system where it has details of delivery boy, location of the delivery, order details

The customer data table has customer order details and customer names.

The customer ordered online then the data table has the customer’s address, customer name, order details, and delivery boy id.

Stage 4: Implementation: Create the application interface using C# programming language, and create a database using Microsoft access.

Stage5: Modification and Maintenance:

Modification and maintenance of the database are done in the Microsoft database.

Methodology and implementation plan:

This database management system has 4 phases, design, coding, testing, and maintenance. By use of RAD methodology, these stages are implemented.

Step 1: Need to create a design a database with five data tables.

Step 2: By using C# programming we need to create a user application interface, Using Microsoft access we need to create a Database and interlink the application interface and database.

Step 3: Need to test the database system and check for the error the clear the errors.

Step 4: Need to check the database on a regular basis because things to be needed to be upgraded.

Expected results: The Deliverables

By creating a working application for the restaurant so they can access it easily. The Restaurant owners can view the details of the store manager, the number of staff working on a daily basis, and the financial details.

The Store manager can use the database system to view the no of people working in the store and can view the accurate details of the orders

Customers can easily order the food through the online menu

Supporting Facilities:

Database: Designed in Microsoft ACCESS

Application program language: C# programming

Other application: Microsoft Visual Studio (Programming IDE)

Broadband Billing System Database Design SQL Project

Database design of Broadband Billing System application with the help of stored procedures and triggers in SQL Server.

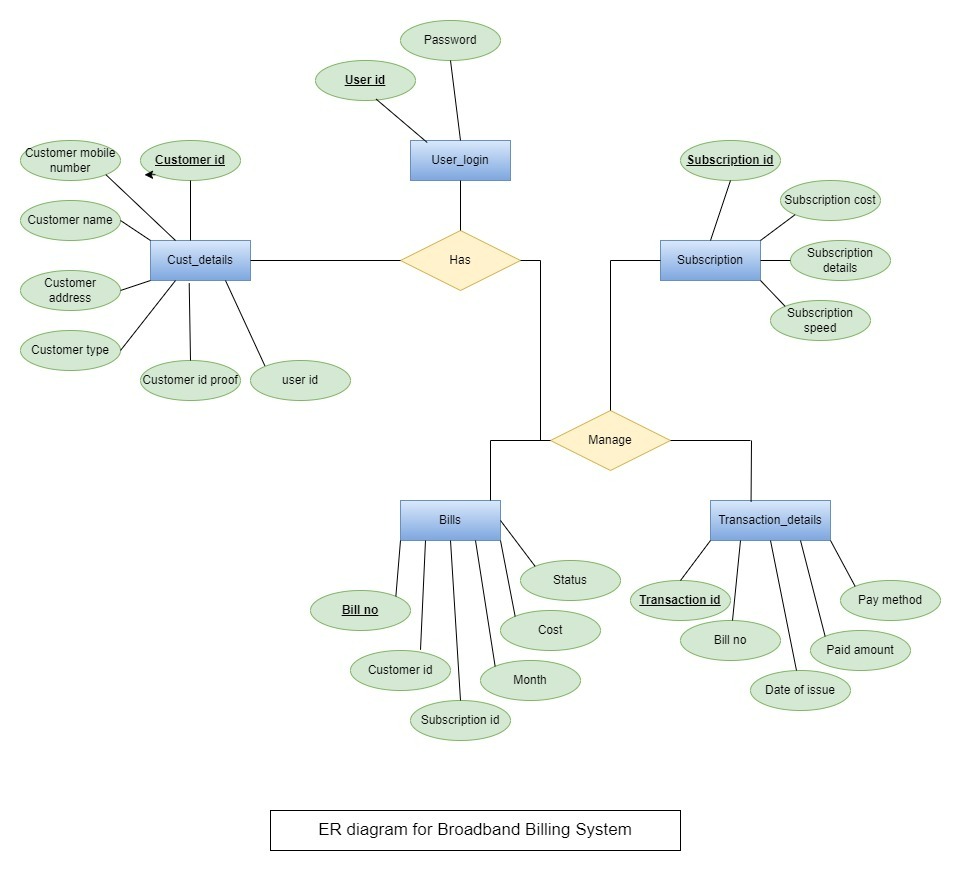
ER Diagram for Broadband Billing System:

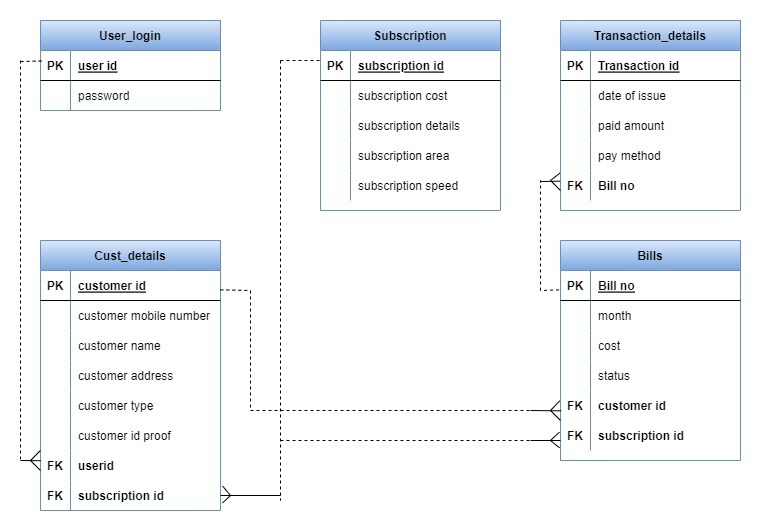
Data Model Diagram for Broadband Billing System:

Create Data Base:

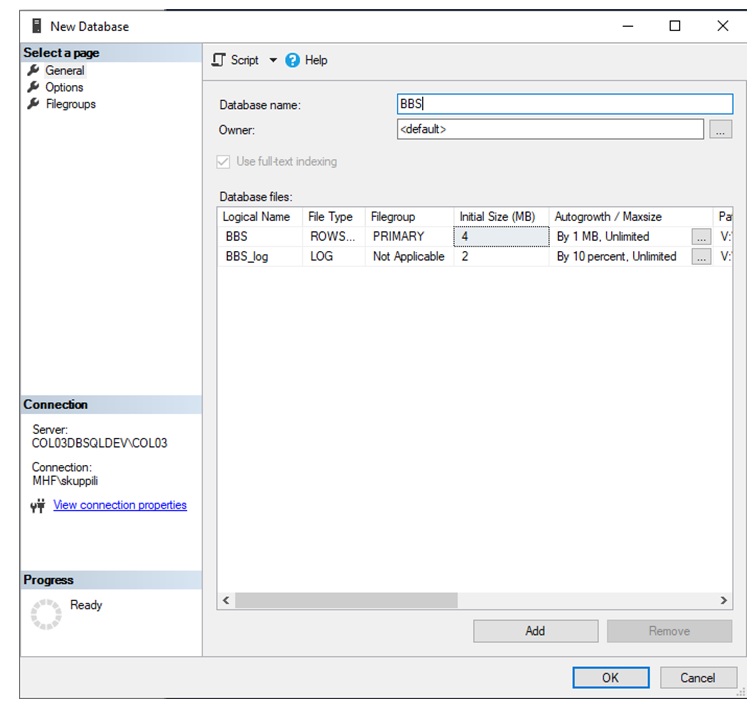
For this purpose, created a Database Named “BBS” on the server.

  • Right Click on Database in Object Explorer of SSMS
  • Click on New
  • And Provide the name and hit the ok button
created a Database Named “BBS” in the server

Create Objects specified in Data Model & Add data to the “Subscription” table

Run the BBS_CreateTables script that will create the below data model in SQL.

Creation of SQL Procedures:

SP#1

Create a procedure that gets the customer’s name, customer mobile number, id proof, type, city, area, and password as inputs and registers the customer for choosing any suitable plan of broadband as per his locality.

Run the BBS_RegisterNewCustomer_prc Script to create Register New Customer

Testing Script:

USE BBS

go

— Register New Customer

Exec BBS_RegisterNewCustomer_prc

  @CustomerName='Suresh Kumar'

, @CustomerMobile ='80043781'

, @CustomerIDProof ='ARC5296P'

, @CustomerType ='Regular'

, @City ='HYDERABAD'

, @Area ='HYDERABAD'

, @Password ='iSuraj'

SP#2

Create a procedure that gets the customer’s name, customer mobile number, id proof, type, city, area, and password as inputs and registers the customer for choosing any suitable plan of broadband as per his locality.

Run the BBS_ShowCurrentSubscriptionPlans_prc script:

Testing Script:

use BBS

 go

 — Check Current Subscription Plans

 Exec BBS_ShowCurrentSubscriptionPlans_prc @USerID=2 , @Password ='iSuraj'

SP#3

Create a procedure that gives the customer all the plans available and the customer can choose anyone plans out of them as per his need and locality by taking subscription id, customer id, and month as input.

Run the BBS_ShowAllPlansToCustomers_prc Script:

Testing Script:

Use BBS

go

 — Show all plans to customers

 Exec [BBS_ShowAllPlansToCustomers_prc] @SubscriptionID =1 , @CustomerID =100001 , @Month ='JUNE'

SP#4

Create a procedure that will generate the bill for the customer’s chosen subscription plan by taking subscription id, month, and customer id as inputs.

Run the BBS_GenerageBillForCustomer_prc script:

Testing Script:

use BBS

 go

 — Generate Bill for Customer

 Exec [BBS_GenerageBillForCustomer_prc] @SubscriptionID =2 , @CustomerID =100001 , @Month ='JUNE'

SP#5

Create a procedure to make a transaction for payment for the chosen transaction and will show the transaction details of the customer’s payment status.

Run the BBS_ShowPendingTranactions_prc script :

Run the script:

use BBS

 GO

 — Show Pending Transactions

 exec BBS_ShowPendingTranactions_prc  @CustomerID =100001

Trigger:

Create a trigger that gets triggered when there is any update on the bill table after the successful transaction of payment and this trigger has to change the status of the bill payment from pending to paid.

Run the below Scripts:

BBS_Transaction_Details_Update_tr Script

BBS_MakeTranactionsForPayment_prc Script

Testing Script:

 use BBS

 GO

 — Show Pending Transactions

 exec BBS_ShowPendingTranactions_prc  @CustomerID =100001

 — Make Transactions for payment

  exec [BBS_MakeTranactionsForPayment_prc] @TransactionID=2 ,   @PaidAmount =700, @PayMethod ='CC'

Run the 1st SP first to get the transaction details and amount

Pass those in 2nd sp and execute it.

Then if you run the query you will see the status updated to Paid

Select * From Bills b where billno=2

 End

Download the Broadband Billing System application Stored Procedure Scripts Here.

School Case Study Database Design Queries and Answers

database design:

  1. Create a DATABASE: SCHOOL 

TABLES

Create the following three tables with the same names and data types as provided below:

CourseMaster

Column Name

Data Type

Remarks

CID

Integer

Primary Key

course name

Varchar(40)

NOT NULL

Category

Char(1)

NULL, Basic/Medium/Advanced

Fee

Small money

NOT NULL; Fee can’t be negative

StudentMaster

Column Name

Data Type

Remarks

SID

TinyInt

Primary Key

StudentName

Varchar(40)

NOT NULL

Origin

Char(1)

NOT NULL, Local/Foreign

Type

Char(1)

NOT NULL, Undergraduate/Graduate

 EnrollmentMaster

Column Name

Data Type

Remarks

CID

Integer

NOT NULL Foreign Key

SID

Tinyint

NOT NULL Foreign Key

DOE

DateTime

NOT NULL

FWF (Fee Waiver Flag)

Bit

NOT NULL

Grade

Char(1)

O/A/B/C

 Using the above table layouts as schema, write T-SQL Statements for the following requirements:

  1. List the course-wise total no. of Students enrolled. Provide the information only for students of foreign origin and only if the total exceeds 10.
  2. List the names of the Students who have not enrolled in the Java course.
  3. List the name of the advanced course where the enrollment by foreign students is the highest.
  4. List the names of the students who have enrolled for at least one basic course in the current month.
  5. List the names of the Undergraduate, local students who have got a “C” grade in any basic course.
  6. List the names of the courses for which no student has enrolled in the month of May 2020.
  7. List name, Number of Enrollments, and Popularity for all Courses. Popularity has to be displayed as “High” if the number of enrollments is higher than 50, “Medium” if greater than or equal to 20 and less than 50, and “Low” if the no.  Is less than 20.
  8. List the most recent enrollment details with information on Student Name, Course name, and age of enrollment in days.
  9. List the names of the Local students who have enrolled for exactly 3 basic courses.
  10. List the names of the Courses enrolled by all (every) students.
  11. For those enrollments for which fees have been waived, provide the names of students who have got ‘O’’ grades.
  12. List the names of the foreign, undergraduate students who have got a grade of ‘C’ in any basic course.
  13. List the course name and total no. of enrollments in the current month.

stored procedure

Using the above table layouts as schema, write a stored procedure for the following specifications:

Input Parameters:

Date From (Mandatory), Date To (optional, if not specified, take the current date), &Student ID (Mandatory) 

Requirements:

Course-wise,enrollment-wise in ascending order of course name to be printed. If no enrollment exists for a given course for the period specified, print the course name and the remarks ‘No enrollment for this period’

——————————————————————————————

Enrollment Details of<Student Name > from <FromDate> To <ToDate>

Origin :                                                          Type:

SL.No       Course Name    Date of Enrollment    Fee Waiver? Grade 

                                                                  (Yes/No)

  …             …               ……                              ……      ……

  …             …               ……                              ……      ……

                       Total No. of Courses Enrolled:

The Development of the above-Stored Procedure below using SQL Server:

–Create the database

create database School_DB

go

–To exchange the context

USE School_DB
go

–create CourseMaster table

create table CourseMaster
( CID int Primary Key,
CourseName varchar(40) NOT NULL,
Category char(1) NULL CHECK(Category='B' or Category='M' or Category='A'),
Fee smallmoney NOT NULL CHECK(Fee>0)
)
go

–To see schema of table

sp_help 'CourseMaster'
go

–To view the table

select * from CourseMaster
go

–Insert the values in CourseMaster table

insert into CourseMaster values(1,'SQL Server','M',10000)
insert into CourseMaster values(2,'MSBI','A',20000)
insert into CourseMaster values(3,'Python','B',5000)
insert into CourseMaster values(4,'Data Science using Python','M',90000)
insert into CourseMaster values(5,'C#.NET','B',15000)
insert into CourseMaster values(6,'Java','M',15000)
insert into CourseMaster values(7,'Power BI','A',30000)
insert into CourseMaster values(8,'Oracle','A',30000)
insert into CourseMaster values(9,'MySQL','B',15000)
insert into CourseMaster values(10,'Cobol','B',16000)
insert into CourseMaster values(11,'Cognos','M',40000)
GO

–Create Student table

create table StudentMaster
(
SID TinyInt Primary key,
StudName varchar(40) NOT NULL,
Origin char(1) NOT NULL CHECK(Origin='L' OR Origin='F'),
Type char(1) NOT NULL CHECK(Type='U' OR Type='G')
)
GO

–Insert the values in StudentMaster table

insert into StudentMaster values(100,'Arman','L','U')
insert into StudentMaster values(101,'Jhon','L','G')
insert into StudentMaster values(103,'David','F','G')
insert into StudentMaster values(104,'Rosy','L','U')
insert into StudentMaster values(105,'Mike','F','G')
insert into StudentMaster values(106,'Jessica','L','U')
insert into StudentMaster values(107,'Abhi','L','G')
insert into StudentMaster values(108,'Srinu','L','U')
insert into StudentMaster values(109,'Venkat','F','G')
insert into StudentMaster values(110,'Ram','L','U')
insert into StudentMaster values(111,'Khan','F','G')
insert into StudentMaster values(112,'Laya','F','U')
insert into StudentMaster values(113,'Naresh','F','G')
insert into StudentMaster values(114,'Naveen','F','G')
insert into StudentMaster values(115,'Rahman','F','U')
insert into StudentMaster values(116,'Abosode','F','G')
insert into StudentMaster values(117,'Manikanta','F','G')
insert into StudentMaster values(118,'Lalitha','F','U')
go

–create EnrollMaster

create table EnrollMaster
(
CID INT NOT NULL FOREIGN KEY REFERENCES CourseMaster(CID),
SID TinyInt NOT NULL FOREIGN KEY REFERENCES StudentMaster(SID),
DOE DateTime NOT NULL,
FWF Bit NOT NULL,
Grade char(1) NULL CHECK(Grade='O' OR Grade='A' OR Grade='B' OR Grade='C')
)

–USING THE ABOVE TABLE LAYOUTS AS SCHEMA, WRITE T-SQL STATEMENTS FOR THE FOLLOWING REQUIREMENTS:

1. List the course wise total no. of Students enrolled. Provide the information only for students of foreign origin and only if the total exceeds 10.
2. List the names of the Students who have not enrolled for Java course.
3. List the name of the advanced course where the enrollment by foreign students is the highest.
4. List the names of the students who have enrolled for at least one basic course in the current month.
5. List the names of the Undergraduate, local students who have got a “C” grade in any basic course.
6. List the names of the courses for which no student has enrolled in the month of May 2020.
7. List name, Number of Enrollments and Popularity for all Courses. Popularity has to be displayed as “High” if number of enrollments is higher than 50, “Medium” if greater than or equal to 20 and less than 50, and “Low” if the no. Is less than 20.
8. List the most recent enrollment details with information on Student Name, Course name and age of enrollment in days.
9. List the names of the Local students who have enrolled for exactly 3 basic courses.
10. List the names of the Courses enrolled by all (every) students.

–11. For those enrollments for which fee have been waived, provide the names of students who have got ‘O’ grade.

select StuName,grade
from StudentMaster SM
inner join EnrollMaster EM on SM.sid=EM.sid
where EM.Grade='O' and FWF = 1

–12. List the names of the foreign, undergraduate students who have got grade ‘C’ in any basic course.

select StudName,Origin,Type,Grade,Category
from CourseMaster as CM
inner join EnrollMaster as EM ON CM.CID=EM.CID
inner join StudentMaster as SM ON SM.SID=EM.SID
where SM.Origin='F' and SM.Type='U' and EM.Grade='C' and
CM.Category='B'

–13. List the course name, total no. of enrollments in the current month.

select CourseName,count(*) as Total_No_of_Enroll
from CourseMaster as cm
inner join EnrollMaster as em on cm.cid=em.cid
where datediff(mm,DOE,getdate())=0
group by cm.CourseName