Vehicle Management System Project using Python and SQLite


The complete development of this Vehicle Management System project using Django as the backend and sqlite3 as the database. This Python project has main sections Login/Signup, Dashboard, Vehicle, Driver, Booking, Repair, and Report which are explained in the coming slides in detail.

Functions Below:

Login/Signup

Users can signup/log in to the portal with this page. It takes in the necessary fields required for the user details

Dashboard

This is the dashboard in which you can view your details is shown and the user can edit the details.

Driver

Driver Section has two pages, one is to add a driver and the other is to view the list of drivers available. This section is only visible to the users which have admin access. The Driver list has the features to search and sort lists according to the fields.

Vehicles

In this section there are two pages one is to add vehicles and the other is to list the vehicles owned by the user. On the vehicle list page, the user can view individual details, edit the details and delete the vehicle.

Booking

The booking section has four pages one is the form to book a trip the second one is the success page where the booking details including the distance, cost, and duration are displayed using google maps API. On the success page, you have the option to pay which will take you to the payment page.

The payment page lets you enter the card details to pay. There is a page to display all the bookings made by the user wherein the user can search for the bookings. The admin will have another option which is to confirm the booking and a driver will be allotted and a mail will be sent to the user saying the mail is confirmed. The map option in the booking list page displays the route using google maps API. When the admin confirms the booking a confirmation mail will be sent to the user.

Repair

The repair section has two pages, one for reporting the issue and another page to show the issues made by the user. On the issues page, the admin has an option to solve the issue made by all the users.

Report

Each user can have a report of the trips that he has made. There is an option to mail the user the report for further use. Demo Here is the live demo of our project. The quality of the gif is a bit low.

Database tables:

Vehicle Table

Owner
Cost per KM
Price
Registration Plate
Vehicle Status
Insurance Status
Total KM traveled
Fuel Type
Mileage
Vehicle Type
Image

Report Table

Registered Date
Registered User
Vehicle Mileage
Issue

Driver Table

First Name
Last Name
National ID
Address
Email
Phone Number
License Category

BookingTable

Source
Destination
Distance
Booking Date
Start Date
End Date
Security Deposit
Allotted User
Allotted Driver
Vehicle
Cost
Duration

StellarStudent College Student and Faculty Communication Project

StellarStudent is a web application that deals with students and faculty. Ever since digitalization started in the country, schools and colleges want the best way possible to share information with their students. Some colleges use Google Drive or Whats app to share materials or collect other documents. However, the chance of data loss or misplacement is guaranteed. It is better for the college to have an admin who can look after all the happenings on the college website with just one click. With high security and validations of users, the chances of data misplacement are low with StellarStudent.

This Student and Faculty Communication project aims to connect the students with their faculty with no miscommunication. It is a web-established web-based application that involves faculty uploading study materials and notices like events and placement drives, viewing certifications, and quiz results of students. Students can also communicate with each other via the exchange of images, feedback, and discussion. This application can be handled by the admin and manage students as well as faculty.

Objective 

The StellarStudent is a web-based Student and Faculty Communication project for BVRIT-H students and faculty. The main objective of this project is to let college students interact with their faculties.  In this project, the faculties can upload materials, quizzes, etc. Even students can ask questions to faculties and can also upload the certificates. Our main goal is to ensure cost-effective, technical excellence, and secure apps.

Methodology 

To store the user data MYSQL has been used as a database. HTML and CSS have been used for front-end development. PHP is used as a server-side language, which is used to connect the front end to the back end. We can run this application in our browser.

Software requirements specifications

 Introduction:

Student and Faculty Communication SRS describes the requirements and specifications of StellarStudent, a web-based application for the college. 

Purpose:

The purpose of this document is to present a detailed description of StellarStudent.

Scope:

The project StellarStudent helps college students to interact with their faculties and many more. This web application can be accessed by students and faculty of BVRIT HYDERABAD College of Engineering for Women.

Overall description

The project StellarStudent is a web-based application with two interfaces: One is for students and another is for management. The website works on desktop computers, laptops, and mobile devices with the help of a browser.

Project Functions:

The project Student and Faculty Communication has the following product functions:

  • The web portal will provide the functionality to manage the system and the student
  • The website is secure because users must enter login details to access the
  • The system contains a huge For this reason, the search option has been provided on all report pages. The search results can be viewed in the list view.
  • The product works online with help of the internet

Assumptions and Dependencies

    • Internet connection
    • 24X7 uptime server connection
    • One assumption about the product is that it will always be used on mobile phones that have particular technical support.

Modular Decomposition of Components:

Dashboard Component

• Admin account
• Publish news
• Publish events
• Publish meeting schedule
• Add course records
• Add subject records
• Add certificate types

Faculty Component:

• Quiz materials
• Study materials
• Students record
• Faculty profile
• Certificates

Discussion Component:

• Post discussion forum
• Discussion reply
• View discussion forum

Quiz Component:

• Upload quiz question
• Attend quiz exam
• Quiz result

Study material Component:

• Upload notes
• View study materials

Certificate Component:

• Upload certificates
• View Certificates

Upload certificate by student Screen

View Uploaded Certificates

Order Management System for Steel Fabrication Factory Java Project

The web-based “Steel fabrication Order management system” project is an attempt to simulate the basic concepts of order management systems. The system enables the customer to do the things such as view all available products, and products by category-wise distribution. The user can place the order, the delivery agent will get the order details and it will be delivered to the customer at their residence. Users can request customized products with their own requirements and budget.

The Order Management System provides a facility that enables users to view details about products without logging in. But if the user wants to place the order, then it is required to log in first. Users can view all available products with detailed descriptions, reviews, and ratings. Users can choose a particular product. The system checks for the availability of the quantity of the product. If the product is available then the system allows the customer to select the product and place an order. To order a product the system asks the customer to enter his details such as first name, last name, city, street, landmark, state, pin, phone number, etc.

Scope 

  1. Order Management System for Steel Fabrication Factory is a web-based application that allows the admin to handle all the activities online quickly.
  2. So, the aim of the project is to provide products to customers. The customer can choose the products from the category and place the order. Users can request customized products to their own requirements and budget. Staff then can contact the user with the details provided by the user at the login time
  3. Staff will arrange the products as per the order and make them available for collection.
  4. Once the order is ready, the delivery agent will collect the products and they will be delivered to the customer at their residence

SYSTEM ANALYSIS AND DESIGN

System analysis is the performance management and documentation of activities late to the life cycle phase of any software namely:

  1. The Study Phase
  1. The Design Phase
  1. The Development Phase
  1. The Implementation Phase
  1. The Testing Phase

Software analysis starts with preliminary analysis and later switches to a detailed one. During the preliminary analysis, the Analyst took a quick look at what is needed and whether the cost benefits. Detailed analysis studies in depth all the cornered factor, which build and strengthens the software.

ER Diagram:

PROJECT FEATURES

Admin module

Admin is the main role in the overall system. Admin can log in into the system using credential where admin credential was already stored in the database.

After successful login into the admin dashboard, there are various operations that the admin can do mentioned below –

  1. View customer: Admin is able to view the list of customers who are already registered into the system. Customer data is stored in a database so the admin can fetch those data to view the list of customers
  2. Add remove staff: Admin can add staff by giving a particular role also admin is able to delete it from the system
  3. View feedback: Admin can view feedback which is given by customers on products after purchasing

Manager module

Like the admin, the manager can log in to the system with the credentials stored in the database. The manager carries out the most of operations on the owner’s side. The manager can perform the following functionalities mentioned below:

  • Manage products: The manager can add products into the system with all the necessary details. As the products are managed category-wise, the manager can add distinct categories first and then products under that specific category. Managers can also update products by changing the price of products or the available quantity of product
  • Manage delivery: The manager is able to see all the orders. After placing an order by the user, the manager assigns that order to the particular delivery That order is visible to that delivery agent’s dashboard with details.
  • View feedback: The manager can view feedback and ratings given by customers on products after purchasing. The manager can review and analyze the feedback
  • View order customization: The manager can review the customized orders that users have requested, and contact that specific user from the contact details given at the login time

User module

User can login into the system, or even without login users can see product lists, detailed descriptions of products, reviews, and ratings of products. Even without a login user can check all available products. But to place an order user needs to log in first to the system.

Registration and creation of user profile

The system shall require a user to register, in order to carry out the process to place an order. For registration it will ask the user for the following information first name, last name, city, street, landmark, state, pin, phone number, email, and password. The system will automatically generate the user’s profile.

Making Order

After registration user’s credential is saved in databases and using the credential user can log in to the system. For place an order user must do login first otherwise the system will not allow the user to place an order.

After login into the system successfully now the user is able to place an order. The first user needs to search for the available product or the user can search for a product by category, one more option is available the user can select a product and customize it according to their need.

If a user wants to place an order of multiple products, then the first user selects one item and moves it to the cart using the ‘add to cart button, after adding it to the cart now user can go for another product and the user can add multiple products to add.

After adding products to the cart, the cart dashboard will show all the products, product quantity, and total price. Now users can place orders by selecting a payment method.

View Order History: The system shall allow a user to view all information about his previous orders. In history, the system shows the previous product, delivery status, etc.

Delivery Agent

Account Delivery agent is another important role in this system. The main role of the delivery agent is to deliver the product to the mentioned address and update the status of delivery. The delivery agent has functionalities mentioned below:

  1. Receive order: The delivery agent received the order and does a job of delivering the product on time
  2. Track order: The tracking status of the product during delivery is updated by the delivery agent. Tracking status like ‘product arrives, ‘on the way, ‘delivered’, etc. Users get to see this status on his/her side
  3. Verify payment: The delivery agent needs to verify the payment details like whether payment is already done or needs to be collected at the time of delivery
  4. Update order status: After delivering the order successfully, the delivery agent needs to update the status as ‘delivered’.

Software Required for Development

Module 1: Database Design – MySQL-for database

Module 2: Front End – HTML, CSS, JavaScript, React js.

Module 3: Back End – Eclipse IDE(Any IDE), Spring tool suite, Tomcat

Download The Complete Project code, report, and PPT of the Order Management System for Steel Fabrication Factory Java & MySQL Project.

Payroll Management System C++ Project

OBJECTIVES

  • Manage Employee Information efficiently.
  • Define earnings, deductions, leave, etc.
  • Generate Pay-Slip at the convenience of a click.
  • Generate and Manage the Payroll according to the Salary Structure assigned to the employee.
  • Manage your own Security.

SYSTEM REQUIREMENTS

Software Requirements

Operating system:   Windows XP or Later versions of windows

IDE:    Dev C++

Hardware Requirements

Processor: Intel Pentium core or later versions

 Hard Disc: 120GB

RAM: 256 MB or More 

SYSTEM ARCHITECTURE

MODULES

Admin Login Module

Here in this module call, the user is prompted to enter the login credentials. The Login Module is a portal that allows users to type a username and password to log in. This module is no longer available to users after they have logged in. The Login Module appears to users next to the introduction module.

Data Entry Module

After you selected data entry from the main menu you land on this screen. In this module, the Data of the employee are inserted. The Fields required here are Name, Id of the employee, Designation, Age, Years of experience, No. of working hours,  Loan Status if any.

All the required data is processed and the salary, earnings, and deductions of the employee are calculated and finally stored in the files for permanent storage.

Storing and Retrieving Data Records Module

Records of all the employees are to be maintained and the records are stored in Files and the information is retrieved from the files. All the Records are separated by new lines, and each field of an individual record is separated by a ‘tab’. 

WORKING PROCEDURE

STEP 1

The main function is executed first and the control the followed by code.

The function ‘intro()’ got executed and the welcome message is displayed when the user proceeds to the next step by pressing any key.

STEP 2

The user is prompted with a login screen here and a user with valid credentials can have the access to the software.

STEP 3

 After the user with the valid credentials logs in, the data of previous employee records are retrieved.

STEP 4

After the user with the valid credentials logged in and successful retrieval, the user land on the home screen (the Main menu), and based on the choice of the user he lands on the requested screen.

STEP 5

After the job is done, all the modified or created data is stored in the files and the software is successfully exited.

FUTURE SCOPE

  • Continuous tracking of their activities within the company of every employee can be provided with their individual login credentials.
  • Auto updates of the details like bank loan updates can be provided.
  • Administration control over the software is to be improved.

Ex: Administration can able to add the employee credentials such that the employee can know their status and companies administration legally.

  • Databases can be used for easier and more efficient access.
  • The proposed system is capable of handling only 100 employee records and can be improved.

You can also visit & download the Java Application project on Payroll Management System

E-Commerce Order Management System Project using JAVA Swing

We have made a project on Order Management using Java AWT. Abstract Window Toolkit (AWT) is a set of application program interfaces ( API s) used by Java programmers to create graphical user interfaces ( GUI ) objects, such as buttons, scroll bars, and windows.  We have made our project by creating a store “E-Commerce Store”.

In our project we have to build a user interface where there is a login page where the user will be required to enter their email-id and password, after inserting, their details will be checked via JDBC with the information in the database if their information is incorrect an error message will be displayed, if the user does not have an account there is a button below which is create an account and after clicking that button the user will be taken to a different window where the user will be asked to input additional information and will be required to verify his email-id where the user will receive a onetime password (OTP), after entering that OTP the user will be required to set a password and other related information after successfully creating the account the user will receive a successful message.

After that, the user will be taken to the payment setup page where they have to enter a couple more information like Newark Id, Newark Pin, and Newark Password. Also, on the login page, if the user fails to remember their password, they can click on forget password and will be taken to another window where they will be required to enter their email-id and will receive an OTP after that they can change their password which in turn will be reflected in the database also.

After successful login the user will be taken to the store where there are some items to buy accompanied by a chat box and cart, the former takes you to the chat box where you can talk to our store and can directly go to the specific item purchase page as well you can also report a complaint regarding a specific item.

Talking about Cart, on that page you can see the items you have purchased and also delete the items that you have purchased but wish to keep no longer. For every item, there are specific specifications that you have to choose like memory, model color, etc., and below that there are three buttons cart, done and clear clicking on done will confirm your order and clear will clear the existing choices you have made there is also a button at the bottom which is back to store and it does what it reads.

On the cart page, once you have confirmed your order and wish to make no changes you can select on proceed to pay and after that, you will be taken to a new page where you can make your payment. To make a payment you will have to enter your Newark Id, Pin, and Password and then if you still wish to go back to the cart you can go before paying the amount. After paying the total amount of the items you purchased, the same amount will be deducted from the database as well and in case you have insufficient funds an error message will be displayed

The E-commerce system has massively replaced physical shopping, especially for electronic goods. Therefore, we have created our mini project to stimulate the initial aspects of an e-commerce engine starting with the user creating an account and ending with checkout and payment.

AIM

The first thing that comes to your mind when you think of an order management system is Amazon. Therefore, we decided to model our project on a mini version of Amazon, trying to incorporate some of its features including registration, purchasing items, placing orders, payment, etc.

Literature Review

To place an order on Amazon we need to create an account or if we have an account we just need to sign in.
We navigate to the product we want to buy.
We can then add the product to the cart.
We check the cart and remove the product that we don’t want.
We can then check out and proceed to pay.
We have to specify user details.
We also have Amazon Pay from Amazon their in-house UPI for quicker payment.

PROBLEM STATEMENT

To create a secure small-scale and affordable online store for small vendors for managing inventory and orders as an order management system.

BLOCK DIAGRAM

FEATURES

Account Handling:

Our program is able to create an account for both accessing the account and generating a house payment account, log in into an account by verifying necessary credentials like passwords and forgot passwords.
Our primary verification is done through email:
We use email for:
Verifying email during creating an account by sending an OTP through email.
Authenticate the user when there is forget password request for an account.

Cart system:

A simple easy-to-use GUI for users to select items to add to a shopping cart.
The user can even remove the item once they added it to the cart and simultaneous updating of the final price.

Chatbot:

A simple chatbot to respond to simple queries from the users.

Payment gateway:

We have created an in-house gateway where the user only needs to verify his bank credential once and then he can create an id and password that he can use during checkout making the process easier for the user every time he makes a purchase.

CONCLUSION & FUTURE SCOPE

We have successfully created an online shopping store that can be distributed to small vendors to employ for their use.

Our future endeavors include: Ordering more than 4 items of a particular product auto-updating inventory verifying phone number

We have successfully used the above features for the creation of the order management system using the code mentioned above using java. Our future endeavors in improving our project include connecting our payment gateway to a bank account id, verifying a phone number, and being able to order more than 4 numbers of a particular product.

Online Shopping Store Website Project using C# and SQL

MY ONLINE SHOPPING STORE 

We have a physical shopping store, which is doing well in terms of revenue and margin. We want to increase the business by extending the availability of our products through online mechanisms. Quick time-to-market is the main criterion;

we are adding some features: 

  1. Home Page 
  2. Product Search facility 
  3. Product Detail Page 
  4. Add to Cart 
  5. Place Order

Use Case Diagram-Online Shopping Website:

The use case diagram is usually referred to as a behavior diagram used to describe the actions of all users in a system.

All users described in the use case are actors and the functionality is the action of the system.

The use case for an online  shopping website:

Specification of Use Cases:

Use Case                                      Home page

Home Page

Element

Details

Actor

User

Trigger

With or without authentication

Pre Conditions

Various Categories of the items are displayed

Post Conditions

On clicking each category, various sub-items are to be displayed

Normal course

1.      On hovering various categories are displayed

2.      On each Category, the subcategories are displayed


Use Case                      Search Product

Search Product

Element

Details

Actor

User

Trigger

On clicking the search bar for the item to be searched.

Pre Conditions

 Users can check the items they needed

Post Conditions

The various items of the searched product are displayed

Normal course

1.      User enters the Product name or product category

2.      The various items of the product are displayed

Use Case                                      GetAllProducts

GetAllProducts

Element

Details

Actor

User

Trigger

With or without authentication

Pre Conditions

The user needs to enter a product name

Post Conditions

The sub-list of all the items should be displayed.

Normal course

1.      The various products should be displayed varying in different perspectives

Use Case                                      GetProductDetails

Get Product Details

Element

Details

Actor

User

Trigger

On clicking a particular item the info about the product is to be displayed.

Pre Conditions

The user needs to enter the product name or category

Post Conditions

The total info regarding the product is to be displayed

Normal course

1.      User enters the Product name and then submits

2.      The fetching records will be displayed

Use Case                                      AddProduct

Add Product

Element

Details

Actor

Admin

Trigger

When the User Quantity is not available

Pre Conditions

 Checks whether the searched item is available in the inventory or not

Post Conditions

The user can search for the prescribed item

Normal course

1.      Admin checks in the inventory stock

2.      During the period of offers or when the inventory is not available to the users, he adds to the database.

Use Case                                      Delete Product

Delete Product

Element

Details

Actor

Admin

Trigger

When the offer period is completed

Pre Conditions

 Refactoring the product as per the daily market price

Post Conditions

The product is not available after the deletion.

Normal course

1.      Admin login using his credentials

2.      Search for the product to be deleted

3.      Deletes the particular products

Use Case                                      Edit Product

Edit Product

Element

Details

Actor

Admin

Trigger

When the product needs to be updated during the season sale

Pre Conditions

 The product may vary in its cost and delivery

Post Conditions

The product has been updated regarding the information

Normal course

1.      Admin logins using his credentials

2.      Updates the selected products in the inventory.

Use Case                                      Add To Cart

Add To Cart

Element

Details

Actor

User

Trigger

When a user needs to buy the item at a later point in time

Pre Conditions

 If the user likes a particular product he can choose to buy it by clicking the Add To Cart


Post Conditions

The selected items are available later until the selected product is available

Normal course

1.      User selects the particular product

2.      He then clicks on Add To Cart.

3.      The liked items are available for later usage

 Use Case                                     BuyNow

BuyNow

Element

Details

Actor

User

Trigger

With  authentication

Pre Conditions

The total amount should be displayed.

Post Conditions

On Clicking the order needs to be placed.

Normal course

1.      Click on Buy Now, select the items and then go to payment

2.      The order should be placed after payment.

Shopping cart System ER Diagram:

ER Diagram:

Flow Chart For Online Shopping system:

Database Table Design:

ProductCategory:

Field Name

Type

Remark

CategoryId

Int

PK

CategoryName

Nvarchar(50)


Products:

Field Name

Type

Remark

Id

int

PK

CategoryId

int

FK

Price

Float


Quantity

Int


Description

Nvarchar(Max)


Picture

Nchar(100)


CartItem: 

FieldName

Type

Remark

Id

Int

FK

Price

Float


Quantity

Int


DBMS Project on Student Management System

Student Management System is purely developed by using DBMS queries. The main functions involved to develop this project is developing ER diagram, DDL/DML, SQL constraints,  Retrieving data using the select function, Restrictions, and sorting functions,  Aggregate, and grouping, Single row function, Joins, and finally Subquery.

ER DIAGRAM OF STUDENT MANAGEMENT SYSTEM

DDL AND DML

1) Create a table name student and attribute of s_id, first last and middle name, address, email, city, and state.

2) Display the datatype of all attributes in the student table?

3) Insert values into the table student?

4) Change the datatype of s_id in the student table?

5) Update the city of s_id=001 to bby?

SQL CONSTRAINTS

1) Create a table name student with an attribute s_id that is not null?

2) Create a table name student with an attribute s_id that is unique?

3) Create a table name student with an attribute s_id which is a primary key?

4) Create a table name teacher with an attribute s_id which is a foreign key and team name?

5) Create a table name student and with an attributes city which a default constraints “KOLKATA”?

RETRIEVING DATA USING SELECT

1) Display all the columns of the table name course?

2) Display the columns c_name aliases course name of table name course?

3) Display the columns c_fee and c_name using concatenation and aliases course details of table name course?

4) Display the course fee and increase in course fee by 3000 where the course duration is 45_hr?

5) Remove the duplicate value from course duration with a student ID from the table name course?

RESTRICTIONS AND SORTING

1) Display the student ID and the first name from the table name student whose state is westbengal?

2) Display all the data of the table course whose course ID is ‘11’.

3) Display all the data of the table course whose course fee range is less than 100000?

4) Display the Lastname and city of the table student where the student’s first name starts with ‘a’ and consists of 4 characters?

5) Display the course fee of the table name course which is between 10000 to 50000?

AGGREGATE AND GROUPING

1) Display the average course fee for all the courses in the given table?

2) Display the minimum and maximum course fees in the given table?

3) Display the count number of course names from the table name course?

4) Display the total course fee in the table name course?

5) Display the student ID and minimum course fee from the course table and group by student ID having a course fee less than 102000 and sort the minimum course fee in descending order?

SINGLE ROW FUNCTION

1) Display the student ID and student first name and state from the student table where convert student first name and state into uppercase?

2) Display the student ID and student first name and state from the student table where convert student first name and state into lowercase?

3) Display the student ID and student state from table student and change the first character of all states to uppercase?

4) Display the student ID and student first name middle name last name together from the table student use the character-manipulation function?

5) Display the student ID and the length of the first name and the last name from the table student using the character-manipulation function.

JOINS

1) Display the registration number for the user’s table and the student’s first name on the table student use inner join?

2) Display the registration number for the user’s table and the student’s first name on the table student use left join and order by the first name.

3) Display the registration number for the user’s table and the student’s first name and last name from the table student use the right join and order by registration number.

4) Select all teachers and all courses in the given table using full join and order by teacher ID.

5) Select all students’ first names and last names and city in the given table using self-join and order by the city?

SUBQUERY

1) Display the first middle and last name of the student where the course fee is minimum?

2) Display the teacher ID and first middle and last name of the teacher where the course name is DBMS?

3) Display the phone number of the student of who’s registration number is 20?

4) Display the registration number who live in Jaipur?

5) Display teacher ID first name and phone number whose qualification is b.tech?

Online Learning Management System PHP Project

Objectives of the Project:-

The general objective of this Online Learning Management System project is to provide various courses to students as well as others who are interested in learning online. The use of the internet has increased and so the courses are available to be learned online. By providing this option, it would be easy for the users to learn by sitting in a comfortable place and learning based on the time they have.

The courses will be added, deleted, etc. by the admin. This project consists of the front end and back end sides. The front end side of the website is developed for the general public who are interested to know about us and to find out the courses provided by the management system. The back end is for the users who have created their accounts and admin utilities.

Scope of the Project:-

For this project, to store all the data various tables and attributes are required. As the main idea of this project is to provide courses for the students to enroll in and learn, it will also allow the instructors to teach courses. Thus the scope of this project is limited to the following tables: COURSES, USER DETAILS, STUDENTXREF, and INSTRUCTORXREF.

User requirements:-

Following would be the basic user requirements-

  1. Users should be able to view the Home page, About Us, and login/Register page of the website.
  2. Users should be able to search for the courses in which they are interested.
  3. Users will be asked to enter the user type as Student, or Instructor while creating the account.
  4. Users who have been marked as Students will be allowed to enroll in the available courses and will be displayed the courses in which they are already enrolled.
  5. Users marked as Instructors will be able to teach the course which is not taught by anyone else. They will be able to see the courses which are taught.
  6. Admin type of user will be able to add or delete courses as well as delete instructors from the courses.

*Note – User can be general public without creating an account, student, instructor, and admin.

Business Rules:-

Below are some basic business rules-

  1. One student can enroll in many courses.
  2. Every single course can be taken by many students.
  3. One instructor can teach many courses.
  4. One course will be taught by only one instructor.
  5. Users can be students or instructors based on the details entered while creating an account.

Entities and their attributes:

In this proposal, there are basically 4 entities. The description for each is given below-

USERDETAILS Entity –.When a student or instructor wants to enroll/teach for any course, first of all, they will have to create an account on the website by using the login page. All the details entered while creating an account will be stored in this table. This table will consist of the attributes as User id, user last name, user first name, user type (it can be student or instructor), and password. The primary key of this table will be the user id. Once the user has created an account, they will be able to know about the courses.

COURSE Entity – The course table will store all the details related to the courses which are offered. This table will have the following attributes Course id, Course name, course department, course description, course start date, and course end date. Course id will be the primary key for this table. Based on the above attributes, students can decide which course they are interested in. The instructors will also be able to know about the courses which are already taught by some other instructors and the courses available for them to teach.

STUDENTXREF Entity- This table will act as a reference table between the COURSE and USER DETAILS tables. The attributes of this table are student id, course id, and user id. The primary key of this table will be the student id.

INSTRUCTORXREF entity – This table is also a reference table between COURSE and USER DETAILS tables. If the user type is instructor then the details for that user id will be stored in this table. The attributes of this table are instructor id, user id, and course id. Instructor id will be the primary key for this table. Here the course id will be unique as 1 course cannot be taught by multiple instructors.

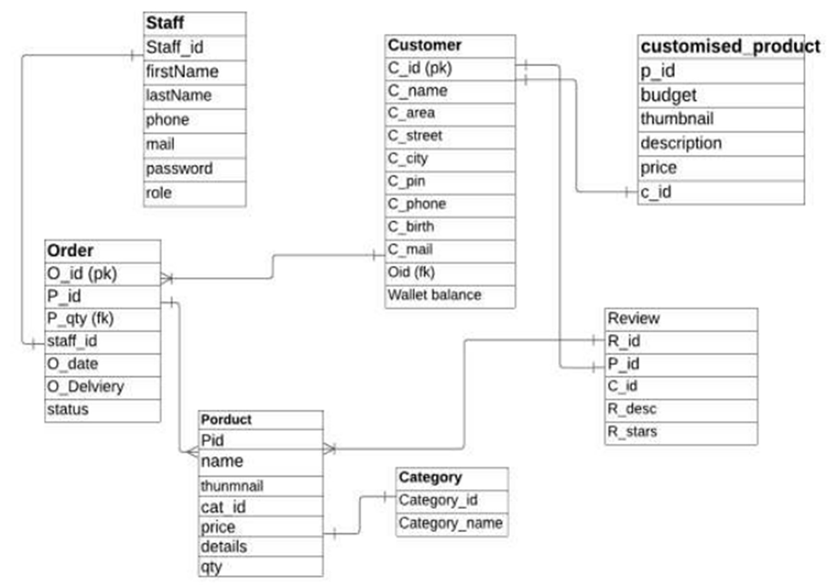
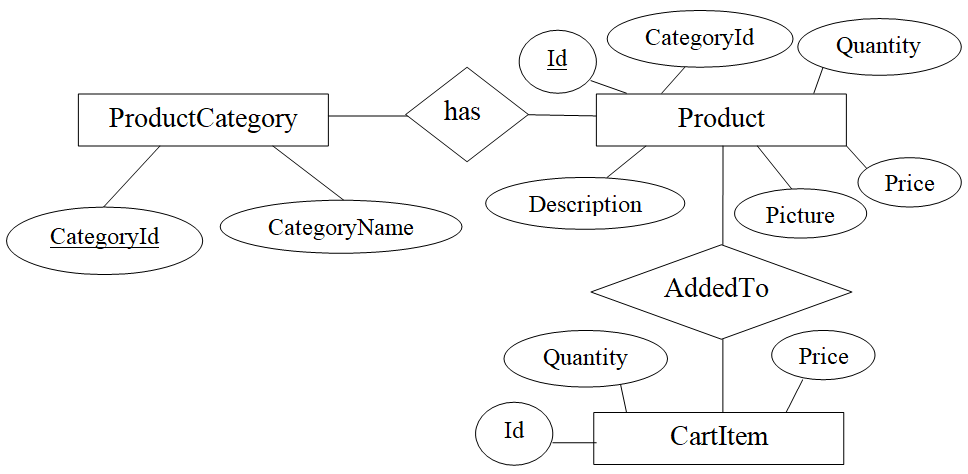
Entity-Relationship Diagram:-

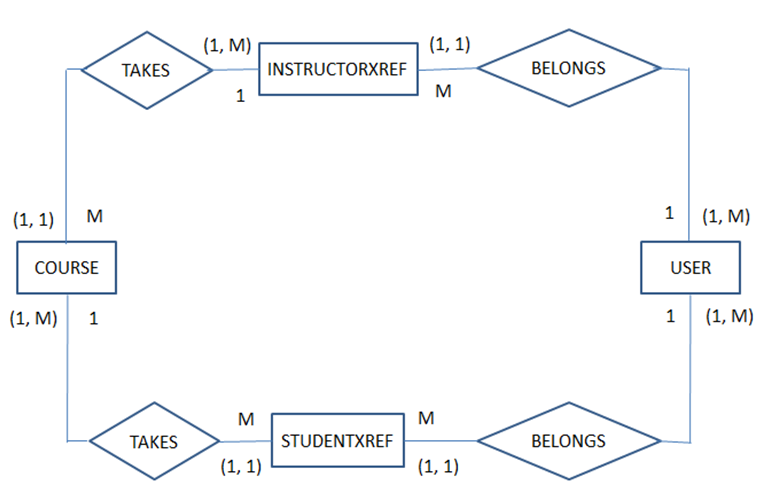
Fig 1: Entity relationship diagram for Online Learning Management System.

Website Description:-

The online learning management system is a system that provides students to learn about various courses online. Various pages have been created for the users like Home Page, About Us page, Login/Register Page, and Search courses page.

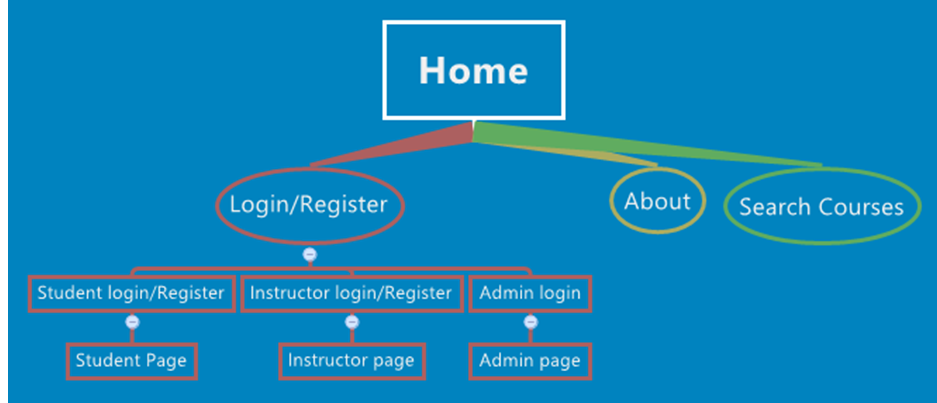
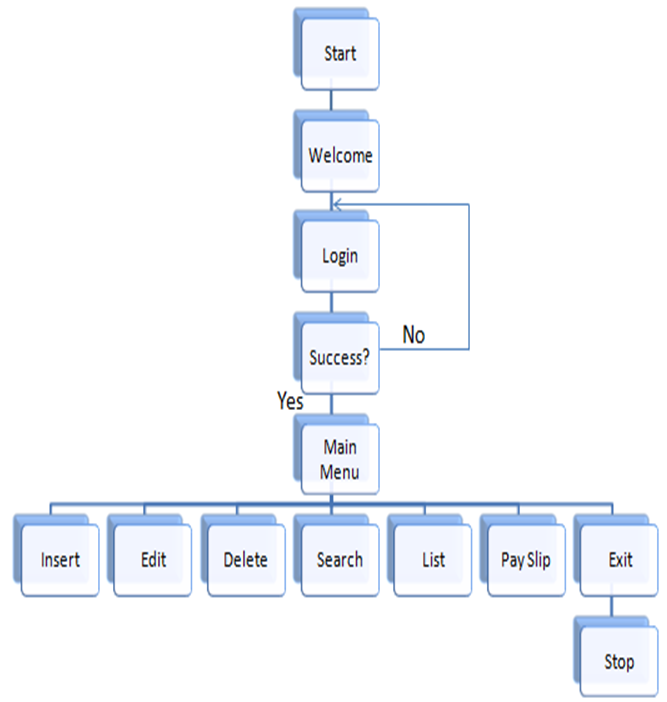
The sitemap for the online Learning management system is as:

The project consists of the Front end and back end. The front-end pages are described below:

Home Page:

This page is the main page of the project. This page gives a brief description of the management system and also posts the latest courses which are going to be added in the future. This page will be linked to all other pages. Whenever the user is interested in learning any course, then they need to create an account by clicking on the Login/Register button provided on the navigation bar.

Login/Register Page:

The login page lets the user enter their username and password to login to their account. There are three different links for students, instructors and admin in the login/register page. Students can click on the enroll/register for courses link in order to login into the account. Students who are already registered can put in their username and password to login to the account. In the case of new users, they can register for a new account by clicking Join us button. In order to sign up for an account a user needs to enter an email address, preferred username and password, and date of birth. The user has to make a selection of the account type either teacher or student from a drop-down menu. Then they can simply login into their account. 

The login page lets the user enter their username and password to login to their account. There are three different links for students, instructors and admin in the login/register page. Students can click on enroll/register for courses link in order to login into the account.

Students who are already registered can put their username and password to login to the account. In case of new users, they can register for a new account by clicking Join us button. In order to sign up for an account a user needs to enter an email address, preferred username and password and date of birth. The user has to make a selection of the account type either teacher or student from a drop down menu. Then they can simply login into their account. 

About Us Page:

This page describes the goal of developing this project. This will make clear to the users what the purpose of developing this website is and how they can use it. Contact information is also provided for the users so that if they have any doubts, they can send an email with the query. 

1.6.4 Search course Page:

When a user is interested in learning any course, before creating an account he can check whether the course in which he is interested is provided by the management system or not. This search option will help them to know about the courses and then they can decide whether to enroll in those courses or not. While using the search option, users are not required to create an account.

The back end part will come into the picture when the user has created an account. Users can be students or instructors. While creating an account, the user will be asked to select the User type from the drop-down option. The pages at the backend side are described below:

Student Page:

This page (student.php) will be displayed to the user whose user type is Student. It will display the courses which are available for a particular student to enroll. He can select multiple courses for enrolling. Checkboxes are provided in front of all courses and then finally enroll button is provided.

Once the student selects any course and clicks on Enroll button, he will be shown a thank you message for enrolling in those courses. Student.php will call enroll.php when an enroll button is clicked by the student. The back button is provided on enroll.php which will re-direct the student to student.php. The student will also be displayed the courses in which he has already enrolled on student.php. 

Instructor Page:

When a user selects the user type as an instructor, he will be directed to instructor.php page. On this page, he will be displayed with the courses which he is already teaching. The instructor will be able to teach courses that are not being taught by any other instructor. A checkbox option will be provided to the instructor to select courses and then he can click on each button. This button will direct the instructor to teach.php page where he will be displayed a thank you message.

Admin Page:

Admin page is designed for the administrator to add and delete courses in the system. In order to login as an admin the user needs to select the admin-Add/Delete courses link from the Login/Register page. Two options appears in the admin page 1.Add a course and 2.Remove a course. Add a course lets the admin add new courses in the system.

The details the admin needs to provide in order to add a course are course name, course department, course description, course start date, and course end date. The admin can simply press the Add Class button. A success message appears on the page after the submission of the details. In order to remove a class the admin can make a selection from the drop-down menu and press the Delete Class button. The success message appears afterward.

Functions provided by the website are:

  1. The following are the functions provided by the online learning management system:
  2. Browse the homepage, and about us page.
  3. Search courses without creating an account.
  4. Interested users can create an account.
  5. Students can enroll in courses.
  6. The instructor can teach courses that are not being taught by any other instructor.
  7. Admin can add/delete courses.

Usability considerations:

The online management learning system website has logical navigation. Users can easily navigate around the webpage. The home page gives the users information about the whole system. All the contents are written in simple language. It has a user-friendly interface and functions well with no broken links. All the links and sub-links are clearly represented. The procedures to log in to the account, register for courses, and add or remove the courses from the system are very clear.

The system lets the users know if their attempts of adding courses or removing courses were successful. When the users put wrong credentials while logging in, it lets users know their attempt has failed because of the wrong username or password. So, that user can put the correct information and log in to the account. The website has all the required functions based on user types. That makes the website informative and user-centered. 

FUTURE ENHANCEMENTS:

  1. Based on the entries in the database, graphs can be created to provide information about the number of students in each course.
  2. A class entity can be added to provide more information about courses like classrooms, class timings, etc.
  3. Change the template to make it more attractive and user-friendly.
  4. Passwords can be stored in an encrypted way to avoid giving away personal information.

Temperature and Air Quality Monitoring System Project for Pet lovers

Introduction:

In this modern world, there are many pet lovers who would like to carry their pets to places wherever they go. It’s the responsibility of the same person to ensure the safety of their pets. There are some public places where they can’t take their pets. For example, if a person visits a shopping mall he can’t carry his pet into the shopping mall. Hence, he/she has to park his car in the parking lot, leave his pet inside the car, slide down the window a little bit for air circulation and continue his shopping.

For suppose he/she forgot to slide down the window and left for shopping then the pet gets suffocated due to lack of air circulation and a rise in temperature. Even though he/she slides down the window and leaves for shopping there is a possibility that one of the many people inside the parking lot may smoke a cigarette. The smoke released may enter the car and damage the air quality which in turn may have effects on pets.

This is where our project finds its scope. We are developing a “Temperature and Air quality monitoring system for Pet lovers” in which we are monitoring the temperature levels, humidity, pressure, and air quality of the air inside our automobile and present them in an attractive dashboard so that the pet owner can monitor the atmospheric conditions inside his automobile through all of his gadgets having internet connection.

High-level architecture of the project:

Hardware Requirements:

  • Raspberry Pi Zero
  • 32 GB or larger Micro–SD Card
  • Power Supply and cable
  • BME680 Sensor
  • Connecting cables

Software Requirements:

  • Balena Cloud to create dashboards using sensor data
  • Balena Etcher to flash our SD card
  • Balena CLI for command line interface
  • Balena Sense code for installing the services

Project Implementation:

Step-1:

  • The first step of our implementation is to flash the operating system is to flash balena operating system into our Raspberry pi zero board.
  • For this initially, we have to create a balena cloud
  • Once we signed up and login into our balena cloud account then we have to create an application as shown below with our Wifi SSID and password and then we have to download Balena operating system image
  • Once we download the operating system image file then we will insert our SD card into card reader and connect the card reader to our
  • Then we will flash the OS image file into an SD card by means of balena Etcher as shown
  • By end of this system, our SD card should be ready with the flashed operating system for insertion into our Raspberry Pi zero board.

Step-2:

  • The main aim of this step is to complete the hardware
  • Please find the pin configuration of the Raspberry Pi Zero
  • Please find the pin configuration of the BME680 sensor
  • The connections are listed below:

Pin1 of Raspberry Pi zero——- CC pin of BME680

Pin3 of Raspberry Pi zero—– SDA pin of BME680

Pin 5 of Raspberry Pi zero—– SCL pin of BME680

Pin 9 of Raspberry Pi zero—– GND pin of BME680

  • Once we complete the connections to the BME680 sensor then we have to insert the flashed SD card into the SD card slot of our Raspberry Pi Zero
  • Please find the Raspberry Pi zero board after the connections are done as below:

Step-3:

  • Once we completed step 2 then we have to power up our Raspberry Pi zero board and then we have to open balena
  • If everything goes right our device must automatically be listed in balena cloud as shown
  • Then we have to install Balena command line interface for pushing the services
  • Then we have to push balena sense code into our board by using push
  • Please find the balena CLI below:
  • Once the push is successful then automatically the services get installed as shown below:

Step-4:

  • When the above three steps are successful then our cloud starts pulling the data from the sensor
  • To see the readings in dashboards we need to enable the public device URL and we can copy the URL we can access the dashboards on any device on which a web browser is installed across any geographic location.
  • Please find the screenshot of the dashboards below:
  • Then for testing purposes, I started breathing on the sensor. As we all know human breath contains CO2 and it is warm we can see on the dashboards as Indoor Air Quality showing Unhealthy and temperature is also raised as
  • After I have stopped breathing on the sensor within some time the IAQ returned to Good and also we can see the temperature started dropping as
  • As I have mentioned earlier every individual having a public device URL can monitor the dashboards from any electronic device which has a web browser installed in it. Please find the dashboards opened from the mobile phone
  • Hence the device is placed in a car with wifi module connected to it our device starts sending the data to the cloud. Hence even though pet owners leave their pets in cars and left for shopping can monitor the temperature and air quality and can make sure their pet is safe.

Corona Virus Prediction and Analysis Machine Learning Project

1.  Introduction 

Background 

Currently, there are many people, who are being affected by CoronaVirus. It started in China and now it is spreading all over the world. Till now, there is no medicine for this virus, and it’s killing millions of millions of people. So, it is a big question among all of us of how many people are going to be affected.

Problem Statement 

Currently, there is no application that can predict the spread of CoronaVirus for the future 30 days. So, with this project, we would like to create awareness among the people, by showing them how the corona rises for the future 30 days so that they can take some preventive measures by staying indoors.

Project Goal 

The main objective of this Corona Virus Prediction project is :

  • Future prediction of the increase/decrease in the number of active Coronavirus Cases for the next 30 days – for the whole world as well as for the United States of America. We have chosen the USA among all the counties as it is the highly affected country due to corona.
  • Future prediction of the increase/decrease in the number of deaths due to Coronavirus for the next 30 days.
  • Future prediction of the increase/decrease in the number of recovered cases due to Coronavirus for the next 30 days.

2.  Literature Review

 There is an outbreak of Corona in early December. This is caused due to severe acute respiratory syndrome coronavirus 2, which is basically the family of SARS virus. Many governments all over the world are issuing their own preventive measures to control the spread of coronavirus. So, we have conducted a literature review regarding this virus, based on the information that is publicly available.

Background of Literature Review:

China alerted WHO on 31st December 2019 that many people are reported to be suffering from Pneumonia, in Wuhan City. They reported that it started on Dec 8th, 2019, and there were an increasing number of patients who are working or living around the Huanan Seafood Wholesale Market.

When we started working on this project at the start of February, the Coronavirus was majorly prevalent in China. Initially, at the time of our project proposal, the mortality rate in China among all the confirmed cases is around 1.2% as of February 2020. And the mortality rate in all other countries, other than china was around only 0.2%. Among all the patients, who were admitted to the hospitals, the mortality rate, was around 11%. COVID-19 is increasing with great speed, and now there is a relatively very high mortality rate

A Way to Further Research :

So, we have performed this literature review, to analyze the spread of coronavirus. After analyzing how increasingly it’s spreading all over the world, we thought of performing our own prediction regarding this virus, so as to make people aware of its spread, and with this, they can take their own preventive measures, so that they do not fall prey to this dangerous virus.

We had very little amount of data when we started this project. It is a very trending topic all over the world. And millions of millions of people are losing their lives due to this virus. So, we are very curious to analyze this pandemic and so we have taken up this project.

We have found many datasets to collect data regarding the corona cases. Some of them include Kaggle, John Hoppkins, etc. So, we thought of choosing the dataset from John Hoppkins, as it’s updating the dataset on a daily basis. So, we collected the data and performed our own future predictions.

3. Methodology 

Approach

 So, basically, we have followed the below approach to kick-start our Corona Virus Prediction project:

  1. Firstly, we have started with research on choosing the datasets. On performing research on various datasets, we have finalized with John Hoppkins data set, as it gives us the live data on coronavirus.
  2. Secondly, we have collected the data and performed our preprocessing operation, so as to make our data ready for future predictions.
  3. Next, coming to choosing the machine learning algorithm. We have chosen appropriate machine learning(we will discuss below regarding this).
  4. Finally, we have performed our predictions to analyze the active cases, deaths, and recoveries for the next 30 days, based on the data available from the datasets and the chosen machine learning algorithm.

Figure: Approach

4.  Implications 

Benefits of the Project: 

  • This Corona Virus Prediction project helps in the prediction of coronavirus cases for the next 30 days, all over the world.
  • With this, we can also predict the increase in corona cases in the world.
  • By this, we can know how fast the coronavirus is spreading all over the world.
  • We can create awareness among people.
  • We can also create awareness in government so that they can take preventive measures to stop the spread of corona.

Lessons Learned:

Initially, I had no idea of a Machine learning algorithm. I started learning about machines from scratch. I bought some Udemy tutorials and through that, I learned everything step by step. At the start of the project, I am not even aware of what machine learning algorithm to use.

It was really an exciting experience doing this project. I am inspired to take up a Machine Learning Course for my next semester to learn deeply about Machine Learning Algorithms.

I tried my level best and contributed my 100% to this project.

Now, I came to know about machine learning, different types of machine learning Algorithms, and the differences between classification and regression algorithms -when to use what, creating test and train sets, building up the model, choosing the appropriate parameters, and performing future predictions. In the future, I would also love to take up a project related to Classification Algorithms.

5.  Conclusion 

  • Finally, to conclude, we have performed prediction using SVR and Polynomial Regression Algorithm.
  • SVR predictions are mainly for predicting the world case scenario, which includes confirmed, death, and recovered cases.
  • Polynomial Regression is used for the prediction of US Cases.
  • Based on the results, we believe that our predictions were almost accurate, with some little differences from the actual values.
  • This project can be further scalable, to include the predictions for various individual

6.  Appendix 

  • We have used Google Collab for our project. As we are two members of the team, we have chosen this, because it enables us to simultaneously work on the project from different
  • No Installation is Required.
  • We just need to have a google account. And we can easily create a Google Collaboratory file in our google drive, just like Google docs.
  • We will provide both .py files as well as .ipynb files along with this report, so as to run on google collab.
  • .ipynb can be uploaded to google collab directly and the results of the projects can be easily checked.