Parent Communication Register Android Application

Introduction:

The Main aim of our Parent Communication Register Android Application is to automate the attendance in the form of Android Mobile Application. Our intention is to establish a good communication between Student Mentor and parent.

In this new era of Science and Technology, computer is one of the most important components in our life. Works can be done in a better way by the help of computer.

welcome screen

We have seen over the years that the process of manual attendance is being carried out across almost all educational institutions. The process is not only time consuming but also sometimes yield inefficient results in the false marking and calculation of attendance. We need not maintain pen and paper based attendance registers. Following this thought, we have proposed a PARENT COMMUNICATION REGISTER (PCR) APP by which we notify parents via SMS OR a call Notification system which is implemented on Android mobile application.

This Android application will give the students attendance information and SMS notification feature whereby every parent will be periodically notified regarding his/her child attendance

Our system primarily focuses on building an efficient and user friendly Android mobile application. The application will be installed on the Mentor phone which runs android OS. It intends to provide an interface to the professor who will require a user id and password to carry out the task. Apart from that, the application would support strong user authentication and quick transmission of data.

Modules:

  1. Admin
  1. Faculty

Admin:

In Admin module, we design the administrator activities like viewing the attendance related to students marked by all the faculty. Hisprivileges can be seen at the use case diagram.

Faculty:

In faculty module, they have their own privileges such as viewing their own absentees and also establishing communication with the parent via SMS or call. Each and every privilege can be seen at the use case diagram.

SOFTWARE REQUIREMENTS:

Operating system                   :          Windows XP, windows 7, windows 8, Mac OS versions, Linux ubuntu 12.04

User Interface                         :           HTML, CSS, PHP

Client-side scripting               :           Java script

Programming language         :         Java runtime environment 1.6, Java JDK version 6.0

IDE/Workbench                     :         Eclipse version 4.2.2, Android studio (IDE)

Tools                                         :         Android SDK, Android mobile

Database                                   :         oracle

4.5 MODULES

  1. User module login activity
  2. Add faculty module
  3. View attendance
  4. Take attendance
  5. Auto report generation module
  6. Send message or call
  7. View students
  8. View absents

Output Screens:

ADMIN AND MENTOR MODULES
Admin registering mentor & faculty login activity
selection of mentor & list of students
Student status
Student status

SpeakUp Android Application

Description:

We speak to communicate with the world. Speaking ability is the natural gift for human beings to express him/her to the outer world. But what about dumb people? Showing sympathy on them is what people do. But this app helps the dumb by speaking on behalf of them, so that they can be beneficial by avoiding their usual way of sign language.

Purpose:

By using this SpeakUp Android Application, dumb people can communicate with others as if they can speak so that they can express their intention of speaking without difficulty. This application can also take the input as voice and convert it in to the text.

The main purpose of this project is to help the mute for speaking. Some text has to be entered that can be spoken out by an inbuilt voice. We can also record a voice and can save the recorded voice along with some textual information. All the recorded voices can be viewed and played.

Whenever there is a need to speak, the dumb can open this application, enter some text, speak it out or play any related recording available.

Functional Requirements:

  1. Recording voice.
  2. Saving the recorded voice along with some textual information.
  3. Displaying all the recorded voice with their textual information.
  4. Playing and stopping individual recording.
  5. Deleting the selected recordings.
  6. Speaking the entered text by an inbuilt voice.
  7. Give the input as voice also.
  8. Changing the volume of the speech.
  9. Searching for the recorded voice by entering textual hint.

Modules:

  1. Text to Speech
  2. Speech to Text
  3. Recording module

Hardware Requirements:

  • Android mobile with a minimum version 2.3.
  • Processor is not less than 500MHZ.
  • RAM is not less than 170MB.
  • SD card with minimum of 512MB.
  • Resolution is not less than 480*800pixs.

Software Requirements:

  • Mobile Operating System: Android 2.3 or Later
  • Server Operating System: Windows XP or Later
  • Tools (IDE): Eclipse or Android Studio
  • User Interface: XML
  • Code Behind: JAVA and XML

Sketch Yourself Android Application

Project Name: ”Sketch Yourself” an application for Android device users. The main aim of the application is to generate a pencil based sketch out of the image supplied as input.

Project Description:

  • “Sketch yourself” – an application specially designed for ‘Art-lovers’, now can have a quick pencil-sketch of their own in minutes, and others they are willing to make of.
  • The application is expected to be an easy-to-use Sketch-drawing tool which uses an image as input and fetches different types of Pencil-Sketches as output. Hence providing users with choices for selection.
  • Includes an Image-gallery, which supports Image Selection from wide range of Images available on memory.
  • Finally, helps in saving the new sketched Image to the memory, assigning a user-defined name.

Scope of the Project:

  • Users of the Application are able to get different types of pencil sketches on their finger-tip. No need of sitting for hours in the Artist-queue to get you sketched.
  • Makes use of some Image-processing Algorithms for building a sketch. Hence an exposure to learn something new.

Sketch Yourself Input output details

Talking about the technology:

o   Android being the latest Operating System for cellular phones now-a-days, there arises a need to develop an application for Android users. Hence, making user more comfortable.

o   One of the best advantage in using Android, is that it is Open source, providing the same API’s for both native and third-party users. And the next best advantage is that Android is not a proprietary version and hence attracts large volume of Developers.

Planning:

Project-definition:

“Sketch Yourself” aims to be an application for android device users, which generates a beautiful pencil-sketch out of any image inputted to the application. The main feature of the application is to generate a pencil-based sketch created by artists.

The features of the system include: 

  • Providing the user with Image-gallery interface to choose image.
  • Generating Sketch out of user’s selected image.
  • Finally, saving it on the phone.

Technically speaking, the project aims at creating the sketch with the help of certain Image processing algorithms like Gray-scale, Invert, Blur, etc.

Let’s have an exact look at what the system should do:

Sketch Yourself Output Screens

Preliminary Investigation 

Preliminary investigation talks about the first look on what the system aims to do. The main task of the system is to produce pencil-sketch. Now, the question is how to achieve it?

Having surfed the Internet and referred different books on Image processing, got an initial idea of what should ideally be done. One of the Algorithms for generating pencil-sketch out of an image is discussed below.

Let’s have a look at the pseudo-code along with an example:

Brief on Project Development Methodology:

In this application to be developed, I would prefer to use a combination of “Application Proto-typing Methodology” and “Object-orineted Methodology”, as we need to successively develop and test algorithm, its exactness and its quality and choose the preferred one and make changes as required.

Application Proto-type Methodology:

  • The term ‘Proto-type’ refers to the working model of an information system application.
  • A proto-type may be a diagram, a business process or even a system placed into production.
  • Steps involved in Proto-typing method:
    • Identify Proto-type
    • Agree to plan
    • Create Proto-type
    • Review Proto-type
  • Proto-type is a live, working application.
  • Proto-types evolve through an iterative process.
  • Proto-type helps in clarifying user requirements and also to verify feasibility of the application.

Sketch Yourself Sketching Application

Requirement Specification:

  • ‘Sketch Yourself’ will be designed to work with the android based mobile phones. 
  • The application will have Straightforward and user-friendly interface.
  • It will allow viewing images both from the phone as well as the memory-card.
  • Any image selected by the user is processed to get a beautiful sketch of pencil. One such example is shown below:
  • Allows the user to choose from different variations of sketches processed by the application.
  • The one chosen by the user can be saved back on memory as a new Image.
  • The output file will be saved with the new name given by the user. 

Sketch Yourself Final Screen Shot

System Design

Architectural

  • Activity Diagram

Sketch Yourself Activity Diagram

The above activity diagram depicts the overall activities of the system i.e, it includes step-by-step procedure.

  • Use-cases

Use-cases are interactive diagrams which reflect the communication of user with the system. Major use-cases of the system are as follows:

Sequence Diagram for Save sketch-file Use-case

Select Image-file Use-case

          This use-case allows the user to choose a specific Image-file for input to the application. Here, a validation should be performed for supporting only specific image-formats as inputs.

Produce Sketch Use-case

          This use-case allows the user to produce sketch using some image-processing algorithms on image. It also includes resizing the image, converting into Bitmaps, etc.

Save the Sketch Use-case

          Finaly, when the sketch is available to the user. He needs to provide the file-name for the output image file and save it to desired location on the memory card. 

Validate an Image File Use-case

This use-case enables the system to check whether the selected file is an image or not. It also confirms whether the file is in specific image format supported by the application.

Views the Image File Use-case

After the user selects a particular image-file and the the file is also validated, this use-case enables to view the image to the user.

Re-size Image Use-case

This use-case enbles the application to resize the image, if it exceeds specific limits, inorder to ease the faster execution of the algorithm used.

Sharpen Image Use-case

This use-case allows the user to sharpen the image, if the user requires.

Convert to Bitmap Use-case

This use-case enables the application to convert the Image inputted to Bitmap format, so that we can process the algorithm which uses Bitmap format.

Process the Algorithm Use-case

This use-case allows the most important part of the application i.e. to apply algorithm on the Bitmap image and produce the sketch. 

Provide desired file-name Use-case

The above use-case enables the user to enter the file-name he wishes to provide for the output file.

Choose Location Use-case

This use-case enables the user to show the location where the sketch-image file should be stored.

User-Manual

“Sketch yourself” is an android application which is helpful to people who are art-lovers and wish to design their own pencil-sketch from the image in minutes. We may explain the procedure in detail as below. 

First Step

This document explains you(users) with how the software works. Let us say you have your android device. You need to open the application by selecting it from the menu as I have pointed out.

Here, the user needs to open the application by clicking on the application icon from the menu-window.

Second Step

As we click on the application icon in the previous step, next we get the home-page of the application. Home-page is designed in such a way that it shows what we would receive as output from the input given. A very self-explanatory image shown.

Here, At the home-page of the application, the user needs to press the “Open File” button, as I have pointed.

Third Step:

As we click the open file button i.e , the control of the application is transferred to the Gallery application where user needs to select an image and click on it to select. By click we mean – finger touch.

Here, scrolling is facilitated. So the user can scroll for more images down in the gallery.

Fourth Step

As the user selects a particular image, the above screen appears so as to show the user, the image he has selected. Here, the user needs to press any of the two buttons available.

The first button “Pencil Sketch” is to create a pencil based sketch while the other button “Black & White Sketch” is to create a black-white sketch of the given inputted image.

Fifth Step

On selecting the first button “Pencil-sketch”, we get this output. Here, we need to provide the name of the sketch inorder to save the file to the device and press the save button. Final step is user can exit the application by pressing the “Exit App..” button.

Allows the user to save the sketch..

Allows the user to exit the application.,

Fifth Step-b

Here, when the user selects the second option of “Black and White Sketch” , he gets the above image as output. Hence, he can save the file to the device.

Allows the user to exit the application.,

Allows the user to save the sketch..

Future Enhancements:

The project produces two different types of sketches a user can have for his image.

Next, we can have a camera running directly from the application itself to facilitate user have a sketch of the instant image clicked.

Another future enhancement I would like to see in my project is to share the image to social-networking sites like facebook, twitter, etc.

GPS Based Friend Tracker Android Application

Introduction

In past five years, social networking applications had gained a lot of support and popularity all over the world.”The world is a global village “; this terminology has proven true in this aspect. So taking this thought into consideration, we are developing an application which would be a different view point in social networking world.

An application named “Friend tracker” will serve its users with a new picture of social networking. Generally in such(Social Networking) applications, people stay in touch through posting and sharing their comments, pictures, videos, and much more.

Purpose

There are times, when people like to know the current location of his/her friend/(s) or colleague/(s), apart from staying in touch, which we do in social networking applications. Taking this thought into consideration, we are planning to develop an application which will behave as follows:

This application will provide user with his/her friends location using GPS (Global Positioning System). It will provide global position of that device itself the user is holding,and through satellite. The premises of application are not premised up to this extend only.  It also facilitates user to make new friends that are using that particular application and are connected through internet.

Overview

The application offers an ability to work with location sensitive information. It will allow the user to login/register to the system. The user can also make friends by searching the application users and sending request to them. He/she can also accept or reject the request received by him/her from other application users.

He can select particular friend from his friend list and can trace his/her current location, provided that he owes Android GPS based mobile phone and his GPS facility should be activated.

Application gives surety that user’s personal and location based information is never shared without users permission. For accessing this application, user has to be connected through internet.

Requirement Specification:

Registration for very first time
Description: The user of the application has to register him/her for the very first time usage of the application. The registration details include username, E-mail id, gender, city, mobile, picture (optional).

Login into the system
Description: The user has to login into the system for usage of application. Login details include verification of username and his password.

Viewing location of his/her friend
Description: User should be able to view the location of any of his/her friend from friend list, provided that GPS of that particular friend should be on.

Sending Request
Description: The user of the application should be able to send request to the other user/(s) of application, and wait for the respond, in form of acceptance.

Responding to Request Received
Description: The user of the application can also receive request from other users of the application.

Manage Profile
Description: User of the application can manage his/her personal profile details by editing and updating it as and when he/she wishes.

Friend List
Description: User of the application should be able to see his/her friend list on demand, from where he/she can view location of any of his friend.

Store Location Details
Description: The user of the application should be able to store location of any of his/her friend along with date and time.

Removing a Friend
Description: User of the application should also be able to remove the any of his/her friend whenever he/she wishes to.

Trace current Location
Description: Once login into the system, user must be provided with its own current location to be displayed on map.

TOOLS AND TECHNOLOGY

  • Hardware

o   An android phone consisting of GPRS.

  • Software

o   Operating System:  Android 2.2 or higher.

o   GPS enabled in a device.

  • Development Tools

o   Eclipse

o   Android-sdk version 2.2 or higher

o   A Personal Computer with minimum configuration will do, for better performance of application, configuration can be enhanced.
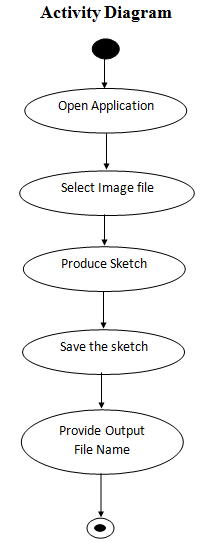
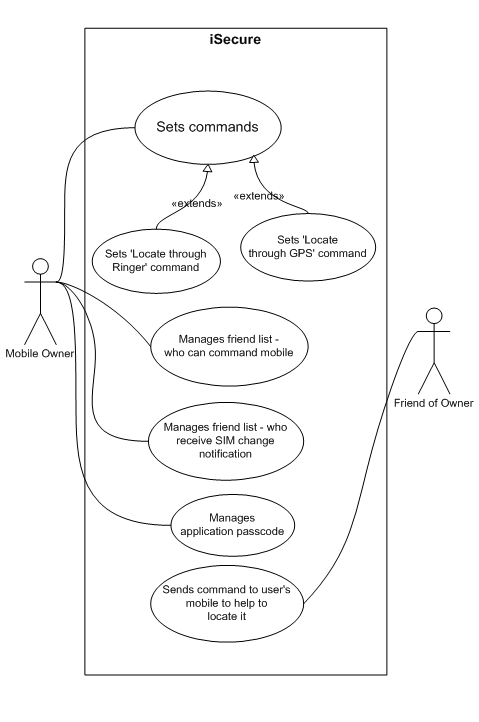
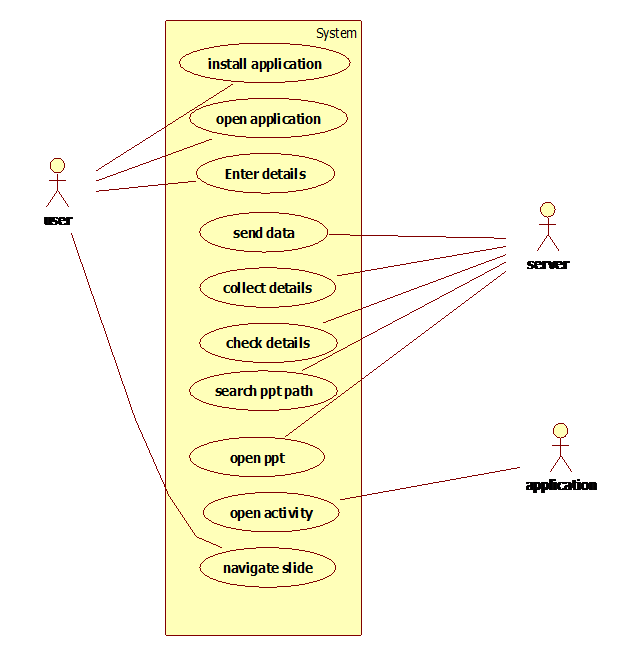
Use case Diagram
Main Use Case

Friend Tracker Use Case Diagram

The above use case contains all the activities that user of the application can carry out while using the application.

Individual Use cases
1) View Friend’s Location
Friend Tracker - View Friend’s Location
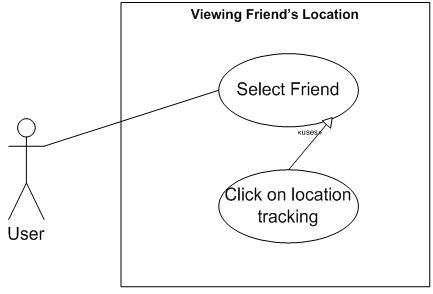
The application user selects the friend and tracks its current location.

2) Sending Friend Request
Friend Tracker - Sending Friend Request
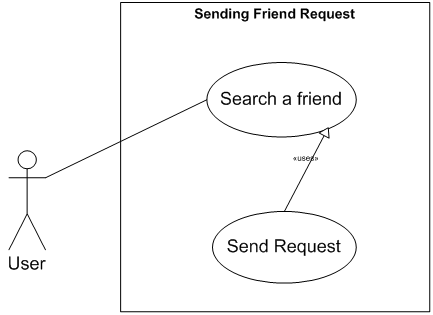
User has to search a friend among the users of the application before sending friend request.
3) Responding to friend request
Friend Tracker - Responding to friend request
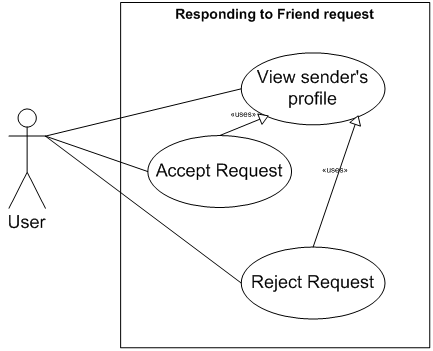
While receiving friend request from other user of the application, user can view his profile details before accepting or rejecting a request.

4) Managing Profile
Friend Tracker - Managing Profile
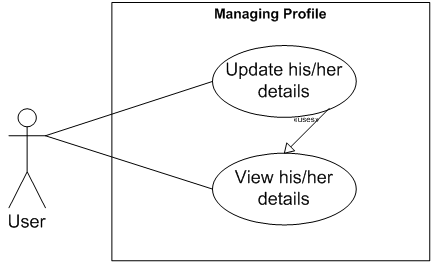
Application user can view his personal details before editing/updating those details.

5) Removing from friend list
Friend Tracker - Removing from friend list
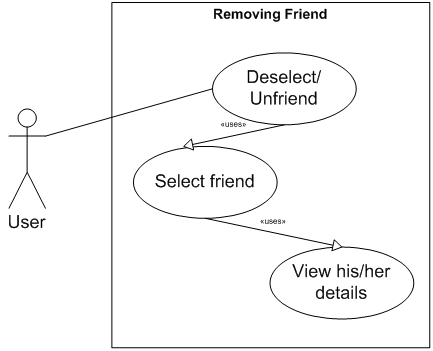
While removing a person from his friend list, application user has to select him from that list. User can also view her personal details before removing that person from his friend list.
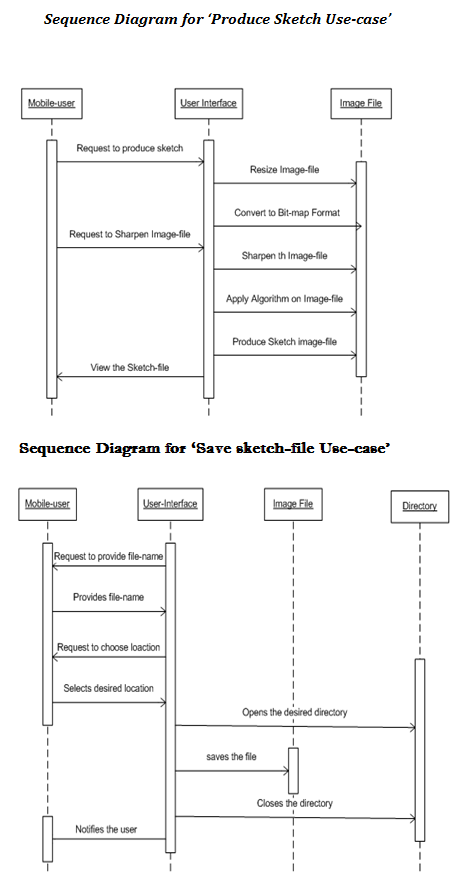
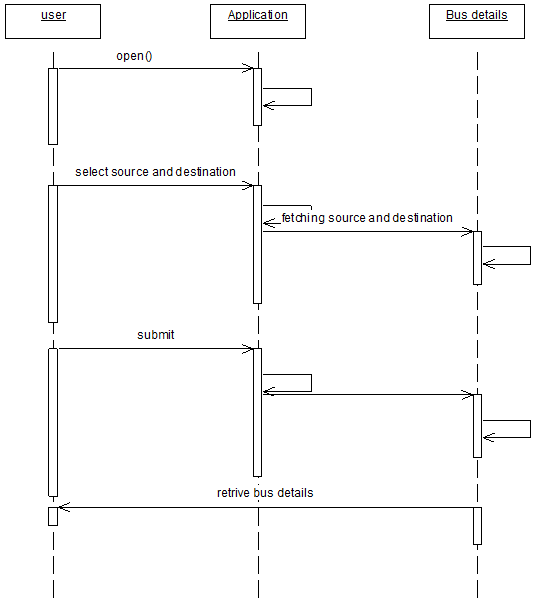
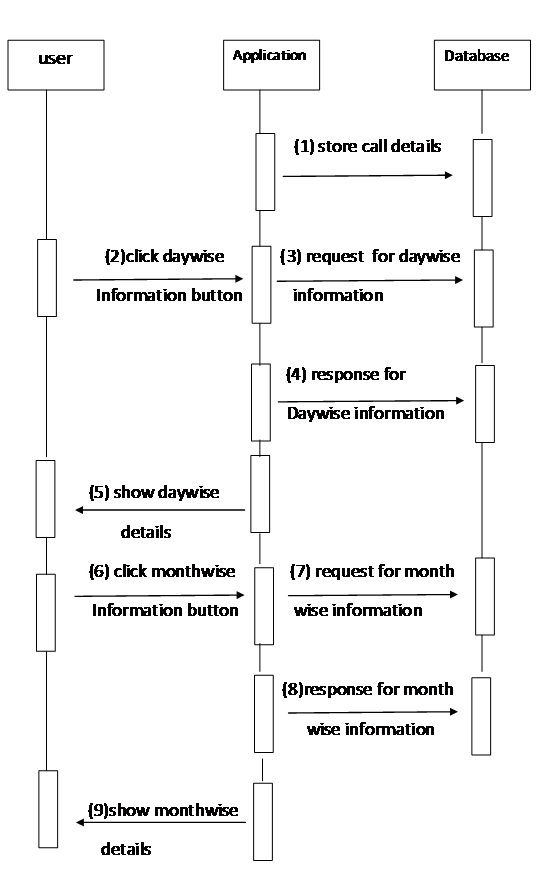
Sequence Diagram

1) Searching a friend

Processing: List of people already registered to the application will be created.
2) Getting friend’s location

Processing: Calculation of the latitude and longitude will take place and based on that data, position of the user will be located in the map.
3) Managing Profile

Processing: Details of the user will be selected and in second processing, updation of the details will be done in the database.
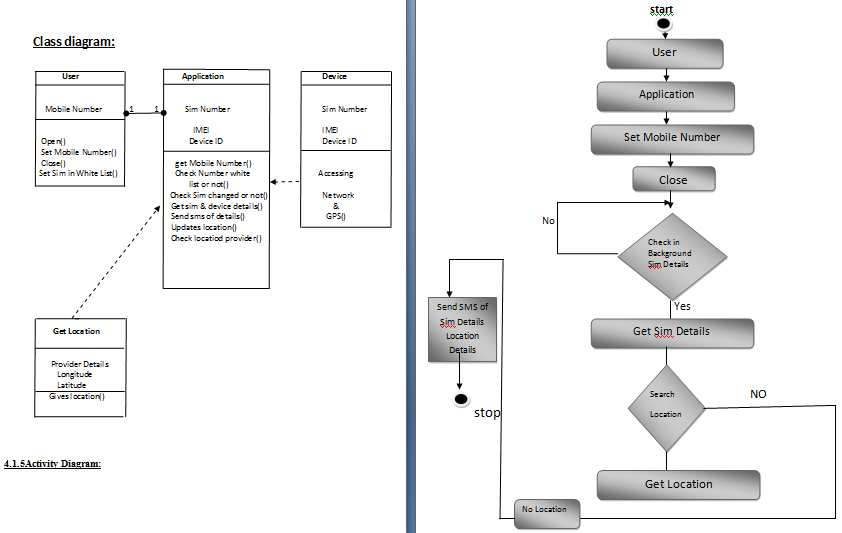
 Class Diagram

User can register him/her self for using this application. He can send request, accept friend request and from that friend list will be maintained. User can trace the location of the user who is his/her friend.

Structure of Classes used

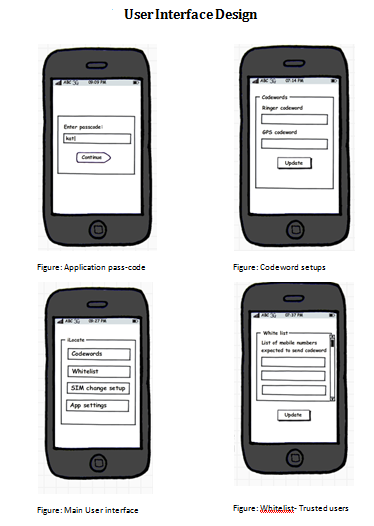
User Interface Design

Outline of User Interface Layouts
1) Login to the system

When user starts using this application, he will be shown this login page. If he is already registered into the application, than he just have to click on “Login” button and he will be redirected to the main page. If he is not registered into the application, than he has to click to “Register” button to use the application. And if he clicks on “Register” button, than he will be redirected to the register page.

2) Register to the system

On entering these details and on clicking on “Create Account” button, s/he will be registered to the application. And after that he will be redirected to the main page.

3) Map will be shown with options:

User can view the map and the above shown options. If s/he clicks on “Friends Location” s/he will be redirected to the Friends List page.
4) Friends List

Selecting one of the friends from list and clicking on “Location” button s/he can view his/her friend’s location. And on clicking on “Unfriend” button that person will be removed from his list
5) Manage Profile

User can edit his/her details. And after editing it, s/he can save that updates.

6) Search

He can search new friends and can send them friend request.

7) Request remaining to be accepted

User can view, who have send them the request. And he/she can also view sender’s profile and on that basis s/he can accept or reject the request
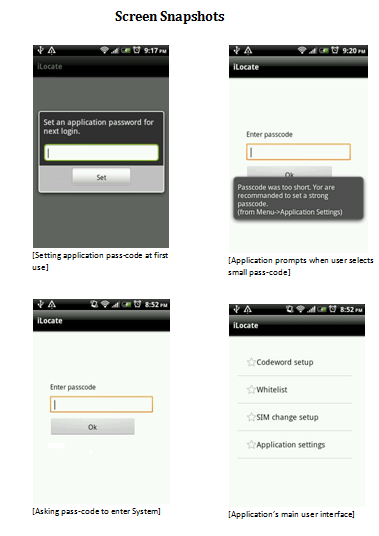
Screen Snapshots

Login Page

GPS Based FriendTracker output Screenshots
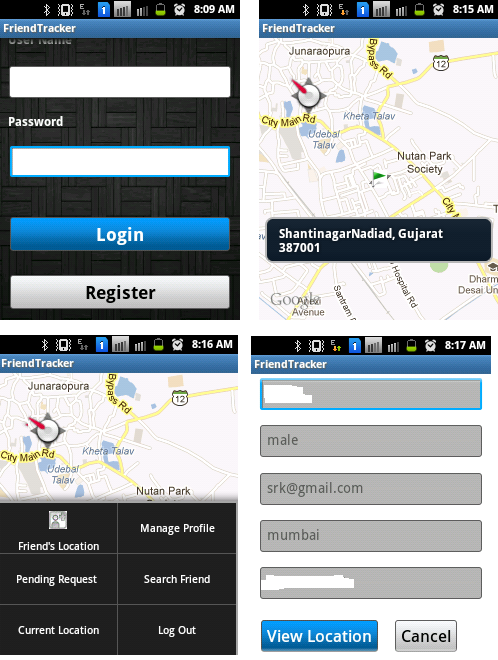
Application starts with the login page. On entering login details and on clicking to login button, user will be successfully logged in to the system. If s/he is an anonymous user than s/he can register himself/herself to the application.

Current Location Page Menu

After getting logged in to the application, user will be shown his/her current location. Being on current location page and clicking on menu, user will be shown this menu from which he can select any of the option.

Friend’s Location List of friends for viewing their location

If user wants to view location of his/her friend than he can select “Friend’s Location” and he will be redirected to the page containing list of users. On selecting one of the friend from the above list, he will be redirected to the page containing the details of that friend.

Friend’s Detail Page

On clicking on “View Location” he can view the location of that particular friend.

Location of the friend is viewed.

Latitude and longitude of the friend will be shown on toast. Address of that friend will be shown on the toast.

Message Dialog Change View

On having a long press on the screen, message dialog will be opened. On clicking on “Change View “ option user can change the view from street view to satellite view. On clicking on get distance user can get the distance between him and his friend. On clicking on address, he can view the address of his/her friend. On clicking on “Change View” user can the view from satellite view to street view.

View Location View Distance

Firstly, user will be shown his own location and than the diastane between him and his friend. Distance between user and friend will be shown to the user.

Manage Profile Manage Profile

On clicking on Manage Profile, user will be shown with his own details. On updating his details and on clicking on “UpdateAccount”, user can update his details.

Search Friend Search Friend

On clicking on “Search Friend”, user will be shown . User can select particular user and he will be redirected to his personal details.

Search Friend Search Friend

On clicking on “Send Request”, user can send request to that particular user. If that person is already his friend than he will be shown an message like “Friend Request sent ERROR..!!”

Pending Request Pending Request

On clicking on “Pending Request”, user will be shown list of friends who are waiting for their request to be accepted . On selecting particular friend, user will be shown with the friend’s detail.

Pending Request

On accepting the request, user will be shown with the above message.

Future Expansions:

• The height of the user from the surface of earth will be calculated.
• User can set destination location.
• User can find the distance between its current location and destination.
• User can find remaining time to reach the destination.
• User can search specified location.

Security for Lost or Misplaced device – iLocate

Security for Lost or Misplaced device – iLocate

In this fast moving world, people are always in rush. People usually carry few necessities with them, and we cannot separate mobile phones from these. For one or another reason, it sometime happens that people misplace or lose the thing, and one cannot easily afford losing the thing like mobile. People always want the mobile to be with them.

iLocate Output Screens

Purpose behind developing the iLocate is to provide its user to track their lost or misplaced mobile.

Misplaced mobile

A simple text message from a friend’s mobile will make users mobile to ring (even if it is on Silent mode) if phone is misplaced within reachable range.

Lost mobile

Sometimes user loses his mobile and he/she may not able to locate it through making it ‘ringing’ because mobile may not be within a reachable range. At those times application can serve the user by following ways:

iLocate Use case Diagram

A simple text message from friend’s mobile will help user to receive his phone’s GPS location information on friend’s mobile as a URL. By clicking or opening this link user will be able to see the current location of his/her mobile on Google Map.

If SIM change takes place on user’s mobile, iLocate will notify about this SIM change activity by sending text messages to friend’s mobile numbers.

Following are terms used throughout this documentation:

Pass code

Pass code is a keyword that user of application sets when he uses the application for the first time. This code is then used by user for subsequent login to the application. User can’t access application without having pass code. User may change pass code any time.

iLocate User Interface Deisgn

Whitelist

White list is a list of mobile numbers of user’s friends. User may add to, remove from or change numbers defined in this list. Once user adds a number to this list, this number is recognized as a Trusted Number by iLocate, and user of this number is a Trusted User. This means that only a trusted user can send codewords from his/her trusted mobile so that application can prevent unwanted users from misusing the features of application.

Friends

A friend is a trusted user whose number exists as an entry in white list. Friend and trusted user are names that may be used interchangeably.

Codewords

A codeword is a keyword that user has defined for taking a desired action when his/her mobile receives that codeword to his/her mobile, from a trusted number. iLocate has currently two kind of codewords.

  1. GPS Codeword: A GPS codeword is a keyword that user has defined within iLocate. When a trusted user sends this codewords from his/her trusted mobile to user’s number as a text message, application recognizes it and generates a link that can help user to view his/her location on Google Map. This link is sent back to trusted user’s mobile so that he/she can locate user’s mobile on Map.
  1. Ringer Codeword: A Ringer codeword is another keyword that user has defined within application. When user’s loses his/her mobile within a reachable range but due to the current profile on the mobile he/she may not be able to locate mobile, at these times a friend may help user by sending a simple text messages (we call it Ringer codeword) that will make user’s mobile ringing.

These codewords are configurable by user of application once he/she is logged in.

SIM change notification receiver

SIM change notification receiver is another list of mobile numbers of user’s friends. User may add to, remove from and change numbers defined in this list. Once user adds a number to this list, application notifies on these numbers by sending text messages when SIM change takes place on user’s mobile. Numbers in this list are also termed as Trusted Numbers.

Implementation:

  1. Setting application pass-code at first use
  2. Asking pass-code to enter System
  3. Application prompts when user selects small pass-code
  4. Application’s main user interface
  5. Codeword setups- to set/modify codewords
  6. Whitelist- list of trusted user numbers
  7. SIM change setup- to add/update SIM change notification receiver
  8. Prompts when user leaves pass-code setup activity
  9. Error message on setting invalid pass-code
  10. Prompts when any updates are made
  11. Alerts when user leaves any activity without saving details
  12. Received message on friend’s mobile when he sends codeword to get for user’s location information
  13. User’s location is shown on the map when friend clicks on the link sent as a message through iLocate
  14. Defined friends receives notification as a text message when user’s mobile’s SIM is changed

Tools and Technologies 

Software:

Android Platform v2.1 and later

Development tools:

Android SDK:     includes all power features of java adding to it more specific APIs for android development.

Eclipse IDE 3.7:  IDE, with ADT (Android Development Tools) plug-in, provides features specific to develop, debug and deploy the Android Apps.

SQLite: A database engine helps to create self-contained, cross- platform databases for Gadgets.

+Hardware:

ARM processor: Reduced Instruction Set Computer (RISC) –SoC used in Android devices.

User Manual

Introduction

This application will help an Android user to track the lost or misplaced mobile. If user misplaces a mobile which is currently in silent/vibrate mode, he may change the phone mode to ‘ringing’ by using another mobile with facility of sending text message. Also if user loses mobile he may find current GPS location of his mobile through another mobile. It notifies mobile user on SIM change via text message on another predefined mobile. This application also restricts unauthenticated change in App-Settings by using password protection.

Users of this guide

This User manual is intended to be used by user’s of iLocate application on the android mobile having Android platform version 2.2 or later. It provides a complete set of instructions for an iLocate user to demonstrate each individual feature of iLocate user.

Functional Description

iLocate comes with the set of features to locate your lost or misplaced android mobile. User may find his mobile by turning off the silent mode by sending simple code as a text message to make his mobile ring.

User may also locate his device on map by requesting the mobile’s current location through sending a simple preconfigured code as text message from another trusted device to user’s mobile. In response user will get a link as a text message on a trusted device which will show user’s mobile’s current location on map.

User can choose specific numbers to receive the command from by maintaining a list called – ‘Whitelist’.

User will receive notifications on preconfigured trusted mobile numbers; about any SIM change activity on user’s mobile by configuring the SIM change setup.

Instruction Sections

Getting stated

(User may get the application by visiting <x.com>/iLocate). Installation may take time depending on your device and data connection. Once you are done with installation you are ready to GO.

First use

After installation you can run the application by going in to main menu and launch the application by clicking iLocate icon as shown in Figure 1.1. Application will prompt the password (Figure 1.2) to be used for login. This is asked only once when you first time or when password is not set.

After setting the password you will be redirected to pass through activity (Figure 1.3). Enter the password you set here and click Ok. On correct password entry you will get the main interface of iLocate (Figure 1.4).

Defining Whitelist

White list is a list of numbers which are allowed to send the codewords on user’s mobile. We will refer them as Trusted Users or Whitelist.

To define or update Whitelist, Go to Whitelist from main menu (Figure 2.1). You may add up to 5 contacts. Click on Update after you are done.

Now iLocate will recognize these numbers as trusted ones and will allow to command user’s device.

Configuring the commands

Go to Codeword setup from main menu.

Define Ringer codeword and GPS codeword.

Ringer codeword will cause user’s device to switch to General profile and make it Ring for some time, upon receiving Ringer codeword.

GPS codeword will cause user’s mobile to generate a link defining its current location and cause it send it to the trusted user’s mobile as a text message.

SIM change setup

This feature allows you to define mobile numbers which will receive notification if SIM change takes place on iLocate user’s mobile.

To define or modify your SIM change notification receiver’s mobile number, go to SIM change setup (figure 2.3) from main menu. You are allowed to enter up to 2 mobile numbers.

iLocate will notify these defined notification receiver about any SIM change on user’s mobile via a Text message.

Changing application pass code

Once you are logged in, you can change your password. To change password, go to Application settings from main menu, simply replace password with new one. You must select password that is at least 4 characters long.

Future Enhancement:

We have included very basic features that required for application to work. Some advancement in futures may possible for better features and better user experience.

Dynamic entries for contacts & fetching contacts from mobile instead of manual typing:

This version of iLocate has fixed number of allowable contact numbers for White list and SIM change list. Advance controls may be used to add or remove text fields as per user’s need. Also application may allow user to fetch contact from People list itself and selecting accordingly.

Connecting using internet

Application may be extended to make a use of internet to allow the device to be located through another device by trusted users (already registered with application) and to track movements of user’s device.

City Bus Management Android Application

 Project Title : City Bus Management

Abstract:

  • This is an android application used to find out the bus number from one place to another place.
  • User need to give the details of source and destination.
  • Accordingly it will display the details of the bus number which is going in that route.
  • It is a time saving application to user.
  • User can easily get the information of the bus number of a particular route.
  • In this way a user will be free of confusion about the buses.
  • It will also be very helpful for those people who are new to the city.

City Bus Management Activity Diagram

KEY FUNTIONALITY:

In the cities, especially  in India buses are major form of transportation.  So by this app we can get the information required for reaching to the desired destination. We select  the source and destination  and after  pressing  the  submit  button we get the  bus   number   of the  bus  we have to travel  . Thus this application has its importance in the city travelling.

City Bus Management Home Page

Introduction

Existing system:

There are some bus route finders and bus number finding  systems in the internet these days But these require  internet  connectivity for the working of the application. This is somewhat money consuming. Also if the net is slow the process is also slow. And  if the net  connectivityis weak  then the process of finding the busses will also be difficult. To overcome the above problems we have developed our particular   project which will work without internet.

City Bus Management Place Details

Proposed System:

CityBusManagement applicationthat wehave developedwill workwithout internet connectivity. This is the  major advantage  thisparticular applicationwe have developed our  project t has  a database of  its own which makes it independent of  internet,and  it displays the bus numbers  on its own.  This makes finding  of the  bus numbers easy, fast and  efficient .

Mobile Theft Monitoring Android Application

The objective of this project is to create an android application “Mobile theft monitoring” where we are able to find our lost phone easily.

Sometimes we accidently tend to replace our phone somewhere and we end up searching for it. Yet sometimes we are lucky to get our phones back but sometimes we never get it back.

Hence to avoid such situations and keeping the recent demand and the greed for phones in mind we have decided to develop this application “mobile theft monitoring”.

Mobile Theft Monitoring Activity Diagram

This application gets activated as soon as the person who has stolen the phone changes the sim and switches on the phone. The user will not know that an automatic message is being sent to the predefined number.

This message will contain the sim details as well as the location details. This information will be sent as a message to the destined number till the application is uninstalled in the mobile. This will be like a torture to the user and makes it easy to find the location of the phone and track the user.

The location of the device is found using GPS and the details are sent to the predefined number in the form of a message as soon as the user changes the sim and switches on the phone .

The application also consists of the setting of the number to which the message regarding the sim and the location details are to be sent.

In this application all the operations are done in the background using the concept called “service”.

Thus “mobile theft monitoring” is a useful application which helps us to track and find the device in an effective manner.

INTRODUCTION

Nowadays since the usage of phones has increased ,the demand for  creative and new applications has also increased .

The security of mobile phones play an important   role hence we decided to create a project   called “mobile theft  monitoring”.

Mobile Theft Monitoring Home Screen

PROJECT ANALYSIS

It is an appication where it helps the user to find out where the device is if it is stolen.when the person steals the phone and changes the sim an  automatic  message which displayes the location of the device ,sim number,phone number, imsi number  will be sent  to a number  which  we specify in the settings . thus the device that has been stolan will be found easily .

In our appication we have the facility to specify the num to which a msg about the location.

The application also consists of the setting of the number to which the message regarding the sim and the location details are to be sent .

In this application all the operation are done in the background using the concept called “service”.

A special feature of this application is that we have provided a long press for the specification of the  broadcast reciever number in the application itself which the user will not know. The screen that will be displayed to him

SCOPE:

The scope of this project is that we will be able to get our device back and we will get the sim details even if the person has changed the sim . In addition to that we will also get the phone number and the location  details which makes the theft monitoring action an easy task.

The objective is to design a simple, intuitive interface with limited screen estate for the monitoring of the theft action.

FEATURES:

The main feature of this project is that this application does not need any special indication or operation, the sim and location details are automatically sent as a message to the destined number as soon as the user changes the sim and switches on the phone .

Another feature of this project is that we have the option to put the sim in white list , so that it traces only if a new sim has been inserted by another person and not our permanent number.

Usually when a device is lost we have applications where only the location of the phone is sent to another phone but in our project the SIM details and the location details are sent to the destined number making the tracking process a less tedious job.

Our project works in such a way that the user will not be knowing that the sim and the location details is being sent as a message to a specified number as soon as he changes the sim switches on the phone.

Since nowadays the craze and the greed for phones has increased it is becoming highly difficult to protect and safeguard our devices Hence we have proposed this project in such away to get our devices back even if it gets stolen.

Existing system with limitations:

In the existing phones we only have the facility where the location of the device is tracked and is sent back to the user.

In such cases if the user has lost his phone and the person who has taken the device changes the sim and replaces it with another sim then the tracking of location will be of no use since the sim has been replaced with another sim . and even if ther is a provision of sending the location of the device to another android phone ,the information is not enough to find out the location of the device.

This application combines both the details that is the sim and the location details and sends it in a message to the predefined number making the tracking of the device an easy  task.

Proposed system with features:

In our application “mobile theft monitoring”  gives both the sim details as well as the location details of the device which has been stolen.

As soon as the user removes the sim and replaces it with another sim the GPS tracks the location of the device and sends it in the form of a message to the predefined number which has been set by the owner of the phone.

Additionally this application takes all the sim details such as phone number, sim serial number and the imsi number and sends these details as a message to the predefined number .

Call History Analyzer Android Application

Abstract:

This Call History Analyzer Android Application describes all call details and calls bill calculation i.e, missed calls, received calls & dialed calls. Which shows the total call history? By this we can get the total information on calls like no.of missed calls, no.of received calls, and no.of dialed calls and also total time spent in the mobile.

Call History Analyser Sequence Diagram

Collaboration Diagram Details:

  1. Store Call details
  2. Click Day wise information button
  3. Request day wise information
  4. Response for day wise information
  5. Show day wise details
  6. clock month wise information button
  7. request month wise information
  8. response for month wise information
  9. show month wise details

The total information is automatically stored in the background data base without interacting with the user. In this, application there will be three buttons they are Information by month, Information by date and Call cost per second. By choosing this we can know the calls data. It also shows the total duration i.e., how much time is spent on calls in particular month or on particular date. It shows month and date wise.

List Of Output Screens

  1. Home Page

Call History Analyser Home Page

  1. Information by Month

Call History Analyser Info by Month & date

  1. Information By DateCall History Analyser Set date option

Conclusion:

It shows month and date of call details and call bill calculations i.e., missed, received and dialed calls. This shows the total call history.
This stores the database by broadcast receiver automatically without interaction with the user.

Download Call History Analyser Android project Source Code.

Crazy Alarm Android Application

ABSTRACT: The Crazy Alarm Android Project is quite different from the standard alarm application which we use daily.Sure wake up of the user is achieved with this application. The Application consist of an alarm personalization menu where user needs to enter the details for setting the alarm. Once the alarm is set , it gets scheduled . Whenever the scheduled time arrives, the alarm raises. Basically , in any alarm application when the alarm raises at scheduled time , the two operations that user can perform are : STOP and SNOOZE. But , my application when it raises , it asks some number of mathematical and logical questions randomly to which the user must answer. Crazy Alarm App Home Page   It is must , because until and unless the user solve those questions , the alarm tone plays in the background. The only way to stop the alarm is to solve the questions ,during this process the user comes out from drowsy through which the main aim of the app is achieved. So that,the user can ensure sure wake up. Crazy Alarm App Set Alarm Feature CONCLUSION  We have proposed and built a Crazy Alarm application, which can be used to add a layer of accountability to any android mobile , which helps user to ensure his sure wake up.The project is mainly to differentiate the Standard alarm application which we have in our mobiles where we find only stop and snooze operations where as in the presently developed project. Crazy Alarm UML Diagrams

Slide Navigator Android Application

Abstract:

Slide navigator is an android application for sliding the pages of the PowerPoint presentation through smart phones. Here the computer and the smart phone must have internet facility. Here the user requests to the server through port and server checks the port and verifies it, when the details are matched it moves to further process to navigate the ppt presentation. These presentations can be handled by the user from anywhere by navigating with a single touch making it more easier.

Use case diagram of Slide navigator

Existing system:

Earlier the presentation was done only through the computers where one person would handle the slides and the other would present the slides. where it requires two persons to operate.

Proposed system:

The application when installed in smart phones acts as a remote control but the difference is that slides can be handled from any amount of distance convenient to the user and this can be done only by a single person just by clicking a button.